I love my x100s!
http://zackarias.com/for-photographers/gear-gadgets/fuji-x100s-review-a-camera-walks-into-a-bar/
Thursday, May 30, 2013
Tuesday, May 28, 2013
This Week's Reading - 20130527
WD ships low-cost high-grade 4TB hard drive | Reviews - Peripherals - CNET Reviews
10 ways to make your passwords secure | News | TechRadar
Photographing the moon with an iPhone | TUAW - The Unofficial Apple Weblog
How to change an encrypted volume's password in OS X | MacFixIt - CNET Reviews
WordPress wp-login.php brute force attack | InMotion Hosting
System Center VMM 2012 SP1: Software Requirements
Just tried this on a brand new HP mini-tower and it did indeed work. How to fast-charge your iPhone or iPad using a standard USB port | TechHive
4 Tips for Building a Productive Relationship with Marketing | PCWorld
Found this very usable and functional script for outputting current status of your Windows DFS replication… DFS Monitor With History - Script Center - Spiceworks
Might have to look into this for an aging Iomega generic storage appliance for a couple of customers… WD Introduces Four-Bay Rackmount NAS - SmallNetBuilder Announcing Windows Storage Server 2008 R2 Essentials! - Windows Storage Server - Site Home - TechNet Blogs
Monday, May 27, 2013
Monday, May 20, 2013
This Week's Reading - 20130520
How to dummy-proof the PCs of friends and family | PCWorld
Best headphones: 10 top headphones for sound quality | News | TechRadar
Switch to Mac: Translating Windows to OS X | Macworld
Saving Google Maps destinations for easy navigation | PCWorld
Inside Google's Secret Lab - Businessweek
10 things that are hard to find (or gone altogether) in Office 2013 | TechRepublic
Sunday, May 19, 2013
Tutorial: Lost PC password? here's how to recover it
TechRadar: All latest feeds Tutorial: Lost PC password? here's how to recover it

Ever forgotten your Windows password and locked yourself out of your PC? It's a nightmare, but there are several ways to get back in.
We're going to explore the method a professional hacker would use to get into your PC. It's straightforward and uses your Windows 7 installation disc, which contains all the tools you need to get in and change the password.
The technique we'll use contains a real life hack. We'll replace the Sticky Keys executable with a command prompt, so that even without logging in, we can pull up a command line and change the password, then use it to log in.
If you don't have a Windows installation disc, one option is to load up a password cracker. This is exactly what we'll do using the industry standard Ophcrack. You should only use these techniques to access your own PC. Hacking into another person's machine is a criminal offence.
Step-by-step: Recover Windows 7 passwords
1. Boot installation disc

To reset your Windows user account password, you must first boot the computer from the Windows 7 installation disc. Switch on your PC, and when you're given the option to boot from DVD, quickly hit any key to boot. After Windows loads its installation files, you'll be shown the language setup page. Select your country to set up the keyboard, then click the 'Next' button.
2. Repair the computer

Click 'Repair your computer'. The repair software takes a few moments to load from the installation disc, then begins examining the computer's hard disk boot table, looking for any current Windows 7 installations to repair. Unless you've installed many copies of the operating system by hand, there will be just one installation, so click 'Next' to continue the recovery process.
3. Find the C drive

The resulting screen gives you many options. Click 'Command prompt' and one appears. The C drive is usually not mounted as C at all, so you need to find out its current drive letter. To do this, type bcdedit | find "osdevice" into the command line. This command results in text ending in partition= and a drive letter. This is the letter you should use instead of C in the following step.
4. Prepare the recovery

Enter the following commands. Take care to ensure that you use the correct driver letter in place of C: copy c:\windows\system32\sethc.exe c:\ and copy c:\windows\system32\cmd.exe c:\windows\system32\sethc.exe. When prompted, confirm the second command by typing Yes. The first command backs up a file, and the second replaces it with the command prompt.
5. Reboot into Windows

Now remove the installation disc and reboot. On the login screen, press the [Shift] key five times in a row. As if by magic, a command prompt appears. Enter the following command: Net user <name> <new password>. Substitute the name of the account to reset and a new password as appropriate. Close the command prompt and enter the new password to log in.
6. Copy sethc.exe

The final step we must take to restore access is to restore the sethc.exe file we overwrote in step 4. To do so, click 'Start > Accessories', right-click 'Command prompt' and select 'Run as Administrator'. This gives you the right to copy sethc.exe back into the system32 folder. Now enter the command Copy c:\sethc.exe c:\windows\system32\sethc.exe. Confirm the copy to finish.
7. Download Ophcrack

To crack an unknown password, we need to use a heavy duty password cracker like Ophcrack. You'll need to download it from http://ophcrack.sourceforge.net/download.php. To get started, insert a blank, formatted DVD-RW, then right-click the downloaded image and select 'Burn disc image'. The disc being written is a bootable live CD containing both Linux and Ophcrack.
8. Boot Ophcrack

Once the DVD has been written, boot the affected computer and the DVD should begin to automatically load the Ophcrack software, which runs outside of Windows. Once the software has loaded, a menu should appear offering several options for running Ophcrack. Either press [Enter], or wait for the timeout and automatically select the Ophcrack graphical mode.
9. Crack passwords

Short passwords, such as '1234' or 'password', will fall to Ophcrack almost immediately because the software tries these first in a brute force attack. Complex passwords take more time, and the longer the password the longer it will take to crack - if it can be cracked at all. A complex password may take several hours to crack. Ophcrack doesn't store the passwords, so make a note.
10. Comprehensive cracking

Finally, let's perform a deep scan of the whole computer to reveal all passwords associated with Windows user accounts. Close any windows and double click 'Launcher', then scroll down to 'DeepSearch' and press [Enter]. Ophcrack will search all available media for any password files - not just the system volume - and then perform its password-cracking wizardry.
     |
http://rss.feedsportal.com/c/669/f/9809/s/2c1e58d4/l/0L0Stechradar0N0Cnews0Csoftware0Coperating0Esystems0Clost0Epc0Epassword0Ehere0Es0Ehow0Eto0Erecover0Eit0E11518930Dsrc0Frss0Gattr0Fall/story01.htm
Sent with Reeder
Brief message sent from a handheld device.
Monday, May 13, 2013
10 tips for mastering Microsoft Outlook 2013
Geek Tech 10 tips for mastering Microsoft Outlook 2013
Keeping track of emails, calendars and contacts can suck untold time out of any workday. If you use Outlook, anything that speeds up your work can boost your productivity measurably. Imagine if your inbox only showed the messages you wanted to see. Consider if you could locate vital contact information in seconds. What if you finally knew why some of the hyped Outlook features aren't working as advertised?
These 10 tips will help you zip through your messages and agenda, and work more effectively overall.
1. View your inbox your way
 Once your organize the screen the way you want it to look, save the View settings so you can return to them anytime.
When you first open your inbox, the default view of your email appears, but it doesn't have to look this way. To see Oulook's many customization options, click the View tab on the ribbon toolbar and choose Change View. There are multiple preset views you can choose, like one that displays the most recent emails only.
Also on the View tab, you can select Message Previews and choose Off to turn the preview off. Or, choose either 1, 2 or 3 to view that number of lines of the message below its header. You can configure any of these options either for the current folder or for all mailboxes.
Click View Settings to see options for customizing a view, such as adding columns or rearranging their order. The Arrangement options let you sort emails by Date, Subject and so on. The Layout options let you customize the Folder Pane and Reading Pane.
Once you have arranged the inbox to your liking, click Change View > Save Current View As a New View. Then type a name for the view, and specify which folders it can be used on and by whom. In the future, return to this view by selecting Change View and selecting your saved view.
2. Redefine what marks an email as already "read"
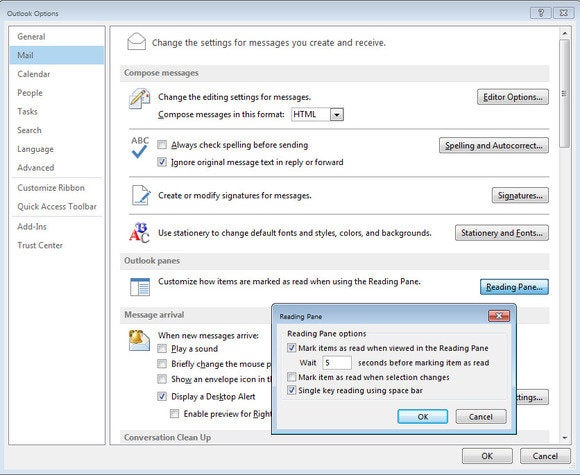 Automatically mark messages as read-only if they appear in the Reading Pane for longer than a preset amount of time.
Outlook colors unread emails differently from messages you've already read. However, it's all too easy for an email to be marked as "read" when you've barely given it a passing glance, which can make you overlook something important.
To prevent this, you can make Outlook less sensitive. Start by selecting File > Options > Mail, and then click the Reading Pane button. Check the "Mark items as read when viewed in the Reading Pane" checkbox, and adjust the number of seconds you want the message to appear in the Reading Pane before Outlook marks it as read. The default is 5 seconds.
After that, while you preview messages in the Reading Pane, only the emails that appear there longer than your preset amount of time will be marked automatically as read.
3. Apply conditional formatting to messages
 The blue color that is used for unread messages is applied using a conditional format. You can change this, and can create your own formats for different messages.
Outlook 2013 has a new way of indicating that messages are unread. There's a blue bar to the left of the message in your inbox, and the message header also appears blue.
This blue is applied using conditional formatting. However, you can change both the color and font. Better still, you can write your own rules and format your emails using colors of your choice.
You can assign a certain color to emails based upon who sent them, or upon which words appear in the subject line. To do this, choose View > View Settings > Conditional Formatting. You will see the Unread Messages rule and the blue color. Here you can change the font or color as you wish.
You can also click Add to add a new rule. Start by typing a name for the rule in the Name box. Then click Font and choose a font and font color to apply to the email header. Finally. click the Condition button. When the Filter dialog opens, select the options that describe which emails will be formatted with your new settings. Click OK three times to save your settings.
4. Reinstate the to-do bar
 You can display the To-Do bar in Outlook 201,3 but it doesn't function as effectively as in past versions of versions.
Outlook 2013 disables the To-Do bar by default, but it's easy to bring back. Click the View tab, select To-Do Bar, and from the dropdown list select which items should appear on the To-Do bar. The options are to turn the To-Do Bar Off (the default) or for it to display a combination of Tasks, People and Calendar. The order in which you select these options determines the order they appear in the To-Do Bar. For example, Task, selected first, is at the top. The second item, People, appears below that and the third, Calendar, appears at the bottom of the bar.
However, the To-Do bar no longer functions as it did in earlier versions of Outlook. Regardless of how wide the bar is, you only see a one calendar month. In addition, if you don't have appointments scheduled for today, then no appointments show even if you have some scheduled tomorrow.
5. Connect to your social media accounts
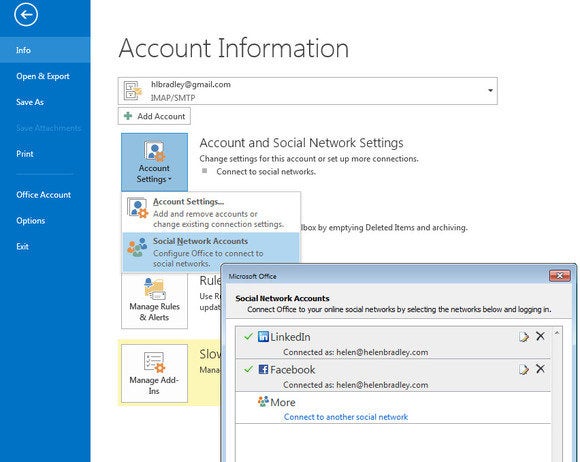 Use the Social Network Accounts dialog to link Outlook with LinkedIn and Facebook so your contact's details will be accessible from within Outlook.
When you connect Outlook to your social media accounts, the People module can display data about your contacts and their activities.
To link a social network account to Outlook 2013, choose File > Info > Account Settings > Social Network Accounts. Connect to LinkedIn and Facebook by selecting the desired service, typing your account details, and giving Outlook permission to access your account. Now details from people in your contact list who use the social site you've added will appear in the People area of Outlook.
6. Clean up contact information
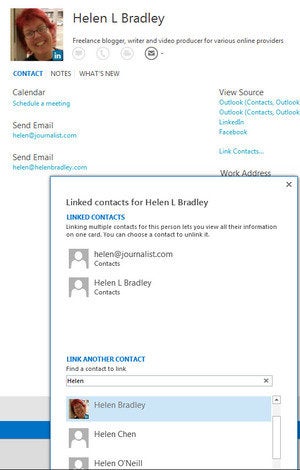 Use the Link Contacts feature to link multiple contact entries for a person together so that the information is more easily accessible.
New features in Outlook's People module let you access information about contacts from places including Facebook and LinkedIn.In some cases you will have multiple contact entries in the contact list for a single person, with different details in each place.
You can link these multiple entries for a single contact to unify the data in one place. Click the contact you're interested in and view their information by choosing Home > People.
On the right of the screen, click Link Contacts, and a dialog will open showing the contact entry or entries for that person. In the Search People box type some identifying information for that person and Outlook will return any other contact entries which may be a match for that person. If they are the same person, click on that entry to link the details.
7. Control where Outlook searches by default
 You can configure Outlook 2013 so it defaults to searching in the folders of your choice.
When you search for emails in Outlook, the default location is your Current Mailbox. However, this is often too limited. If you want a search to return all matching entries in all mailboxes, for instance, you'll need to select this option from the list in the Search box for every search you make.
Alternately, you can change the default location that Outlook uses for searching. To do this, choose File > Options > Search. In the Results area you can select to include results, choosing one of these four options: Current Folder; the Current Folder, Current Mailbox when searching from the inbox; Current Mailbox; or All Mailboxes. Select the option that you want to use and click OK. This will then become the default for Outlook searches although of course you can change it on a search by search basis when needed.
8. Decide whether to use Quick Steps or Rules
 Quick Steps and Rules perform similar tasks but there is a clear choice to be made in which to use for what purpose.
Quick Steps were introduced in Outlook 2010 to give you a method of quickly performing tasks in Outlook. However, you might wonder why you would use a Quick Step rather than a Rule? Quick Steps are flexible so you can choose to apply them when you want to use them - Rules are less flexible and once they are set up they are applied automatically.
The answer to which of these you should use depends on your task. Use Rules, for example, when you can identify a message that should always be handled in a specific way every time. So you would use a rule if you want to move all incoming messages from your boss to a particular folder. A rule will work well here because your boss' emails will be easy to identify by the unique email address.
On the other hand if you store incoming press releases in a special folder this may be a task for a Quick Step if you don't know ahead of time who these emails will come from. Without a way to uniquely identify an email as containing a press release you can't write a rule to automatically process the message. However, you can create a Quick Step that you can click to move any selected message to a specific folder. The Quick Step can't identify that an email contains a press release – you have to do that - but it will speed up the process of moving the email if you decide it needs to be moved. You can create Quick Steps and Rules in the Mail area of Outlook using the tools on the Home tab.
9. Make use of the Favorites
 Make any folder a favorite so it appears at the top of the Folder Pane and is easy to find and use.
If you have a few email accounts your folder pane can become crowded with folders making it time consuming to navigate to find those folders that you use most of the time. You can simplify finding these folders if you add them as Favorites. Favorites appear at the top of the Folder list when you are in the Mail module.
If the Favorites area does not appear switch to Mail and choose View > Folder Pane and click to enable Favorites. Now you can add any folder to the Favorites by right-clicking it in the Folder pane and choose Show in Favorites. You can even set a Search Folder to be a Favorite so it is easy to find and use.
10. Understand the consequences of using IMAP
 If your email service uses the IMAP protocol some features of Outlook won't be available, including detailed message flagging.
If your email account uses the IMAP protocol, certain common functions won't work in Outlook 2013. This will be an issue for an increasing number of Outlook users, since IMAP is used for accessing email from any device. Most people using services like Hotmail and Gmail for example, use IMAP for email.
When you are using IMAP email, in Outlook you can no longer download only the message headers, and decide from there which messages to download. Instead, now all the emails download automatically. In addition, with IMAP you can't add detailed flags to messages. Flags are either on or off, and can't be set to mean different things. You won't be able to allocate messages to Categories either, except for Hotmail account messages. If you have a choice of using POP3 or IMAP and if you don't need to have access to your email from multiple devices you may consider using POP3 in preference to IMAP.
http://www.pcworld.com/article/2038282/10-tips-for-mastering-microsoft-outlook-2013.html#tk.rss_all
Sent with Reeder
Brief message sent from a handheld device.
This Week's Reading - 201430517
Five overlooked OS X system tweaks | Macworld
Blurring objects you want to hide in iMovie '11 | Macworld
Four things Apple could do to improve iPhoto right now | Macworld
Using sysdiagnose to Capture Performance Data In OS XKrypted.comCharles
Enable Active Directory Recycle Bin in Windows Server 2012 - Petri
A nice luxury, no doubt… Review: Das Keyboard's Professional Model S Quiet is a mechancial keyboard that won't annoy your coworkers | PCWorld
Oh great, another YouTube channel I feel compelled to watch! Better Photographic Composition - Beyond the Rule of Thirds - YouTube
5 Automator workflows everyone should have | Macworld
Tips and tricks for iPhoto for iOS | Macworld
Save disk space by deleting copies of Mail attachments - Mac OS X Hints
8 essential features you need in a business router | PCWorld
AppTec makes MDM software free for up to 25 users | News | TechRadar
Enterprise Mobile Manager| AppTec | Mobility Management for Free
Friday, May 10, 2013
Wednesday, May 8, 2013
Hyper-V Snapshots: What, When, and Why
Petri IT Knowledgebase Hyper-V Snapshots: What, When, and Why
What is a Hyper-V snapshot?
Simply put, a Hyper-V snapshot allows you to capture a virtual machine as it was at that time (configuration, processor, memory, and virtual hard disk content), make changes to the virtual machine, and optionally restore the virtual machine to the previous snapshot. But let's dig a little deeper.
That was then…this is WOW!
Making sense of the data you get from Hyper-V Manager and vSphere used to be a complex and manual process. SolarWinds Virtualization Manager provides:
Virtualization Dashboards – give you at-a-glance insight into the performance, capacity, configuration and usage of your virtual infrastructure
Virtualization Reports – give you out-of-the-box and customizable reporting for your business
Heterogeneous Management – provides a single pane of glass across your Vmware and Hyper-V environment
Download Virtualization Manager Free Trial Now>>Confusion about Snapshots
The term "snapshot" is overused in the computer room. Here's how they break down.
- Hyper-V snapshots: Generally, this is the snapshot that people mean when discussing virtualization.
- SAN snapshots: to image a LUN
- Volume Shadow Copy Service (VSS) snapshots: to create an application consistent backup of a virtual machine, file system, and applications such as SQL Server
To add to the confusion, System Center – Virtual Machine Manager has historically referred to a Hyper-V snapshot as a "checkpoint". Meanwhile Hyper-V uses "checkpoint" as a verb. For example, "one will checkpoint a virtual machine to create a Hyper-V snapshot."
Why use Snapshots?
Snapshots are a useful tool because they can allow administrators to send virtual machines "back in time." We can undo changes to those virtual machines since the snapshot was taken. This can be useful in many scenarios.
- You want to perform a complicated upgrade to an application in a virtual machine and want a quick way to roll back the changes if something goes wrong.
- The company is building a demo or class lab and a quick way is needed to reset the virtual machines to their starting point.
- You are testing software and need to repeat a set of tests very quickly without re-deploying virtual machines.
Note that some other features of Hyper-V may also use snapshots. Hyper-V Replica will use snapshots for the replica virtual machines in the secondary site if you choose to retain historical copies of the virtual machines.
Are Hyper-V Snapshots supported in production?
Contrary to some commentators over the years, Hyper-V supports the use of snapshots in production. But you should not blindly use something just because you can – you need to educate yourself about how the feature works and in what scenarios it works well.
Remember, when you roll a virtual machine back in time, you are undoing changes to that virtual machine. Imagine this situation:
- A SQL Server virtual machine must be patched.
- You create a snapshot of the virtual machine.
- Patches are installed to the virtual machine.
- Sometime later the patches are found to be faulty.
- You apply the previous snapshot to the virtual machine.
Three things will happen as a result:
- The virtual machine is restore exactly to how it was when the snapshot was created and this resolves the problem.
- Any data that was modified or stored in the database is lost. That's because the virtual machine is restored exactly to how it was when the snapshot was created.
- You will be fired for losing hours of company business.

Hyper-V snapshots are not necessarily supported by the products that you install in virtual machines so you should always check with the application vendor for support. In fact, some products will break!
Note: Restoring a virtual machine domain controller from any kind of snapshot can cause a USN roll back that breaks Active Directory. This is resolved with Windows Server 2012 domain controllers that are running on GenerationID-aware virtualization such as Windows Server 2012 Hyper-V and vSphere 5.1 (or later).
You must be selective about your usage of Hyper-V. This is why some engineers disable snapshot functionality when they enable self-service or delegated administration.
http://feedproxy.google.com/~r/Petri/~3/hJNDkup6o6o/hyper-v-snapshots.htm
Sent with Reeder
Brief message sent from a handheld device.
Five issues Microsoft must fix in Office Web Apps
Geek Tech Five issues Microsoft must fix in Office Web Apps
I'm all in with Microsoft. I've got Windows 8 running on my primary work machine, I subscribe to Office 365 Home Premium , and I use almost every online consumer service that the company offers.
So when it comes time to create a document using Web apps, there is of course only one choice: Google Docs.
Despite Microsoft's wide array of great software, Office Web Apps simply aren't good enough to trust with critical documents. That may change in the next year.
(Office Web Apps is made up of Word, PowerPoint, Excel and OneNote, as part of Microsoft's SkyDrive cloud storage service for consumers. It's also included with Office 365, the broader email and collaboration suite that has free and fee-based editions.)

Microsoft recently said it plans to roll out new features to Office Web Apps that would allow you to "create polished Office documents from start to finish, all from the Web."
New features planned for Office include real-time document co-authoring, faster launch times for apps, improved file management, and Chrome for Android support.
It's great to see Microsoft making Office for the Web into a more full-featured version, especially while we wait for rumored Office apps for Android and iOS. Before Microsoft straps on a bunch of new features to its online Office suite, however, the company needs to make some improvements to the current version first.
Here are a few suggestions, with an admitted bias towards Word.
Auto-save for Word Documents
Thanks for the flashback to Office 2003, Microsoft, but the Word Web app would be better with an auto-save feature instead of a document recovery feature that works only half the time.
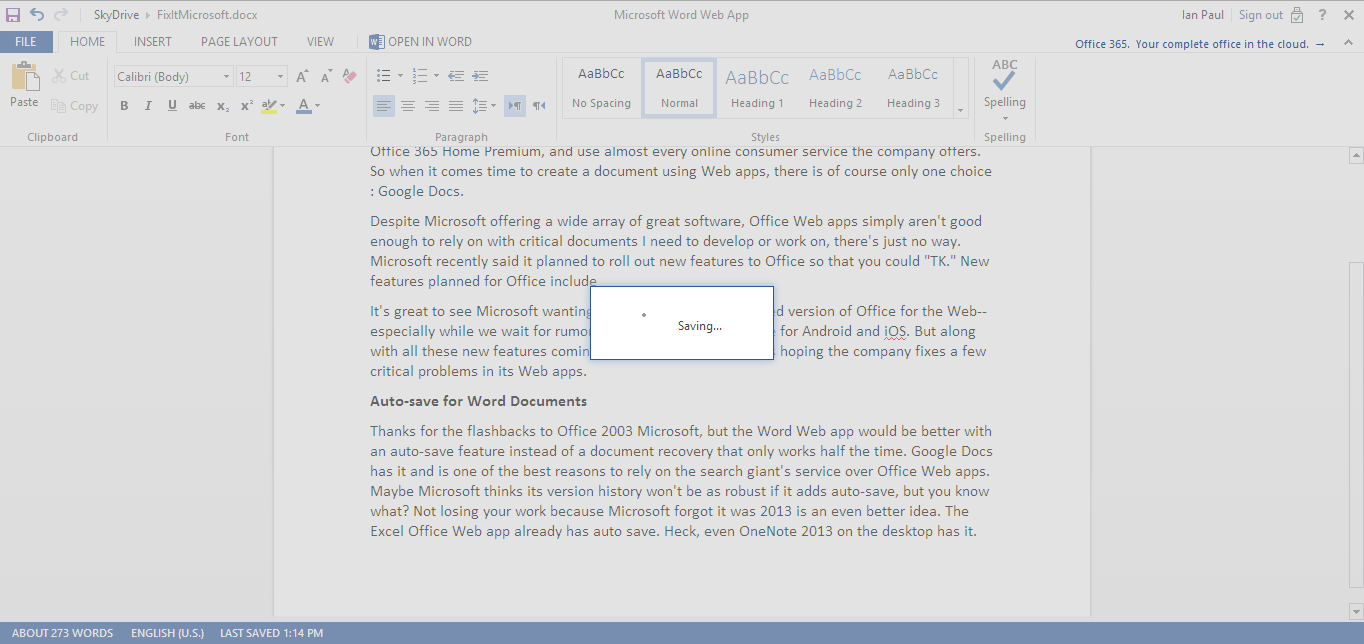 Saving in the Word web app is dicey.
Google Docs has auto-save and is one of the best reasons to rely on the search giant's service over Office Web apps. The Excel Office Web app already has auto-save. Even OneNote 2013 on the desktop has it, why isn't this in the Word Web app?
Fix the connection problems
Has this ever happened to you? You're typing up a document in Word when suddenly you get a notification that the spell checker is down.
 WHY?
WHY?Even worse, sometimes Word documents won't save because there's a problem connecting to Microsoft's servers.
Google Docs in my experience rarely has connectivity issues, but when it does it's not a huge deal. You know why? That's right, auto-save.
Don't be so stingy with new lines
When you get towards the end of a document in the Word Web app, Microsoft gets really stingy about creating new lines. That means after typing about 300 words, you're stuck in the bottom area of your PC's display as Word doles out a few new lines at a time.
After a few minutes of more or less staring down at your taskbar, you end up straining your neck. Yes, you can hit return a bunch of times to create new lines and then scroll back, but that's a hack, not a solution.
Google Docs does not have this issue. After you get close to the bottom of your display, Google Docs adds a new page and automatically scrolls you up a bit, but not so much that you lose your place. If you want to get closer to the center of the doc, all you have to do is scroll the browser page a little more.
Ribbon collapse: go big or go home
The Office Web apps let you maximize your workspace by collapsing the Office Ribbon into a simplified menu, just like on the desktop.
Unless you're a longtime Office user, you'll miss out on this benefit since the collapse button is a tiny little arrow in the far right-hand corner of the screen. This should be bigger and more prominent so it's easier to find.
Right-click for SkyDrive
Admittedly, this is a small gripe, but it's the little details that make the difference between a good application and a great one.
So what's the problem? There's no easy way to open a new SkyDrive tab when you're inside a Web app. Sometimes you might have data in a different document you need to check out in another tab. Right now, if you want to go back to SkyDrive you have to open a new tab and navigate to the site.
But why? There's a little clickable SkyDrive link in the top-left corner of every document right next to the file name. For some strange reason, however, the right-click function to open the link in a new tab is disabled. That's just silly.
For the most part Office on the Web works fairly well. I even created this article using the online suite without losing any of my work, a not-so-frequent occurrence.
Microsoft's three-year old Office Web Apps could be great, especially with handy features like the ability to open your document on the desktop with just one click. For now, however, I'm sticking with Google Docs.
http://www.pcworld.com/article/2038188/five-issues-microsoft-must-fix-in-office-web-apps.html#tk.rss_all
Sent with Reeder
Brief message sent from a handheld device.
Tuesday, May 7, 2013
Recovering Open Directory Databases
Krypted.com Recovering Open Directory Databases
Every now and then I see an Open Directory database that's gotten corrupt for one reason or another. To be more specific, while I see Kerberos get wonky and password server issues from time to time, every now and then I see the actual LDAP database throw errors like this one, when checked with slapd:
/usr/libexec/slapd -Tt
Corruption usually looks a little something like this:
51890ba0 ldif_read_file: checksum error on "/var/db/openldap/openldap-data/cn.bdb"
  51890ba0 bdb_monitor_db_open: monitoring disabled; configure monitor database to enable
  config file testing succeeded
If the bdb (Berkeley Database) files can't be read in properly then you can do a sanity check with slaptest to see if there are other issues as well:
slaptest -f /private/etc/openldap/slapd.conf -v
Provided that your problems are with the bdb files and not ldif files, which can easily be grabbed from another OD box, you can then recover the database using db_recover, along with the -h option to define the directory your bdb files reside in (/var/db/openldap/openldap-data in OS X Server):
db_recover -h /var/db/openldap/openldap-data/
Note, always backup. If errors continue then you can also run with a -c option, which performs a "catastrophic" recovery. Also, before you do a db_recover OD will need to be stopped. Chances are, if you have corruption then the database will be stopped; however, check first:
serveradmin fullstatus dirserv
If it's running, stop it:
serveradmin stop dirserv
Once you're done, there's no longer the need to reboot each time you do this kind of thing, which is actually a huge time saver, so just swap the stop with start and you're good:
serveradmin start dirserv
Similar Articles:
http://krypted.com/mac-os-x/recovering-open-directory-databases/
Sent with Reeder
Brief message sent from a handheld device.
Monday, May 6, 2013
10 due diligence questions to ask before co-locating your data center
10 Things 10 due diligence questions to ask before co-locating your data center
Takeaway: Many organizations are discovering the benefits of data center co-location. But if you don't thoroughly vet prospective co-lo vendors, you could get burned.
One of the hottest trends in 2013 is co-location. The idea of farming out all or portions of your data center is catching on as companies look for greater agility — and for ways to avoid data center expansion costs. Co-lo can be fantastic. But before you take the leap, here 10 ten things you should include in your co-lo due diligence.
1: Will you be able to meet all your IT obligations?
Saving money and facility costs is one thing, but meeting regulatory, governance, and security requirements is another. One hiccup in a regulatory or security area can cost careers, a company reputation, and customers. All are expenses that go far beyond what you'll ever save in cold, hard cash. This makes it essential that you thoroughly vet all co-lo prospects for their ability to comply with the governance, regulatory, and security standards you expect of yourself. If they can't comply, don't do business with them.
2: Is the co-lo you're considering the best fit for your business?
If you're only looking for a place to park a few servers and disk, a bare-bones co-lo that offers secure space and the ability for your staff to perform periodic maintenance might be enough. However, if you're expecting the co-lo vendor to also offer on-staff expertise for the applications you want to farm out or to be thoroughly familiar with all the demands and requirements of your particular industry, you should look for a full-service co-lo.
3: Does the co-lo have SLAs (service level agreements)?
You'd be surprised at how many co-los don't! Never ink a contract with a co-lo unless you have SLAs. If the co-lo doesn't offer them, write them into the contract.
4: How easy will it be to walk away from the co-lo if you have to?
Industry tends to go through alternate phases of outsourcing and insourcing. There is no reason to think that this trend won't continue. Be sure to include in your contact a guaranteed service level from your co-lo vendor in the event that you need to terminate service. No one likes to negotiate these "terminating" SLAs in a new service contract. But if you ever need to make a break, you'll be glad you did.
5: Does the co-lo own its own data center?
A number of SaaS (software-as-a-service) providers still contract with third-party data centers to provide their data center operations. Try to avoid a situation like this. If you ever have a data center disaster or outage at a third-party data center, you are at least one vendor away from that third-party vendor. It will likely mean that you have little influence or leverage — and the health of your business could be hanging in the balance.
6: How much money are you really going to save?
Starting with a co-lo can be as much as 80 percent cheaper than building out your own data center But once startup is over and you're on an ongoing co-lo subscription, co-lo (versus internal data center) costs tend to even out. If it is strategically important for you to maintain your own data center, take a hard look at your situation before going with a co-lo.
7: How does your technology roadmap match up with your co-lo's?
If you are moving mission-critical applications to a co-lo, you need to understand what the co-lo's own technology investments and upgrade strategies are going to be. This upgrade path should closely coincide with your own. If it doesn't, you risk falling out of sync technologically with your co-lo.
8: How strong is the co-lo's disaster recovery plan?
Every co-lo well tell you that it has a disaster recovery (DR) plan — but will the plan work with your own DR plan? Upfront, you should negotiate with your co-lo to jointly test DR with you on an annual basis.
9: How stable is your co-lo?
Many companies check out SAS70, Dun and Bradstreet, and financial statements on co-los to ensure that they're financially viable. But another angle to think about is the potential for mergers and acquisitions. The co-lo sector is no different from other technology sectors. Mergers and acquisitions are ongoing. Sometimes when these events occur, clients find that they don't work well with the new business partner. Be sure to negotiate an opt-out clause in your co-lo contract that allows you to terminate if there is a change in management control.
10: How strong is your co-lo's service record?
When you check out co-lo customer references, ask about service quality and response times. Business is tough enough these days. In an escalated situation, you don't want to find yourself with a co-lo partner that is slow to respond.
Also read…
Automatically sign up for TechRepublic's 10 Things newsletter!
http://feedproxy.google.com/~r/techrepublic/10things/~3/fZU91l9397w/3714
Sent with Reeder
Brief message sent from a handheld device.
This Week's Reading - 20130506
Group Riding 101 - Motorcycle.com
Send a Mother's Day greeting with iOS's Cards app | Macworld
OS X 10.9: what we want to see from Apple's new Mac OS | News | TechRadar
Five overlooked abilities of the Finder's Path Bar | Macworld
Check a Domain Controller Configuration with DCDiag - Petri
Reasons to Use Windows 8 Client Hyper-V - Petri
Viber expands its VoIP service with new OS X app | TUAW - The Unofficial Apple Weblog
How to automate FTP uploads | Macworld
Cars that are the most and least fun to drive - Yahoo! Autos
Saturday, May 4, 2013
Testing Memory On Apple Computers
Krypted.com Testing Memory On Apple Computers
Memory can make a computer run slow, cause kernel panics and in general drain productivity. Bad memory can compound these issues by increasing the frequency of these issues. As such, testing memory every now and then will help to make your life better.
Memtest is a great little tool for troubleshooting memory problems across a variety of platforms. The tool can be installed pretty easily on clients using this little package that was posted awhile ago, but is still functional. Once you've installed the package installer, you can run memtest and have it check memory. To do so, just run memtest all and it will test all of your memory:
memtest all
You can also be a bit more specific about how you're testing memory. You can define the amount of memory to test as well as the number of iterations to test through. The following command shows the first position being the amount of memory and the second position is the number of iterations, as follows (test 1024 Megs of memory and run the tests twice, logging to stderr):
memtest 1024m 2
Adding the –log operator then logs to stderr and memtest.log:
memtest 1024m 2 --log
Overall, memtest is a really easy tool to use. It's also pretty good at isolating issues and can easily be folded into other tools!Similar Articles:
- None Found
Copyright © 2008
This feed is for personal, non-commercial use only.
The use of this feed on other websites breaches copyright. If this content is not in your news reader, it makes the page you are viewing an infringement of the copyright. (Digital Fingerprint:
)
http://krypted.com/mac-os-x/testing-memory-on-apple-computers/
Sent with Reeder
Brief message sent from a handheld device.
Friday, May 3, 2013
Creating complex smart playlists in iTunes | Macworld
Creating complex smart playlists in iTunes | Macworld
http://www.macworld.com/article/2037016/creating-complex-smart-playlists-in-itunes.html#tk.rss_all

Creating complex smart playlists in iTunes
Creating playlists in iTunes can be as simple as dragging a few songs, or as complex as creating smart playlists that refer to other playlists and use nested conditions to pick songs that meet specific criteria. In this week's column, I answer three questions to show just how complex smart playlists can be. While perhaps not the same as the smart playlists you want to make, they are good examples of the complexity that is available with smart playlists in iTunes.
Q: I have a collection of jazz music that is bigger than a single 160GB iPod classic can hold. In total, I have over 6800 albums on four iPods, so I will soon face this problem for other genres too. How can I easily set up two 160GB iPods to hold only jazz music, such as having artists with names from A to L on one and M to Z on another?
The easiest way to do this is set up each iPod to sync a single playlist, and to create two standard (not smart) playlists by dragging all the music from the first group of artists to one playlist, and all the music of the second group to the other.
However, you probably want to be able to sync future additions to your library as well—and that's where things get more complicated. You can't create a smart playlist in which the beginning of artists' names are from A to L, for example.
I can think of a couple of ways to add new music to these playlists. The first is to use the Recently Added playlist, which iTunes creates by default. If you've deleted yours, here's what it looks like:
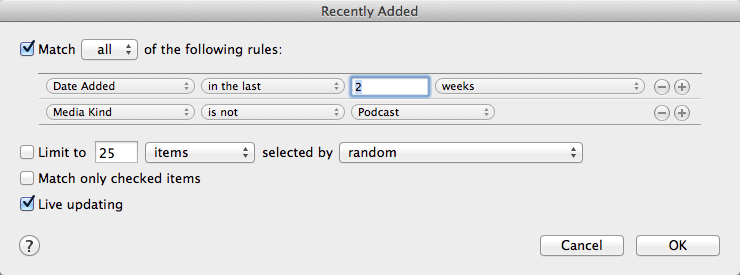
From this playlist, you'd find the tracks you've added recently, then manually add them to your two jazz playlists according to the artists' names.
Another way, which is partly automated, would be to use the Comments field in your tracks' tags. For example, you could add the comment Jazz1 to files that would go in the A to L playlist, and Jazz2 for files to go in the M to Z playlist. Do this for your existing music, and make sure to add the comment when you add new music to your iTunes library.
Then create a smart playlist with the condition Comments Contain Jazz1 for the first playlist, and Comments Contain Jazz2 for the second. Sync just the first or second smart playlist to each iPod, and whenever you add music, as long as you've added these comments (and you have room on the respective music players), the music will sync automatically.
Q: I have playlists as follows: Rock from 1980 to 2000; Pop from 2000 to 2010; and Jazz from 1995 to 2005.
I want to make a smart playlist combining songs from all three of these playlists, but only 10 percent of playlist 1, 25 percent of playlist 2, and all of playlist 3. Is there any way to do this?
Yes, but it will require several smart playlists.
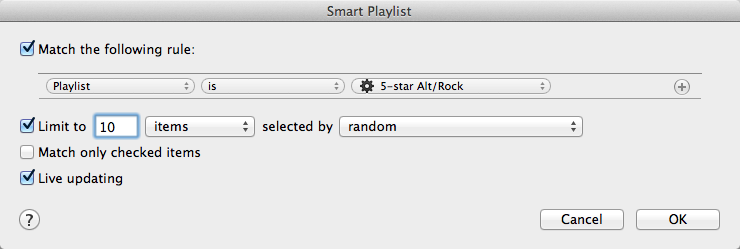
Start with playlist 1. If you want 10 percent of its songs, and there are 100 songs in the playlist, you want 10 of them. You'll need to make a smart playlist where the condition is Playlist is Playlist 1, and limit it to 10 items, as in the screenshot below.
Do the same for playlist 2: Create a smart playlist with a number limited to 25 percent of its contents.
Playlist 3 is your existing jazz playlist.
Now, to group all of these together, you'll need to create a smart playlist with the following conditions (substituting the correct names for the playlists):
- Match Any of the Following Rules
- Playlist is Playlist 1
- Playlist is Playlist 2
- Playlist is Playlist 3
This will grab all the songs you've put in the first two smart playlists, and all the songs in the third playlist, into a single playlist. You can refine this playlist by, for example, adding a condition so that songs recently played aren't included, as follows: Last Played Is Not in the Last 2 Weeks.
Q: I'd like to make a smart playlist that picks songs from a few genres, of a specific rating, but excludes certain artists who have their own playlists. Is there an easy way to do this?
Smart playlists can be quite complex, with conditions and nested conditions. I've made a smart playlist that matches what you want in the screenshot below. Lets look at it closely.
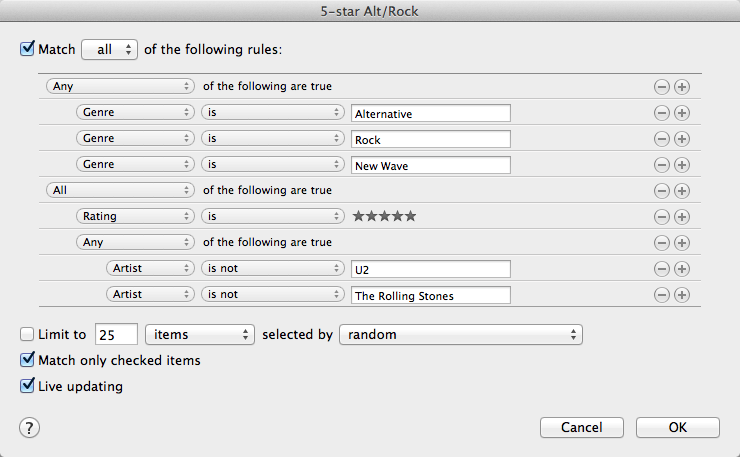
To start with, the playlist matches All of the Following Rules, so only those songs that match all rules will be included.
The first section specifies three genres from which you want to pick songs; it uses the Any condition, so it can pick songs from any of the genres.
The next section specifies a rating—in this case five stars—to whittle down the first selection.
Finally, the third section specifies two artists, again using the Any condition. You could do the same thing with individual smart playlists, but it's just as easy to put all of these conditions into a single playlist.
[Ask the iTunes Guy is a regular column in which we answer your questions on everything iTunes related. If there's something you'd like to know, send an email to the iTunes Guy for consideration.]
Subscribe to the Best of Macworld Newsletter
(via Instapaper)
Brief message sent from a mobile device
Wednesday, May 1, 2013
How to create a VPN shortcut in OS X
Cnet
With the aid of a short Automator workflow, AppleScript can have you connected to your VPN with a single keystroke. [Read more]| |
Sent with Reeder
Brief message sent from a mobile device
Subscribe to:
Posts (Atom)