Showing posts with label photography. Show all posts

Monday, November 12, 2012

This Week's Reading - 20121112

Five Must-Have Windows 8 Apps - Petri

Home - AppyFridays - Free app bundle if you act before this Friday

Ducati - Model year 2013 - model year 2013 - New Ducatis, awesome new water-cooled Hypermotard, though I'll miss the sound of the air-cooled twin…  The Hypermotard would be crazy fun in the hills of West Marin/Sonoma...

Curtains for cursive? Typing replaces handwriting in schools | Crave - CNET - not at my daughter's school, but I see it coming.  I was trying to remember how to write a cursive capital 'S' (not the one I use, but the 'real' one) and had to look it up online!  I love the author's description of her own decline of handwriting:  "I used to be able to write perfectly respectable cursive, but now it has degenerated into an unholy abomination of mixed print and cursive letters, none of which are particularly readable. Every time I go grocery shopping, it turns into an exercise in code-breaking as I try to decipher my scribbled list."

Living with the iPad Mini: Three weeks and counting | iPad Atlas - CNET Reviews

Squier by Fender® USB Stratocaster Guitar - Apple Store (U.S.) - maybe it's time I picked up an axe again...

FortiOS 5 Introduction Webinar - YouTube - From a pretty neat firewall vendor (Fortinet)

Adding subscribers to your photo streams | Macworld

How to Fake Success, Friends & Sexual Partners (with photos) - YouTube

Netherlands Sets Model of Flood Prevention - NYTimes.com

Take engaging photos using the rule of thirds | TechHive

10 things you should consider when virtualizing enterprise desktops | TechRepublic

Five reasons Microsoft Lync 2013 matters | PCWorld

5 best Android and iOS benchmark tools | News | TechRadar

How to make your own Fusion Drive | Macworld

Wednesday, May 2, 2012

Buying Guide: Best cameras for photographing gigs

 
TechRadar: All latest feeds
Buying Guide: Best cameras for photographing gigs

Photography gigs explored

Shooting live music events can be both challenging and rewarding. Having the right kit for the job is half of the problem, since difficult lighting can be par for the course at concerts. And although your camera may be able to take great photos in more favourable conditions, the unique challenges faced at a gig can call for some specialised equipment.

This guide to cameras for photographing gigs has been designed to help photographers of all skill levels and budgets to choose the right gear for concert shooting.

Best cameras for photographing gigs

Whether you're a casual or beginner photographer, an intermediate photographer who takes things more seriously, or an aspiring professional, the best kit for shooting pictures at events is detailed here.

So what challenges can you expect to face? A lot will depend on the kind of venue the event is hosted by. The most common types of events include those hosted at small pubs or bars, medium to large venues, arenas and outdoor festivals.

Best cameras for photographing gigs

Each kind of venue involves different challenges, whether it be with the lighting, or the space available to shoot from.

For example, gigs held at small bars and pubs will often have poor lighting and no separate space to take photos from, whereas arena gigs often require photographers to shoot from the sound desk at the back of the venue, especially when the event is seated, or the artist is a well-known pop singer. Each will place different demands on the photographer, and the kit you use.

Best cameras for photographing gigs

Larger venues often require a photo pass to enable you to take interchangeable lens cameras into the event.

If you're not lucky enough to obtain accreditation, will we also detail suitable cameras for taking pictures from the crowd. In these cases, do be careful to check your ticket, since some venues and artists ban photography altogether.

Best cameras for photographing gigs

So now let's get on and check out the best camera for every different kind of gig environment you could possibly find.

Best cameras for photographing gigs

Best cameras for shooting concerts from the crowd

Best cameras for photographing gigs

So... You have a ticket to see your favourite band or singer performing at your local venue and you really want to take some decent pictures to remember the event by.

You've read the details printed on the back of your ticket and photography is allowed, but it says that "professional" cameras aren't. Normally this means cameras with interchangeable lenses, although bridge cameras will sometimes be disallowed too, depending on how staff at the venue interpret "professional".

The latest compact digital cameras take good pictures in low light, which makes them ideal for capturing a concert from the crowd.

Best cameras for photographing gigs

A general rule of thumb to follow to ensure you will be allowed to take your camera into the venue is that the camera should be small enough to fit in a handbag or coat pocket.

Due to the difficult lighting that can be faced, a camera that takes good images in low light, with some manual control, is often preferable. Although not completely necessary, having manual control will enable you to override the exposure, which will often be thrown wayward by the lighting used at the event.

Because you may be unable to get physically close to the stage, a good zoom with image stabilisation is also something to look out for.

The following cameras should be able to do a decent job of capturing the scene at a concert from the crowd. However, it is worth noting that if the lighting isn't favourable, almost every compact camera will struggle.

Canon Powershot SX230 HS

Best cameras for photographing gigs

Price: £200/$250

Specs: 14.1MP, 1080p video, 14x image stabilised zoom

Sporting a 14x Image Stabilised lens, a 14.1MP rear-illuminated CMOS sensor and some manual control, this camera promises to be ideal for taking images at a concert from the crowd, due to its performance at high ISO sensitivities. The slim, compact design shouldn't raise too many eyebrows from staff at venues, either.

Read our full Canon Powershot SX230 HS review

Fuji Finepix X10

Best cameras for photographing gigs

Price: £400/$600

Specs: 12MP EXR sensor, 1080p video, 4x zoom with bright f/2-2.8 aperture

Although this camera doesn't offer the zoom range of others mentioned here, the 12MP EXR sensor, coupled with the fast f/2-2.8 lens, make this camera ideal for taking images in low light conditions. The excellent build quality should help the camera to survive the rough and tumble of a concert crowd, too.

Read our full Fuji Finepix X10 review

Panasonic Lumix TZ30/ZS20

Panasonic TZ30

Price: £329/$349

Specs: 14.1MP, 1080p video, 20x optically stabilised zoom

Panasonic has long been synonymous with superzoom compact cameras, and its Lumix TZ30 camera should be quite well suited for capturing live music from the crowd, thanks to its 20x optically stabilised zoom and an aperture priority mode. The touch AF and shooting modes should make shooting with the camera held high a little easier too.

Read our full Panasonic Lumix TZ30/ZS20 review

Best cameras for shooting concerts in a pub or bar

Best cameras for photographing gigs

Taking pictures of live performances at your local bar or pub venue may not be all that glamorous, but it's where all musicians start out their career. Who knows? That band playing your local boozer might turn out to be the next U2 or Radiohead, and that female vocalist who performs regularly at the local working men's club may turn out to win the next X-Factor.

Since small venues like this work to tight budgets, stage lighting is often poor, and conditions can be cramped. Usually there are very few restrictions as far as photography is concerned, but it is always polite to check with the artist first if, for example, you wish to use flash.

Best cameras for photographing gigs

If you are a beginner, most entry-level DSLRs, such as the Canon EOS 1100D, Nikon D3100 or Pentax K-r, will enable you to take decent pictures at an event such as this. And so long as the artist is fine with you using flash, the kit lens and built-in flash unit should suffice, in conjunction with a high ISO setting or longer shutter speed, so that the atmosphere of the gig isn't lost.

For photography without the flash, a 30mm, 35mm or 50mm prime lens with a maximum aperture of f/1.8 or faster will enable you to work more effectively with ambient lighting.

Most compact system cameras can take high quality images in low light. But using a screen or electronic viewfinder in very dark conditions can be difficult so the camera will struggle to display a suitably clear image for critical focusing, and contrast detection AF often struggles in low light.

Best cameras for photographing gigs

Intermediate photographers may find the direct control and improved autofocus of a mid-range DSLR body such as the Canon EOS 60D, Nikon D90, Sony A580 or Pentax K-7 will stand them in good stead when shooting an event at a pub or a bar.

Just as is the case with a beginner, a 30 to 50mm prime lens with an aperture of f/1.8 or faster will enable you to work under ambient lighting conditions.

Best cameras for photographing gigs

A zoom lens covering roughly 18-50mm, with a constant f/2.8 aperture, may also be an asset, even if you're using flash. The faster maximum aperture will enable more of the ambient light to be captured at reduced ISO sensitivities.

The greater flexibility of an external flashgun may also help, since they are more powerful and the light can be bounced off surfaces at the venue and directed out of the eyes of the performer.

Best cameras for photographing gigs

Professionals, or those aspiring to be so, will find the superior noise control of a full-frame DSLR, such as the Canon EOS 5D Mk II or Canon EOS 5D Mark III, or the Nikon D700 or Nikon D4 an asset.

In addition to a standard f/2.8 zoom lens covering 24-70mm, an ultra-wide zoom lens in the 16-35mm range, also with a constant f/2.8 aperture, will enable more of the stage to be captured in one shot, or full-length shots of the performer in cramped conditions.

Best cameras for photographing gigs

A range of prime lenses with focal lengths from 24mm to 85mm may also be preferred if you prefer to work with the ambient conditions.

Shoots at venues with little or no lighting may require a wireless flash setup to get the best images possible, so long as permission from the artist can be sought. By placing flash units around the stage, and even using coloured gels in some cases, you can effectively create your own lighting on stage for the shoot.

Best cameras for medium or large venues

Best cameras for photographing gigs

As the venues get larger, the restrictions tend to get tighter. Gigs held at medium or large concert venues tend to require appropriate accreditation to enable you to take an interchangeable lens camera into the venue.

Although most venues of this size will have a pit at the front, which you can gain access to with your pass, you will invariably only be able to shoot the first three songs of each act, and it will be very rare that flash is permitted.

Best cameras for photographing gigs

As with gigs in a pub, an entry-level DSLR camera such as the Canon EOS 1100D, Nikon D3100 or Pentax K-r should be adequate.

Because flash is rarely permitted, beginners will do well to invest in a lens with a fast maximum aperture. The option with the lowest cost is a 30 or 50mm prime lens with an aperture of f/1.8 or brighter, which can often be picked up for around £100/$150, or even less in some cases. Although this be great for low light, it lacks flexibility if shooting a more active performer.

Best cameras for photographing gigs

In these cases a zoom lens with a fast constant f/2.8 aperture covering roughly 17-50mm will help. Those offered by third party manufacturers, such as Sigma, Tamron and Tokina, cost less than the manufacturer's own lenses.

Intermediate photographers will be served well by an mid, to high-end DSLR such as the Canon EOS 60D, Canon EOS 7D, Nikon D90, Nikon D7000, Sony A580 or Pentax K-7.

Best cameras for photographing gigs

This coupled with a standard f/2.8 zoom covering roughly 17-50mm and a telephoto zoom with a fast f/2.8 aperture covering the 70-200mm range. The bright maximum apertures will enable sharp images to be taken under most stage lighting and will also isolate your subject from a potentially cluttered background.

Best cameras for photographing gigs

Professional photographers will find the quality at high ISO sensitivities and increased dynamic range offered by a full-frame DSLR, such as the Canon EOS 5D Mk II or Mk III, or the Nikon D700, invaluable.

Two or three zoom lenses with a constant aperture of f/2.8 will be the norm, the most common being lenses covering roughly 24-70mm and 70-200mm. Some professionals may wish to pack an ultra-wide zoom for capturing more of the stage too.

Although flash is rarely allowed, it pays to be prepared and pack an external flash unit, just in case. On the same note, a prime lens with a bright maximum aperture of f/1.8 or brighter will cover those times when the venue appears to forget to switch on the lights.

Best cameras for photographing gigs

Best cameras for arenas or stadiums

Best cameras for photographing gigs

Concerts at arenas or stadiums are often among the best lit, but due to the stages being larger, and restrictions for where you can shoot from being the norm, these kinds of gigs often have the greatest requirement for specialised equipment.

Many arena concerts require accredited photographers to shoot from the sound desk, the aisles, or even the back of the room. If you're lucky, you may be escorted to the pit at the front to take photos, but this often isn't the case.

Best cameras for photographing gigs

If you are a beginner, and you're lucky enough to have gained accreditation for a show at an arena, and you haven't the means to buy fancy professional lenses, an image stabilised 70-300mm zoom lens coupled with an entry-level DSLR body, such as the Canon EOS 1100D, Nikon D3100, or Pentax K-r, should give you a reasonable chance of getting some decent images.

The image stabilisation should enable slightly slower shutter speeds to be used. Even though lighting at arena shows is generally quite bright, this may still be necessary due to the slow f/5.6 maximum aperture of these lenses.

Best cameras for photographing gigs

If you're lucky enough to own a camera with in-body stabilisation, then it isn't be necessary to buy a stabilised lens.

Intermediate photographers should be served well by a mid-range camera body such as the Canon EOS 60D, Canon 7D, Nikon D90, Nikon D7000, Sony A580 or Pentax K-7. The direct nature of the controls will enable you to adapt to changing lighting conditions more quickly than would be possible with an entry-level DSLR.

Best cameras for photographing gigs

A telephoto zoom lens covering the 70-200mm range with a bright maximum aperture of f/2.8 will be the most useful lens for this kind of concert, although some may find a standard f/2.8 zoom handy for wider shots of the venue or stage.

Most professionals will use a full-frame camera body such as the Canon EOS 5D Mk II, Canon EOS 5D Mk III or (soon) Canon EOS 1DX, or the Nikon D700, Nikon D3s, or Nikon D4 with a 70-200mm f/2.8 images stabilised lens as a basis for a gig kit.

Best cameras for photographing gigs

For those gigs where restrictions require images to be taken from the sound desk or aisles, a 300mm f/2.8 prime, or a teleconverter for use with the 70-200mm f/2.8, is necessary to enable close cropped images of the performer. Some photographers may even hire longer lenses up to 400mm or even 500mm for shooting concerts with these restrictions.

These lenses will generally require a sturdy monopod to enable sharp images to be taken. A standard 24-70mm f/2.8 lens will also be required for shooting wider shots of the venue, or for shooting from the pit.

Best cameras for photographing gigs

Best cameras for photographing gigs

Best cameras for shooting outdoor music festivals

Best cameras for photographing gigs

In the summer the music moves outdoors for festival season. Shooting music outdoors puts different demands on your kit, with many artists performing in daylight, and others on smaller covered stages making it a challenge in itself to be equipped for everything. There's also the weather to consider, since it can change from bright and sunny to thunder and lightning within minutes.

Best cameras for photographing gigs

Accessories that are useful for all levels of photographer include a good waterproof, breathable clothing, and waterproof covers for your cameras and lenses. Although a bin bag and an elastic band may do for a short while, any prolonged rain will require a dedicated cover.

Best cameras for photographing gigs

Optech Rainsleeves are a good option for those on a budget. They are basically a plastic bag shaped specially for a camera with a drawstring that fastens around the end of the lens. A hole is also cut out in the rear which can be fixed around the viewfinder eyepiece, to enable a clear view.

Best cameras for photographing gigs

Another accessory that can be useful at festivals is a step of some kind. Outdoor stages at festivals tend to be quite high, to accommodate the large crowds that gather. This causes a problem because you can only get a clear shot of the performer when they're at the front of the stage, and then the image is taken from a very unflattering angle, right up their nose.

Best cameras for photographing gigs

A folding plastic step is ideal for small to medium festivals, but larger festivals may need something a little bigger. A proper set of aluminium stepladders is the tool of choice for photographers who regularly shoot these kinds of events.

Beginners shooting a festival will be served well by an entry-level DSLR such as the Canon EOS 1100D, Nikon D3100, or Pentax K-r.

Best cameras for photographing gigs

At least two lenses will be needed. The standard kit lens that came with your camera will be great for taking shots of the atmosphere at the festival, but inadequate for shooting artists on stage. An image stabilised zoom covering 55-200mm or 70-300mm will enable better shots of artists on stage, and will be more than adequate for shooting during daylight.

Best cameras for photographing gigs

Saying that, with those lenses it may be a struggle to get decent images after sunset, unless the stage lighting is favourable. For smaller, covered stages, a 30-50mm prime lens with a maximum aperture of f/1.8 or faster will help under the darker conditions faced there.

Best cameras for photographing gigs

Intermediate photographers will find a mid-range DSLR such as the Canon EOS 60D, Nikon D90, Sony A580 or Pentax K-7 work well. For peace of mind, a weather-resistant body such as the Canon EOS 7D, Nikon D7000 or Pentax K-5 may be preferable to help prevent the ingress of dust on dry days and moisture in inclement weather, since even when using a rain cover, cameras tend to get wet during prolonged rain.

Best cameras for photographing gigs

An f/2.8 telephoto lens covering 70-200mm is the ideal lens for shooting festival stages, and a standard f/2.8 zoom covering 24-70mm is perfect for shooting stages under cover, and for capturing scenic views at the event.

Professional photographers, or those aspiring to be, will find the quality at high ISO sensitivities and improved dynamic range of a full-frame DSLR invaluable.

Best cameras for photographing gigs

Weather-sealed cameras such as the Canon EOS 5D Mark III, Canon EOS 1D Mark III, Canon EOS-1DX, Nikon D700, Nikon D3s, Nikon D4, Pentax K-5 or Pentax K-7 are built to withstand the rigours of being used in changeable weather conditions, and should be high on the list for most pros.

Best cameras for photographing gigs

A 70-200mm f/2.8 lens with optical stabilisation will be suited for most types of stage, with a 24-70mm f/2.8 lens being used for smaller covered stages and scenic shots. Depending on the festival being covered, this kit may be complemented with a 1.4x or 1.7x teleconverter, or a 300mm prime lens, for taking close-cropped images on very large stages.

Best cameras for photographing gigs

An ultra-wide zoom or fisheye lens is also ideal for scenic views and for taking scenic shots and images of the crowd, which are all part of the atmosphere of the event. Although flash is rarely permitted when shooting the stage at festivals, many professionals will carry one anyway, just in case, for portraits taken on site, or atmosphere shots at all times of day or night.


Sent with Reeder


Brief message sent from a mobile device

Wednesday, April 18, 2012

Article: Make a Radiant Portrait

Make a Radiant Portrait
http://www.computerworld.com/s/article/print/9226251/Make_a_Radiant_Portrait?taxonomyName=Data+Center&taxonomyId=154


Make a Radiant Portrait

Use your image editor to turn an ordinary portrait into one that pops—in just 5 minutes.

Dave Johnson

April 16, 2012(PC World)

No doubt you have heard someone be complimented with the effusive expression, "You are positively radiant!" I love the sentiment, but I've never quite seen it in real life. Who has skin that actually glows? Perhaps I'm being too literal. Nonetheless, regardless what you think of this in real life, you can create a radiant glow in your digital portraits through some clever photo editing trickery. Using a technique similar to the Orton Effect—which works very nicely in still life and landscape photographs—you can add a warm and romantic glow to your portraits. Here's how.

Start With a Portrait

Begin by opening the photo that you want to tweak in your favorite photo editor. For starters, choose a portrait of a single person in which the overall exposure is about right, and the person fills a lot of the frame.

I'm going to use Corel's PaintShop Pro X4 this week, though the steps are straightforward enough that you can very easily apply them to Adobe Photoshop Elements, GIMP, or any program that supports layers.

Make a Copy

We want to stack two identical copies of the photo, so make a duplicate layer. In PaintShop Pro, choose Layers, Duplicate, and then click OK. You should see a second layer appear in the Layers palette on the right side of the screen.

Time for Some Radiance

Now it's time to add that dose of radiance to your portrait. We'll get the digital equivalent of rubbing your subject with a dash of radium by applying a little Level and Blur.

Make sure that the top layer is selected in the Layer palette, and then choose Adjust, Brightness and Contrast, Levels. Because PaintShop Pro's Levels tool remembers the settings from the last time you used it, it might already be set to some wacky position. Fix that by clicking Reset to wipe out any setting that's already there. Also, I suggest that you select "Preview on Image," so as you move the sliders, you can see the effect they have on the actual photo.

Now drag the white point (the one on the right) towards the left. As you do so, you should see the image get brighter. Tweak the image until it pops, but it's not washed out. It can also be helpful to tweak the position of the slider in the middle so that you bring the levels up overall without overpowering the midtones. When you're satisfied, click OK.

One more tweak: Choose Adjust, Blur, Gaussian Blur, and dial in a radius that gives you a fairly blurry image. Don't set the blur so high that it removes all the detail in the photo, but make the effect fairly strong. I wish I could recommend a setting for you, but this filter's intensity is affected by the resolution of the photo, so your results will differ. Experiment. When you find a setting you like, click OK.

Bring It All Together

It's time for the big payoff. In the Layer palette, change the mode from Normal to Screen. Immediately, you should see a change in the photo—it should look somewhat radioactive. Don't worry, you didn't do anything wrong. We'll fix it.

Grab the opacity slider and reduce the effect until it goes from "difficult to look at" down to "pleasantly romantic." Where you land is a matter of taste, of course, but you can see my final version on the right.

Hot Pic of the Week

Get published, get famous! Each week, we select our favorite reader-submitted photo based on creativity, originality, and technique.

Great news! For a limited time (from March 1 till August 31, 2012), Hot Pic of the Week winners will receive one free downloadable copy of Corel PaintShop Pro X4.

Here's how to enter: Send us your photograph in JPEG format, at a resolution no higher than 800 by 600 pixels. Entries at higher resolutions will be immediately disqualified. If necessary, use an image editing program to reduce the file size of your image before e-mailing it to us. Include the title of your photo along with a short description and how you photographed it. Don't forget to send your name, e-mail address, and postal address. Before entering, please read the full description of the contest rules and regulations.

This week's Hot Pic: "The Mask" by Robin Bravo, Gilroy, California

Robin writes: "I recently read your article on creating the Orton Effect using Photoshop Elements, so I applied it to this picture of a Mardi Gras mask that I took at Disneyland last Christmas. I followed your directions and pulled back the effect to 85 percent. Pretty cool!"

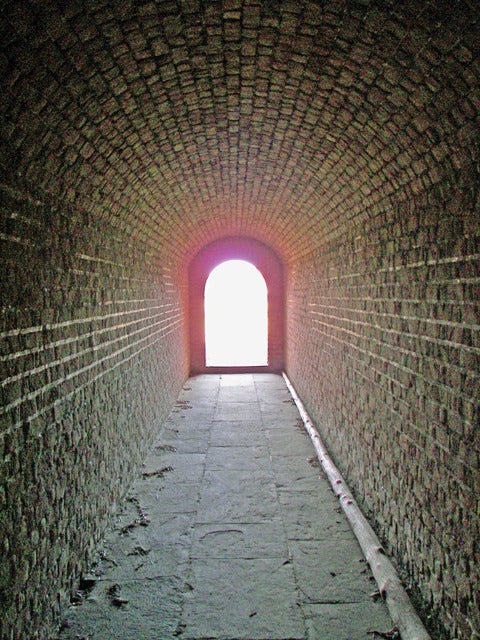
This week's runner-up: "Light At the End of the Tunnel" by John F. Mostler, Brick, New Jersey

John says: "While visiting Florida, I stopped at Fort Clinch. While exploring and taking pictures, I noticed a bright light emanating from the end of the tunnels that led through the walls. This picture was among the most interesting."

John used a Kodak P850 digital camera.

To see last month's winners, visit our March Hot Pics slide show. Visit the Hot Pics Flickr gallery to browse past winners.

Have a digital photo question? E-mail me your comments, questions, and suggestions about the newsletter itself. And be sure to sign up to have Digital Focus e-mailed to you each week.


(via Instapaper)


Brief message sent from a mobile device

Sunday, January 15, 2012

Tutorial: How to fix exposure online

Tutorial: How to fix exposure online:

Tutorial: How to fix exposure online

How to fix exposure online

Getting exposure wrong in-camera is one of the easiest mistakes to make when taking pictures, but fixing it can be rather hit and miss.

Exposure is a complicated blend of brightness, luminance and contrast, so simply changing one of those factors won't result in a well-balanced image.

Moreover, an image that's badly exposed is starting on shaky ground – it doesn't matter how good the rest of your image is in terms of its subject, composition or sharpness – if it's too bright or too dark, people's eyes will simply skip over it and move on.

Fixing exposure can be the work of mere minutes once you know what you're looking for. The tool you need can be found in any photo editor worth its salt, from totally free software like Picasa to high-end software costing hundreds of pounds like the full edition of Photoshop.

We'll also be demonstrating how you can edit your photos effectively without using any software at all, and how to make the most accurate adjustments, whatever monitor and camera you're using.

The right photo

Choosing your shot for this one should be simple, right? Simply find an image that's too bright or too dark and go from there. Not quite.

It's true that modern photos, even JPEGs, contain a huge amount of data beyond what you see in the final image, and that finding and using that data is the secret to successful photo editing.

For instance, just because your image appears far too dark doesn't mean there aren't significant areas of detail lurking within the shadows, which can be brought to light by a judicious tweak of the exposure slider.

As always, this kind of photo editing isn't infallible. Large areas of shadow in your image might contain as much unwanted noise as they do desirable detail, so attempting to salvage a big under-exposure might produce as many problems as it solves. Likewise, badly over-exposed images might appear muddy grey once you've attempted to tone down the white highlights.

That means you should choose the image you want to work on carefully – it's not enough to see a very dark or very bright image and try to correct it, because the worse the problem is, the less likely you are to produce a successful result – even if you're using high-end software.

Choose an image that is successful in every other important way, and is only slightly too dark or too light. Consign everything else to the recycle bin, and resolve to do better next time you're behind a camera!

What you'll need

Chicago photos

With this tutorial, we're attempting something different. Standalone desktop software is phenomenally powerful these days, and attempting to persuade a professional photographer to abandon Photoshop in favour of an online product might result in actual violence.

For everyone else though, there's some fantastic software available online. You don't need to pay for it, you don't need to download it to your computer, and because it's on the internet, you don't need to worry about upgrading it. In this case, we'll use Google-owned Picnik.

Google bought Picnik last year, and it's the default editor you see if you choose 'Edit' from photo-sharing site Flickr. It's a sensationally useful resource; simply upload a photo to it and all the normal tools are there. If you want higher-end tools, you can pay for a Picnik Premium subscription, although the tools we're using this month are available in the free version.

Another of Picnik's benefits is that you don't need to worry about uploading a high-resolution image, which can take quite some time on a standard internet connection. If your image is already uploaded to one of the many supported photo sharing or social networking sites, you can supply your details and choose from your existing online albums.

For example, if you've got a lot of photo albums on Facebook, you can access your shots directly from Picnik. Clever stuff.

Getting going

Using an online photo editor keeps life pretty simple – go to www.picnik.com and you're ready to begin.

Picnik's home page is fairly busy, but if you click on the 'Library' tab at the top of the page you'll be able to choose your shots. 'Get from computer' is what you want if your images are on your hard disk, or you can choose from one of the other options along the top row if you want to edit a shot that's already been posted online. You can enter the URL of any image on the internet – just make sure it's not protected by copyright first.

Once you've chosen your image, you'll be taken to the editing screen. This is bursting with features, although it defaults to the basic edits screen, which is what we want for fixing exposure.

There's plenty to explore, particularly under the 'Effects' tab. Here you'll find tools for adding high-quality effects for your images in single click.

How it works

Exposure refers to the way an image is created – that is, the result of light hitting the sensor in your camera. Any exposure is the result of your camera's sensor being exposed to light for a certain amount of time; the longer the sensor is exposed, the brighter the resulting image will be. Logically, the less time the sensor is exposed, the darker your shot will be.

The problem is that, even with a decent camera making all the decisions for you, getting exposure right can be difficult. Cameras are easily fooled, and snowy scenes or pictures of very dark coloured things will fool a camera into thinking it's looking at a very bright or very dark scene, producing the wrong exposure time and a dodgy image.

Correcting exposure isn't just about adjusting the brightness of an image – it's a cocktail of contrast and luminance values, and is easy to get wrong. Even photo editors with dedicated exposure correction tools will struggle, so while exposure correction can be a very useful tool, take a look at 'In-camera editing' for more on getting things right first time.

In-camera editing

Getting your exposures right when you take your photos is important for two reasons. The first is that every time you make a post-production change to the exposure level in your image, you're removing a bit of detail. Most of the time this detail loss is controlled and unnoticeable in the final image, but sometimes this loss will result in a less sharp image.

The second reason is a simple question of time: if you come back from a holiday with hundreds of shots, the last thing you want to do is spend a day fixing them all because they're under-exposed. Even if it only takes 30 seconds to fix each shot, that's a decent amount of time wasted if you've filled a memory card.

Getting your shots right in-camera means learning how to use the light meter. All DSLRs, some high-end compact and some super-zoom cameras have one. The light meter is a scale in your viewfinder that tells you whether the camera thinks it's about to take a good exposure. A scale ranges from under-exposed to over-exposed, and a pointer moves up and down to tell you what would happen if you pushed the shutter button at that moment.

It's most useful when you're using a manual mode like aperture or shutter priority, but getting to grips with your camera's exposure compensation function will also help you nail more shots in camera, and spend less time editing later.

How to fix minor exposure mistakes online using Google Picnik

1. Connect to Facebook

step 1

In this tutorial, we'll import a shot into Picnik from Facebook. Getting started is simple – go to the 'Library' tab at www.picnik.com, and choose Facebook.

You need to authenticate your account, which means logging into Facebook, and you may prefer to click the cross next to the box that allows Picnik to post on your wall if you want to avoid potentially annoying your friends.

2. Access albums

step 2

Once you're logged in, you can choose from your albums, or the public photos of any of your friends. The default view is pictures of you; click the box marked 'Album' to see all of these, organised by album.

They may take a while to load, depending on the speed of your internet connection, but once they're loaded you can start rifling through them to see the ones that need a bit of help.

3. Pick your shot

step 3

Double-clicking any thumbnail will load Picnik's editor. Here, the main subject is a dark colour, there are bright highlights from the headlamps and there's an overcast sky in the background.

These could all contribute to a camera getting things wrong if it's in Automatic mode. Crucially, the exposure isn't too far off, meaning that most basic editors will be able to correct it without losing stacks of detail.

4. Adjust brightness

step 4

Picnik's exposure tool is found under 'Basic edits'. Click 'Exposure' to access the main tool, plus options for adjusting highlights, shadows and contrast.

For now, adjust the main slider in small increments – left will make your shot darker, right will make it brighter. The numbers on the slider don't correspond to stops, but if you move the slider beyond 50 either way, you run the risk of losing detail

5. Apply changes

step 5

The rest of the exposure tools are fairly blunt instruments, and you need to take care to avoid creating rough gradients. Once you're happy, click 'Apply'.

This doesn't save your image just yet – it simply applies the effect you've chosen and lets you start experimenting with Picnik's other tools. These range from the realistic to the weird and wacky. Picnik is non-destructive, so don't be afraid to experiment.

6. Save and share

step 6

The 'Save and share' tab is your next stop. The default action is saving it back to Facebook, but there are lots of other options, including downloading the finished file to your PC as either a JPEG or a PNG, and sending the image to your Flickr account. There's also an email client built-in to Picnik, or you can opt to print straight from your web browser. Not bad for a free application.


(Via TechRadar: All latest feeds)