Friday, July 10, 2015

Tame your email: how to achieve Inbox Zero in Gmail and Outlook

TechRadar: All latest feeds Tame your email: how to achieve Inbox Zero in Gmail and Outlook

Tame your email: how to achieve Inbox Zero in Gmail and Outlook

Introduction

Intro

Email is a blessing and a curse: while it's a boon for communication and collaboration we've all felt that sinking feeling as we've opened up an overstuffed inbox. But it doesn't have to be that way...

With a few easy tricks and a couple of top tips you can be the master or mistress of mail, eliminating annoyances and reaching the famed state of Inbox Zero. In this article, we're going to look at how to achieve this in the two most popular email services, Gmail and Outlook.

Use conversations

Outlook conversations

This one's particularly important in the corporate world, where what should be fairly simple discussions can get bogged down in endless emails about nothing in particular. Both Outlook and Gmail enable you to view your emails in conversation mode, which means every message in a particular thread is collapsed underneath a single email title.

To turn on conversation view in Gmail, click on the gear icon, select Settings and scroll down to Conversation View. Toggle the switch and save your changes.

In Outlook, conversations are off by default. To enable them, click on View > Conversations > Show as Conversations. You can also change the settings here to specify how conversations should be displayed. In Outlook.com the conversation option is in Options > Group By Conversation and Pre-Load Messages.

Filter the faff and filth

Gmail Filters

No matter how good your organisation's email filters, some spam is going to get through. Thankfully both Outlook and Gmail have some tools that can help you fight the spam menace (and on the desktop you can add more via plugins).

In Gmail, the easiest way to filter unwanted messages is to use the drop-down in the message body and choose Filter Messages Like This. You can then specify what Gmail should do with messages that match the same criteria, such as email address or subject line.

In Outlook, you want Mail > Home > Delete > Junk > Junk E-Mail Options, where you can adjust the level of filtering. If you want you can restrict incoming email to known senders only, although that isn't really practical in most offices.

In Outlook.com, you can tap Actions > Create Rule to automatically delete unwanted messages.

Get to grips with the good stuff

Rules

Filters and rules aren't just for messages you don't want. They can be useful tools for organising the mail you do want, too. For example, you might create Outlook rules that colour-code messages so you can gauge their importance immediately, or you might create a rule or filter that gives certain messages a category and files them accordingly so you can worry about them later.

Such rules and filters are also a good way of keeping legitimate messages out of your spam filter, or of forwarding messages that aren't your department, and it's easy to create very complex rules – so for example you can have different outcomes based on whether incoming messages have file attachments or include certain words.

Unsubscribe from everything

Unrollme

Over time, there's a good chance you'll end up subscribed to all kinds of things – often without asking. That's where the superb Unroll.me website comes in. It works with Gmail and Outlook.com (as well as Hotmail, AOL Mail and iCloud), and it can do two handy things: it can roll all your subscription emails into a regular digest, keeping your inbox tidy, or it can automatically unsubscribe you from mailing lists you don't want. We used the latter option and discovered we'd been subscribed to more than 200 mailing lists we didn't want to be on. It's a fantastic tool.

Use aliases

Outlook alias

Aliases – having multiple email addresses for the same account – are a great way to categorise incoming email, and they're handy weapons in the war against spam too. In Outlook.com you can add additional Outlook.com email addresses to your existing account, while in Gmail you can add anything after the first part of your email provided you do it with a plus sign – so for example karen.smith+notes@gmail.com would go to karen.smith@gmail.com. You can then set rules or filters to look for your aliases and process them accordingly, for example by sending them straight to your spam folder.

Set up Quick Steps

Outlook quick steps

This one's Outlook-only – in addition to Rules, Outlook has Quick Steps to help you organise your inbox. The difference between Quick Steps and Rules is that the former are run manually while the latter are automatic. A Quick Step is a fast way of applying multiple actions to a message or group of messages, and Outlook comes with predefined ones such as Move to Folder or Reply & Delete. By creating a Quick Step and adding it to your Quick Access toolbar (under the lightning bolt icon) you can turn many email processing jobs into one-click efforts.

Create canned responses

Canned responses

You'll often find yourself essentially writing the same message again and again to multiple people, so why not automate it? Outlook's Quick Parts are a blessing here: create an email, write the bit you don't want to write ever again, then click on Insert > Quick Parts > Save Selection to Quick Part Gallery. The next time you need to send that message, put the cursor in the body of the message and click Insert > Quick Parts and then select your canned response.

The process is similar in Gmail but you need to go to Settings > Labs and look for the Canned Responses option. Click Enable to turn it on.

Use Autocorrect

Chrome flags

Canned responses can be overkill for a lot of messages, but there's another way to speed up your email composition and replies. One massive time-saver is to use autocorrect as a form of shorthand, so for example you could replace a long email address with "eml", a postal address with "addr" or a sign-off with "regrd" so the full text magically appears when you type the correct command.

In Outlook, you can define your Autocorrect entries in File > Options > Proofing > Mail > Spelling and Autocorrect. For Gmail you'll need to do it at the operating system level using a third-party app, or via a Chrome flag: type chrome://flags in the address bar and look for Enable Automatic Spelling Correction.

Use task lists

Outlook flags

One of the most practical ways to manage your email is to use to-do lists – flagging a message for future action is only useful if you remember to come back to it, and to-do lists are a great way of ensuring that you do. In Outlook you can flag an email message for follow-up by right-clicking the flag icon and setting a reminder time, or you can drag the message to the To-Do Bar to create a to-do item.

In Gmail, click on Gmail > Tasks to bring up the Tasks List. To add a mail message to it, click on the message's More drop-down and select Create Event. This adds the event you create to your Calendar.

Do it now

Empty inbox

One school of thought says you should only ever read a message in your inbox once: if you just let it sit there, you aren't organising your email effectively enough. Instead, you should take immediate action – delete it if it's irrelevant, delegate it if it's someone else's job, archive if you don't need to do anything or flag it to come back to later.

The end result of that should be the much-vaunted Inbox Zero – or at least it will be until someone emails you and spoils it. The method does work, but it's best suited to infrequent raids on your inbox – if you attempt to process every email as soon as it arrives, you'll find it hard to get anything else done.


http://rss.feedsportal.com/c/669/f/9809/s/4802695f/sc/15/l/0L0Stechradar0N0Cus0Cnews0Csoftware0Capplications0Chow0Eto0Eeradicate0Einbox0Eunpleasantness0Ein0Egmail0Eand0Eoutlook0E12985990Dsrc0Frss0Gattr0Fall/story01.htm

Sent with Reeder


Brief message sent from a mobile device

Tuesday, July 7, 2015

How to set up Family Sharing on an iPhone, iPad or Mac

TechRadar: All latest feeds How to set up Family Sharing on an iPhone, iPad or Mac

How to set up Family Sharing on an iPhone, iPad or Mac

In the dark days before iOS 8 introduced Family Sharing, one parent couldn't access the other's go-to playlist when the kids got cranky in the car. Now, up to six people can share purchases made in iTunes, the App Store, and iBooks, plus family photo libraries, calendars and more. Setup is simple if you avoid a couple snags - here's all you need to know.

How Family Sharing works

Everyone in the group can share the content purchased through their individual accounts, but each person retains authority over their account as an Organizer. An Organizer can grant someone a kind of second-in-command status within their account by designating them as a Parent/Guardian. A child's account is the lowest on the totem pole: it can't be directly associated with a credit card, so all purchases are made through the Organizer's account. If the Ask to Buy feature is toggled on for a child's account, then the group's Organizer and anyone designated as a Parent/Guardian will receive an alert on their own devices when a child tries to buy something, allowing those in charge to approve or disapprove the purchase before it goes through.

Getting started

Family Sharing

Family Sharing on an iPhone, iPad or iPod touch requires iOS 8. To set up an iOS device, go to Settings > iCloud > Set Up Family Sharing. You'll get a brief overview of the feature; when you're done reading, tap Get Started. A couple of screens explain your role as Organizer, then you're asked to add a credit card to your Apple ID if you haven't done so already. If you plan to add a child to Family Sharing, a debit card won't do - since those can be given to minors, Apple requires a credit card to prove you're a grown-up. BUT! If you prefer, you can switch to a debit card after adding the child to the group.

To set up Family Sharing using a Mac, first make sure you're using OS X Yosemite, then open System Preferences and click iCloud. Next, click the Set Up Family button in the left column and follow the on-screen instructions. (Note: The Set Up Family button will change to Manage Family once you've gone through the initial process.)

Adding members

Family Sharing

In iOS 8, the list of family members you share with can be easily managed in Settings > iCloud > Family. A new member can be added by simply tapping Add Family Member and typing in their email address. If you're adding any children, tap Create an Apple ID for a child to set up set up an iCloud email account and password for them. On a Mac, go to Settings > iCloud > Manage Family and click the + button in the lower-left corner.

And that's it!

Family Sharing

You've now set up a group for Family Sharing. You may want to consider putting restrictions on any children's devices to prohibit them from accessing any objectionable content, such as rated-R movies or songs with explicit lyrics. (To do so, visit Settings > General > Restrictions on the child's device). It's also possible to hide purchases made through iTunes, iBooks, or the App Store so they aren't even visible to the people you share with. For more information on everything Family Sharing allows you to do, check out Apple's official page.

Have fun accessing all your family's content without having to buy anything more than once!


http://rss.feedsportal.com/c/669/f/9809/s/47eb0855/sc/28/l/0L0Stechradar0N0Cus0Cnews0Ccomputing0Capple0Chow0Eto0Eset0Eup0Efamily0Esharing0Eon0Ean0Eiphone0Eipad0Eor0Emac0E129850A20Dsrc0Frss0Gattr0Fall/story01.htm

Sent with Reeder


Aron

Brief message sent from a handheld device.

Friday, July 3, 2015

Apple Music mess up your iTunes library? These 7 steps will fix it

TechRadar: All latest feeds Apple Music mess up your iTunes library? These 7 steps will fix it

Apple Music mess up your iTunes library? These 7 steps will fix it

While this week's arrival of Apple Music has been received positively by most users, some are reporting that the metadata in their existing iTunes libraries has been messed up since enabling iCloud Music Library.

iCloud Music Library scans your iTunes library so that you can access all of your music from your other Apple devices, however some people are finding their metadata to suddenly be inaccurate, with incorrectly labelled albums, wonky artwork and more.

Thankfully, there is a way to restore your iTunes library back to what it was before the update – simply follow the seven steps listed below:

1. Close iTunes

2. Head to your iTunes music folder (usually username > Music > iTunes)

3. Drag the iTunes Library.itl file from this folder to your desktop

4. Open the Previous iTunes Libraries folder

5. Drag the most recent iTunes Library[DATE].itl file into the Music > iTunes folder

6. Rename the file iTunes Library.itl

7. Reopen iTunes

If followed correctly, those steps should completely restore your iTunes library to what it once was. Hopefully, Apple is working on an update that prevents this issue from happening at all.

iCloud Music Library is somewhat essential for many of Apple Music's features, like making albums available offline. With that said, enable it at your own risk.


http://rss.feedsportal.com/c/669/f/9809/s/47cc9c20/sc/28/l/0L0Stechradar0N0Cus0Cnews0Csoftware0Capple0Emusic0Emess0Eyour0Eitunes0Elibrary0Eup0Ethese0E70Esteps0Ewill0Efix0Eit0Eup0E12983120Dsrc0Frss0Gattr0Fall/story01.htm

Sent with Reeder


Aron

Brief message sent from a handheld device.

Thursday, June 25, 2015

iOS Tips: How to make iPad or iPhone read books aloud

TechRadar: All latest feeds iOS Tips: How to make iPad or iPhone read books aloud

iOS Tips: How to make iPad or iPhone read books aloud

Audiobooks are fun to listen to during a commute, or anytime your eyes and hands are busy, but they come at a premium price with limited selection. Not to worry: in three simple steps, you can have your iPhone or iPad read any ebook to you without the need for additional apps.

Step 1: Adjust Accessibility settings

How to make iPad or iPhone read books out loud

Go to Settings > General > Accessibility > Speech. Here, toggle on Speak Screen. Now, by simply swiping down with two fingers from the top of the screen, you can have Siri read any text that's currently displayed, no matter what app you're in.

Step 2: Temporarily turn off Auto-Lock

How to make iPad or iPhone read books out loud

Go to Settings > General > Auto-Lock, and make sure Auto-Lock is set to Never. (For security purposes, be sure to turn Auto-Lock back on when you take a break from your book.) Making this change will keep your screen from shutting off, so your story won't be interrupted. (Pro tip: If you're driving, plug in a car charger to counter the extra drain on your battery.)

Step 3: Pick a book!

How to make iPad or iPhone read books out loud

All that's left is to open a book in Kindle, iBooks, or wherever, and swipe two fingers down from the top of the screen to start Siri reading. Siri will read literally any visible text, so be sure to tap the screen once to remove any extraneous elements (such as the book's title, number of pages left, etc.). Siri even flips the pages as it reads along.

Once Siri starts reading, a small semi-transparent arrow appears on the side of the screen. Tap it to bring up several options, including the ability to pause/play speech, or to slow it down/speed it up. (The speaking rate can also be adjusted via a slider on the Speech menu in Settings.)

Siri doesn't read as well as a human being, of course, but once you get used to its monotone delivery and the occasional mispronounced word, it does a surprisingly good job. Go on and give it a try!


http://rss.feedsportal.com/c/669/f/9809/s/47934a82/sc/15/l/0L0Stechradar0N0Cus0Cnews0Cphone0Eand0Ecommunications0Chow0Eto0Emake0Eipad0Eor0Eiphone0Eread0Ebooks0Ealoud0E12976750Dsrc0Frss0Gattr0Fall/story01.htm

Sent with Reeder


Aron

Brief message sent from a handheld device.

Thursday, June 18, 2015

Spam filtering on the cheap for your domain's email

Macworld Spam filtering on the cheap for your domain's email

A little over a year ago I was faced with a spam filtering problem, but it's not what you might expect.

I had been using the paid Postini service for filtering spam sent through my domain, when Google acquired Postini and, once acquired, killed it off and forced users to transition to their Google Apps platform. I found the Google Apps interface to be clunky and, worse, my users found it difficult to use. In addition, I had no interest in sending all the mail for my private domain through Google's servers. Suddenly the bang I was getting for my Postini buck had lost its pop, so I went looking for an another solution.

There are plenty of apps you can install on your Mac to filter spam, but, as is the case with virus scanning on PCs, most desktop software solutions are playing a game of catchup that requires training time and constant updates, which is why I was looking for a web-based solution.

There are also numerous web-based options for spam filtering, but they tend to be aimed at and priced for corporate customers. For example, a year's worth of McAfee's SaaS mail filtering is about $14 per user, Google Apps costs about $25 per user per year, and most any other service you'll find will run somewhere in that range. So, imagine my somewhat cynical surprise when I came across a solution that was free: MX Guarddog.

Oh, I see the way you're looking at me... because that's exactly how I was looking at myself. For several days. Wondering what the catch was.

Funny thing is... there was no catch. MX Guarddog is great spam filtering that you can get for free simply by putting a link to MX Guarddog on your homepage. (There's no time here to explain the "whys" of free MX Guarddog, but if you're interested, check out Who is MX Guarddog to learn why they made it free.) And, if you don't like the idea of linking to MX Guarddog's homepage, you can pay 25 cents per user per month.

The setup for MX Guarddog is easy, but it's important to note that in order to use the service you must have email that is hosted using your own domain. No Gmail. No AOL. No Yahoo. No other addresses hosted on those types of public domains.

The addresses being filtered must be something like: username@yourdomain.com.

Here's how to set the service up:

  1. Go to MX Guarddog.com and click the Register link.
  2. Provide your name, email address, and the domain you want to protect. (It's best here to provide a mail administrator address and contact info.)
  3. Look for MX Guarddog's activation email and click the activation link.
  4. Login using the account information provided in the Postmaster email you receive after activation.
    activationemail
  5. Add a link to your website.
  6. Add the email address you want protected by MX Guarddog.
  7. Provide MX Guarddog information about your email servers.
  8. Update your MX records to direct your email through MX Guarddog's servers.

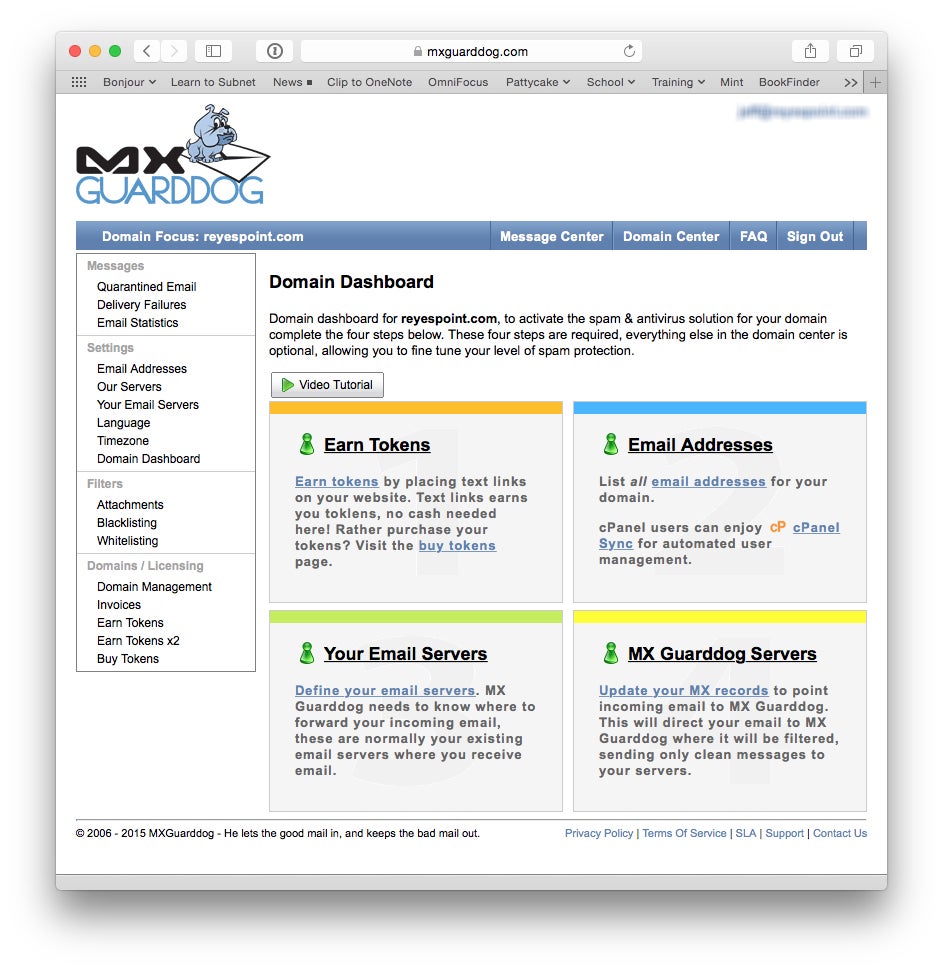
When you log in with your email address and the MX Guarddog-provided password you'll see the MX Guarddog Domain Dashboard. It's here you can add email addresses, create the web-link required for free filtering, add your email servers, and get info on how to update your MX record.

dboard

MX Guarddog Domain Dashboard

To generate a web link:

  1. From the Domain Dashboard, click Earn Tokens. (There's a "Buy tokens" link if you'd prefer to pay.)
  2. Add the URL for the domain you want protected.
  3. Copy the link code and add it to your website.

MX Guarddog offers several options for adding the email addresses you want protected, including adding them manually, importing them in bulk, and LDAP or cPanel synchronization. What makes the most sense for you depends on your setup and needs, but MXGuardog's site provides clear documentation on how to use each of these options.

To tell MX Guarddog where to send filtered mail:

  1. Click the link to Define your email servers.
  2. Enter your domain name or the IP address for your mail server.
  3. Enter a port number, if it differs from port 25.

Updating your MX record information will vary depending on who hosts your site and how your DNS information is set up. Click the Update your MX records link in the Domain Dashboard and follow the instructions that make the most sense for your specific situation.

Once you've completed these steps MX Guarddog will begin filtering your email and sending each of your users a quarantine list. For your users to log in and manage their list have them:

quarantine

MX Guarddog quarantine list

  1. Click the login button at MXGuarddog.com.
  2. Click the "Need a password" link.
  3. Enter their email address.

They will be sent a link for resetting their password and enabling their login.

So simple and some of the best spam filtering you'll find at any price.


http://www.macworld.com/article/2937773/spam-filtering-on-the-cheap-for-your-domains-email.html#tk.rss_all

Sent with Reeder


Aron

Brief message sent from a handheld device.

Friday, June 12, 2015

Mac Tips: How to move the location of your iTunes library on Mac

TechRadar: All latest feeds Mac Tips: How to move the location of your iTunes library on Mac

Mac Tips: How to move the location of your iTunes library on Mac

Got an Apple, Mac, or iOS tech question? We have the answer. Today we have a reader request about how to transfer your iTunes library from one location to another. This question is specifically about moving your library from an external drive to your main drive, but much of the advice should help no matter where you're moving your files.

Question

I have an external drive that I store my iTunes Library on, but now I want to copy the library back over to my MacBook Pro. I've tried going into preferences, but cannot find anywhere to change the location. How can I do this?

Answer

This process is fairly straightforward. First, before you begin, make sure that your MacBook Pro has enough free storage to house the entire contents of your iTunes library that is stored on the external drive. If you have enough free space, then follow these steps to make the move:

1. Plug in the external drive.

2. Quit iTunes if it's open.

3. Open the Finder and locate your Music folder inside of your Home Directory on your Mac.

Move music library

4. Drag and drop the "iTunes" folder from your external drive to the Music folder.

5. Once the copy has finished, keep the data on the external drive intact should something go wrong. You can now unplug the drive.

6. Launch iTunes while holding down the Option key. When prompted, click the "Choose Library" button and select the iTunes Media folder within the iTunes folder that you copied over to the Music folder in your home directory.

7. Alternatively, open iTunes and navigate to iTunes > Preferences > Advanced and hit the Change button to select the new iTunes Media folder.

That's it. From now on, when iTunes launches, it will load the library that is stored in the Music folder on your Mac. Once you are satisfied that everything is working properly, you can delete the iTunes folder on the external drive to reclaim the space.

Move music folder

Got an Apple tech question? Email ask@maclife.com.


http://rss.feedsportal.com/c/669/f/9809/s/47308f38/sc/28/l/0L0Stechradar0N0Cus0Cnews0Ccomputing0Capple0Chow0Eto0Emove0Ethe0Elocation0Eof0Eyour0Eitunes0Elibrary0Eon0Emac0E129650A60Dsrc0Frss0Gattr0Fall/story01.htm

Sent with Reeder


Aron

Brief message sent from a handheld device.

Autodesk Support

I was helping someone purchase and install Autodesk AutoCAD on their work computer, and as of the current versions, it’s no longer an option to do an outright purchase, you have to ‘lease’ the software, much like Adobe initiated a couple of years ago.  It ran us about $1000 for 3 years of use of AutoCAD 2016 LT (the lightweight version which is usually 1/3 the price of the full software without add-ons).

In this instance, we bought the licensing but couldn’t get the user management portal to recognize the purchase and assign it to the user.  The crux of the issue was that the subscription was assigned to the wrong account, one which is outside of the 'team/business' to which it should have been assigned. Once I finally was able to speak to a human who had an understanding (Crystal in San Rafael), we got it sorted out quickly.

My real issue is that there is no phone number to call about this sort of thing (through a back-door means I obtained a number but no one could help me on that). The chat function was offline, and there was absolutely no documentation that I could find that described it. My CDW rep contacted his internal Autodesk person who wasn't able to help out either.

My client spent ~$1000 for a 3 year subscription (also not in love with perpetual purchase going away, but we understand that Adobe did a great job of ensuring constant revenue streams and others are following their lead). So we bought expensive (for us) software, can't get it running, and couldn't get support. It's one thing to have cheap software and get minimal support but it's an entirely different thing to pay for expensive software that's only rented and get minimal to no support. It's unacceptable really. I know that Autodesk is effectively the only game in town but please don't act like it, try harder.

Ultimately, I drove down to the corporate headquarters and talked to the receptionist, Joyce, and asked her how I could talk to a human about support. She said that they don't have any incoming phone lines but she would mail the manager my contact information. Correct me if I'm wrong but it seems a little ironic that customer support doesn't have any incoming phone lines. Just thinking aloud on that one...

Surprisingly, I did get a call about an hour and a half later from a San Rafael area code. Crystal from customer support called and we got things sorted, none of which could have been done without her. In other words, whether the initial mistake was CDW's or Autodesk's, there was no way for me to fix the issue via self-service, knowledgebase articles, or any other visible means.

If you encounter this issue, I can tell you that if you go to their front desk in San Rafael, talk to the very nice Joyce in reception and ask her to have someone contact you, you may get support. Otherwise, the best I got was an international support person who wasn't able to do anything for me.

Again, very expensive software that's now in the greedy rent it for a lot o' money model and you get no easy support on even licensing! Give us your money and good luck to ya'!

Crystal was awesome, everything else was terrible!

If any software vendors are reading this, your takeaways are this:

  • Keep software prices reasonable, come on, don’t be ridiculously greedy.
  • Support your customers, particularly if you have ridiculously expensive software!  Give me something for the absurd amount the software costs.
  • Why, why, why, must you all do the subscription model?  Is it pure greed?  I get sick to my stomach every time I look at how much money streams out of my accounts each month, now we add yet another?

Wednesday, June 10, 2015

10 things IT needs to do during a merger

10 Things 10 things IT needs to do during a merger

A merger or acquisition can unleash an avalanche of complex issues for IT departments. Here are 10 survival tips to minimize the disruptions and help preserve your sanity.


hero

Image: iStockphoto.com/maxsattana

Business decisions to merge or to acquire are almost never made for IT reasons. But operationally, IT quickly becomes a major factor. Many technical IT considerations are involved, as well as political and risk management factors. Here are 10 items you should have on your checklist if your company is active in mergers and acquisitions.

1: Be transparent

Even if your company is the acquiring company, mergers and acquisitions inspire fear among employees--including IT staff. Whatever staff decisions are looming, be as transparent as possible so you don't create an environment of secrecy and rumors.

2: Do staff planning--and let everyone in on the planning as soon as you can

As soon as there is a clear plan, communicate to employees. If a merger or acquisition means some employees will change positions, let them know. If there are employees who stand to lose jobs, let them know--and arrange to actively help them find new employment. If possible, avoid terminating employees because of mergers and acquisitions. It's better to redeploy them elsewhere in the company. You and your staff will feel better about it.

3: Check governance compatibility, not just systems

Whenever IT systems from different companies must be made to work with each other, the focus is on technical systems compatibility. However, especially if you're in a highly regulated industry like healthcare, insurance, or finance, equal billing should be given to compatibility of security and governance practices between the two organizations.

4: Consider end-customer and investor worries

It's easy for IT managers to get caught up in meeting deadlines for system migrations and conversions that come about in mergers and acquisitions and to forget about the outside world of investors and customers who are wondering what doing business with the new company (and its systems) will be like. If there are system complications, plans should be in place to deal with political and people matters as well as the technical problems.

5: Have a failover plan

System migrations and conversions seldom work flawlessly when the IT systems of two companies are blended. This is why it's crucial to have failover plans for all mission-critical systems that can be immediately activated if the necessity arises.

6: Decide which systems you won't continue... and get agreement

From a technical and even a business standpoint, it might appear straightforward to decide which systems are mission critical and must be continued and which can be done away with. However, it's equally important to remember that most of these systems have internal supporters. Never put yourself in a position where you unilaterally make choices on which systems to unplug. Instead, take the time to gather together users so everyone can collectively agree on the decisions.

7: Touch base with vendors and gauge cooperation

In most mergers and acquisitions, the two companies involved have at least several systems that do the same thing but that are from different vendors. Vendors don't like to lose customers, so if a decision is made to terminate a particular vendor's system, you should first perform due diligence on how cooperative that vendor is going to be. Lack of vendor cooperation and responsiveness can extend the time of a system migration or conversion for weeks and even months.

8: Make disaster recovery provisions and update your DR plan

Failover provisions must be made during system migrations and conversions. But at the same time, it's important to be updating the long-term disaster recovery plan to incorporate the addition of a new organization.

9: Secure systems and networks

With the addition of a new organization, there are also new networks and network nodes to look after. One of the greatest security exposures companies face post-acquisition is ensuring that there are no unsecured backdoors or open ports into corporate networks. This can easily happen after an acquisition, because there is so much IT ground to cover that a backdoor can easily be overlooked.

10: Consider the possibility of sabotage

No one likes to consider employee malice or sabotage, but that can happen during a merger or an acquisition because there are usually at least some employees who are upset. The possibility of employee sabotage is highest in IT, where significant damage can be done to systems. If you feel that you have at-risk areas in your organization, the activities in them should be closely monitored. If a potential sabotage begins to unfold, you need to act swiftly and call in outside expertise if necessary. Do not try to handle the entire situation yourself.

Also read...

IT tips for M&A

Have you guided your IT department through the tricky waters of a merger or acquisition? Share your experiences and advice with other IT pros.


http://feedproxy.google.com/~r/techrepublic/10things/~3/qoMU4APMgJc/story01.htm

Sent with Reeder


Aron

Brief message sent from a handheld device.