Monday, March 28, 2016

9 Things I Wish I'd Known About Riding

RideApart - Recent Articles 9 Things I Wish I'd Known About Riding

Remember when you discovered CliffsNotes in high school? I was beyond excited to find out that it's possible to breeze through literature class without thoroughly reading the assigned books. For the small number of you reading this who haven't heard of CliffsNotes (and this is going to change your life), they are pamphlets that summarize the main plot lines of each chapter in a book.

For some of us who ride, we wish there were CliffsNotes on riding a motorcycle. Everyone always says experience and skill comes with time (absolutely true), but there are certain things I really wish I had known as soon as I started learning to ride. It would have made me a better, safer rider a whole lot sooner. Although most of them are "duh" type of things, they completely changed my riding.

I know Bill Kresnak didn't release "Motorcycling for Dummies" just for me, so listen up and relate if you can.

1. That friend you think knows how to ride? He doesn't.

Many of us had a so-called "mentor" who taught us to ride. Although it was my brother who initially taught me to ride on dirt when I was 15, it was an ex-boyfriend who took me under his wing when I got my first street bike. I still remember some of the horribly inaccurate advice he gave me:

  • "You never need to use the rear brake."
  • "If you think you're about to crash into something, just lay the bike down."
  • "If a car drives out in front of you, don't try to slow down, just swerve."

The scariest part is, I believed him! He rode a bike and was willing to offer his advice, which was enough credibility for me to listen to him.

READ MORE: 10 Things They Never Tell You About Becoming A Biker | RideApart

msf-scooter

The truth is, there are very few people who are qualified enough to teach new riders how to ride. The easiest and safest way to make sure you get proper riding instruction is to hire an objective professional. New rider schools typically offer novice through advanced classes that are very beneficial to any rider. But if you insist on having your buddy teach you, really make sure he or she know what they are doing. Don't assume they are experts.

2. Don't have a staring contest with a tree because you will lose.

When I started riding dirt, I would spend more time on the ground than on the bike. When trying to avoid an obstacle, no matter how hard I tried, I always hit the very object I was trying so hard to avoid. It was extremely frustrating, especially because I couldn't understand what I was doing wrong.

Dirt

It wasn't until I nervously went on my first canyon ride that someone said to me "You'll be ok, just look through the turn. Don't fixate on what you're trying to avoid." After that ride, I finally figured out what I was doing wrong on dirt all those years – target fixation! While trying to avoid that tree or that drop-off, I would stare directly at it, and since you go where you look, I'd ride right into it. I had to learn to trust my peripheral vision, and ever since then not only have I been able to avoid any target fixation related incidents on my street bike, I've also dramatically improved as a dirt rider.

3. Moving your bike while sitting on it is a bit like walking with your pants down.

Although this is more relevant to riders who are height challenged like me, it really is safer for anyone to move their bike while off the bike. I'm only 5'4" and have very poor ground clearance on most motorcycles. I used to mimic my friends who'd back out of a parking space while sitting on a bike, and having tipped my bike over on several occasions, I set out to find a better way to move my motorcycle. Turns out, it's much easier to move it while standing beside it.

First of all, having both feet firmly on the ground makes it a whole lot easier to move the bike because you have a good foundation. Second of all, with one hand on the handlebar and the other holding on to the bike's tail, that bike is not falling anywhere. The trick is to find the balance point, which then relies on control over muscle. Whether it accidentally tips slightly toward you or away from you, you have the strength of your whole body to hold it up. I haven't dropped my bike since, nor will you ever see me asking strangers for a push to get my bike out of a parking space.

4. Your hand is on the holster in a duel because every millisecond matters.

I recently retook the new rider course and one of the "mistakes" I kept making (according to the instructors) was covering the front brake. Although I understand why instructors are worried about students grabbing a handful of front brake during the class, it's not a skill that should go beyond your new rider course.

Theory-Test

I'm used to commuting in California traffic, and having two fingers on the front brakes has saved me on numerous occasions. In fact, I was recently on a group ride that encountered a multi-bike pileup right in front of me that required some serious emergency braking. Upon reviewing video footage from a rider behind me, I noticed that even though I was a few bikes behind the wreck, I was one of the first people to get on my brakes. Getting on the brakes sooner has less to do with my catlike reflexes, and more to having my trigger fingers ready on the front brake.

5. The rear brake is your best friend.

Too many people downplay the effect of your rear brake. It's true that it has much less stopping power than the front brake, but it has more purpose than just stopping. It's about control.

When I discovered how much stability you gain by dragging the rear brake, it was game on. Narrow paths between cars, tight U-turns, sharp parking lot entries – bring it all on. With the use of my rear brake, I never have to duck walk my bike again. Learning this skill was a huge game changer for me and I've actually had my riding buddies comment on how much more stable I look splitting lanes.

IMG_8786

Another good use for the rear brake is smooth stopping. Although I use both of my brakes to come to a complete stop, I primarily use the rear brake when rolling to a stop. It makes the stop feel much smoother because the front forks aren't compressing. I challenge you to try it and tell me I'm wrong!

6. Whether you're Valentino Rossi or Joe Schmo, go to the track.

Most people associate going to the track with racing, but it's far from it. In fact, all track day organizations make it clear that you're not there to race. There is no better place to improve your skills as a rider than the track. Where else can you test your personal limits and the limits of your motorcycle in a controlled environment?

READ MORE: 10 Things You Need To Know About Motorcycle Body Position | RideApart

IMG_9058

I would attest a single track day to equal about four to six months of riding experience. Yes, you might be the slowest rider there at first, but so what? Nobody cares, everyone is too concerned about themselves to notice or care about how you're doing.

Also, as long as your bike is in good working condition, it doesn't matter what you ride. I've been to the track with guys on everything from Scramblers to big dual-sport BMW's. As impressive as it is to see people killing it at the track on a sport bike, there's something slightly more impressive about a rider on a non-conventional "track bike" tearing up the asphalt.

7. Always put the right foot down.

Not right as in left and right, but right as in correct. I got into the habit of always putting down my left foot when I stopped. Then one day I was parking my bike on a sideways slope, went to plant my left foot, and realized as I was leaning my bike further and further to the left that I couldn't feel ground. At a certain angle there's a point of no return, and unless you're Hercules there's no saving it and the bike is going down.

Not only did I embarrassingly drop my bike in front of a bunch of other riders, I almost started the dreaded domino effect with the line of bikes I parked next to. It was literally a matter of inches and I'll be eternally grateful that didn't happen because the patched leather vest Harley guys whose bikes I almost took out did not seem particularly understanding. So pay attention to the road where you're stopping and adjust which foot you put down first based on the road conditions.

8. You're not as durable as you think.

This one is an oldie but a goodie — please gear the f up. The broader my motorcycle network becomes, the more horror stories I hear about accidents. Remember how painful it was to scrape up your knee when you went down on a bicycle as a kid? That throbbing pain that made your leg twitch? Take that and multiply it by about 100. That's what motorcycle roadrash is like.

We all know motorcycling is dangerous, but why not attempt to minimize the risk? No one is going to argue that a person who goes down wearing gear is going to have fewer injuries than someone "bare backing" it on a bike. So why would you choose to not wear gear? There really is no sensible answer. I didn't always wear gear, but I eventually learned from the pain of others to not make their mistakes. Spend your money on gear rather than medical bills, and free your family from the burden of taking care of your mangled body. Did I mention the napalm-like roadrash?

Fotolia_15819626_Subscription_XL

9. Always ride your own ride.

I always notice that I make the most mistakes when I'm trying to keep up with someone. Never ride outside of your comfort zone as it will only deplete your confidence, or even worse, cause you to crash.

When riding with people way above my level as a new rider, I always found myself disappointed after the ride because they are so much better than me. In retrospect, riding with other beginner riders gave me a huge confidence boost because you frequently think you're a worse rider than you really are. Everyone progresses at their own pace, so it's not about how long you've been riding or how fast you can get through the corners. Although I do want to get faster, that's never been my primary goal. My goal is to be safe and if it takes me twice as long to progress, so be it. Don't give into the peer pressure.

READ MORE: The Road from Starter Bike to "Big Girl" BMW | RideApart

Kate first learned to ride when she was about 15, but her love for motorcycles began long before that. She was absolutely fascinated with motorcycles as a kid and followed her older brother Dennis around as he ventured into everything from road racing, to Supermoto, to dirt biking, to adventure riding. When she finally got her first bike, there was no going back and now she lives and breath motorcycles.

She and Dennis run Beach Moto, a unique motorcycle gear boutique in West Los Angeles. For them, it's not just a business, it's a passion. They feel incredibly lucky to have the opportunity to meet so many interesting riders and see so many unique bikes through our work in this industry. Their way of giving back to the motorcycle community is by limiting what they carry in the store to only the highest quality items they would use themselves. Knowing their customers are properly protected and fully satisfied with evert purchase is an indescribably rewarding feeling.

Follow RideApart on Facebook and Twitter, along with @RideApart on Instagram.


https://rideapart.com/articles/9-things-know-now-wish-knew

Sent with Reeder


Aron

Brief message sent from a handheld device.

Saturday, March 26, 2016

Friday Five: The New Power of Notes in iOS 9.3, OS X 10.11.4

Other World Computing Blog Friday Five: The New Power of Notes in iOS 9.3, OS X 10.11.4

It's the end of the week, but that doesn't mean an end to learning more about your favorite Apple devices. Each week, the Friday Five takes a quick look at a Mac OS X or iOS app to point out five things you may have overlooked before.

On Monday, Apple updated all four of its device operating systems — OS X, iOS, tvOS and watchOS. As part of that flurry of updates, the Notes app gained some new capabilities. Today we'll take a look at some new things you can do with Notes, as well as highlight a few functions you may not have been aware of before.

Before you do anything, though, you'll need to be sure that your notes have been upgraded so that they're visible on both OS X El Capitan and iOS 9. How will you know if you haven't upgraded? An Upgrade button will appear next to your iCloud account in the Mac Notes sidebar. Click it, and your notes are given the ability to use paragraph styles, checklists, attachments, the Notes "recently deleted folder" (it holds notes you've deleted for 30 days), and locked notes.

1) Lock Notes in OS X 10.11.4 and iOS 9.3
To begin with, we'll look at how to lock notes in OS X 10.11.4. 

The password field in Mac OS X Notes

When locking notes, a single password is created that's used for iCloud notes (those that are synced with your iOS devices) and Mac notes. If you've already set up a Notes password on iOS, the same password is used with OS X. If you haven't set up a password, it's easy:

1. With the Notes app open, select Notes > Set Password from the menu bar
2. Enter a password in the Password field, then type it again into the Verify field
3. Enter a password hint in the hint field. This is very important, since if you forget your password, you won't be able to view those locked notes. The hint appears when you enter the wrong password three times in a row.
4. Click Set Password

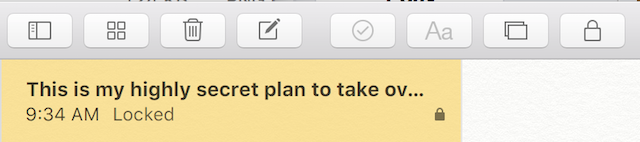
With the password set, it's possible to lock individual notes. To do this, select a note to lock by clicking on it, then select File > Lock This Note from the menu bar. A lock icon appears on the note to indicate that the password must be entered to read it (see image below).

A locked note
After notes have been locked, unlock them all by clicking on one of the notes with a lock icon and then typing the password in the password field. To relock all of the notes, either select Notes > Close All Locked Notes from the menu bar or click the lock icon in the Notes toolbar and select Close All Locked Notes. After a period of inactivity, notes will lock themselves (see image below).

AboutLockedNotes
Removing a lock from any note is accomplished by selecting the note with a click, then choosing File > Remove Lock from the menu bar. Alternatively, click the lock icon in the Notes toolbar and select Remove Lock (see image below). If you've already entered the password the lock will be removed; if not, you'll be asked to enter your password before the lock can be removed.

Close all locks or remove locks

Now let's look at the same process in iOS 9.3.

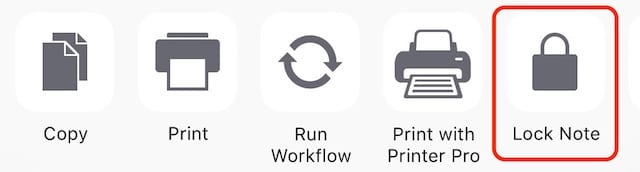
How are notes locked and unlocked in iOS 9.3? From a note that you want to lock, tap the share icon (circled in red in the top image below) and select Lock Note (bottom image below). If you've never locked a Note before in iOS, iCloud or on OS X, you'll be asked to enter and verify a password, then enter a hint. You can also choose to use Touch ID to unlock your notes if your device supports it.

iOS - Lock button

iOS Lock Note Button


When you attempt to view a locked note, a message appears telling you that the note is locked (see top image below). Tap "View Note", and a prompt appears asking for your password or for Touch ID verification (lower image below). Once that's done, your note is visible.

A locked note in iOS

Unlock with Touch ID or password
To relock the note, tap the lock icon in the Notes toolbar. The note is hidden from view until the next time the password is entered.

2) Format text in Notes
One common misconception — and a reason that a lot of people refuse to use Notes — is that you cannot format text. That's absolutely wrong, particularly on the Mac. The image below shows a note that has color, italicized, and underlined text.

Formatted text in Notes

On the Mac, just highlight the text in which you wish to change the font, style or size. Choose Format > Font from the menu bar to change the font, make text bigger or smaller, bold/italicize/underline it, change the color and more. Other stylistic choices, such as the type of list being used (bulleted or numbered) can also be selected from the menu. Clicking in a paragraph in a note, it's also possible to use Format > Text to change the justification of the text or (using Format > Indentation) even indent text. Many of these same commands are also available by selecting text, then right-clicking to bring up a context menu that shows fonts and transformations (make all lower-case, make all upper-case, capitalize) among other items.

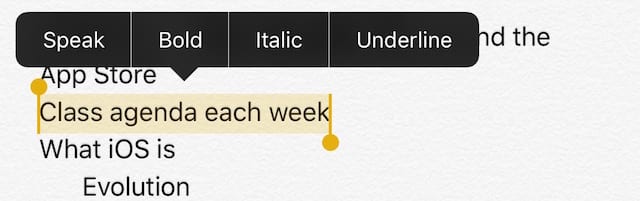
Your choices for formatting text in the iOS version of Notes are much more limited, so if stylish text is what you want, you should definitely consider formatting it on the Mac. Notes on iOS allows you to bold, italicize, or underline text and indent (or outdent) it. To do so, select either a word or all of the text with the usual tap > choose select (or select all), and then apply the appropriate styling from the menu that appears (see image below).

Formatting text in iOS

3) Import notes from Evernote into the Mac Notes app
For big users of Evernote, this tip won't do you any good. But if you're like a lot of folks, you may have heard about Evernote at one point, signed up for an account, and then put a few items out into the cloud-based "backup brain". You can now take those notes out of Evernote and bring them into the Mac Notes app, meaning there's one less service you need to worry about and one less app to have on your Mac.

To begin, you'll need to log into Evernote from the Mac (or Windows) app. When your notes are visible, select the ones you wish to export. I found it useful to simply command-click on the notes I wanted to export to select them. Next, choose File > Export Notes from the Evernote menu (see image below). This can take a while if your notes are images rather than text, so be patient.

Exporting from Evernote

When the export is complete,  you have the exported Evernote XML Export (.enex) file on your Mac. Now launch Notes on your Mac and choose File > Import Notes. Select the .enex file, then click Import. A dialog appears, asking if you really want to import the file to Notes and also letting you know that the notes "may look different in Notes" (see image below). Click Import Notes.

Importing Evernote notes into Notes

A new Imported Notes folder is created, and the notes you've imported are listed in that folder. Even the creation date of the original Evernote note is intact, making it easy to keep a history of when those notes were created.

4) Adding attachments to notes
Notes isn't just about text; photos, videos, audio files and more can be added to any note. Even map locations and previews of websites can be attached.

On the Mac, it's quite simple. If you have a file on the Mac desktop, just drag it to the note and drop it. Have a photo you want to add? Click the Photo Browser button (highlighted in red in the image below), find the photo or video you wish to attach, then drag it to the note and drop it.

Photo Browser in OS X Notes

How about taking something from another app like Maps or Safari? Easy. Let's say you are looking for a 1TB SSD kit from MacSales.com and you want to save the information into a note. In Safari, click on the share button (see image below) and select "Notes". You'll be asked which note you wish to add the information to, or you can create a new note. If you do choose to make a new note, the title of the web page is the name of the note.

The OS X Safari Share Button

You don't get the full web page neatly packaged into the note; instead, a nicely formatted web link is placed in the note (see image below). To preview the web page on the Mac without even opening Safari, just click once on the web link to select it, then press the space bar. You can do the same on the iPhone 6s or 6s Plus using 3D Touch — just give the web link a "hard press" and a preview of the web page appears.

Web Link in Notes

How about adding a similar link on an iPhone or iPad? In Safari on your iOS device, just tap the share button, select Notes, and then choose whether to add the link to an existing note or create a new note.

You can make similar links from a number of Mac and iOS apps that use the standard Apple Share button. Just see if Notes is listed as a share recipient, then choose a note to add the information to. I was surprised to find that I could add my current Activity progress to a note from the iOS app, and with my default Twitter app — Tweetbot — I can save pithy tweets for posterity in a note I created for that purpose. Dropbox users can add links to files stored in the cloud service by using the Share button, something that can't be done at this point with iCloud.

One other tidbit about attachments added to notes; both the Mac and iOS versions of the Notes app now include an attachment browser. The Mac attachment browser button can be found in the toolbar (see image below), and when clicked, tabs appear that highlight Photos & Videos, Sketches, Maps, Websites, Audio, and Document files. In the iOS Notes app, there's an identical button that displays the same attachments in a scrolling list.

Mac Attachment Browser

5) Export a note as a PDF file
On occasion, you may need to share a note with someone else, and you don't really want them to be able to accidentally or intentionally edit the information. That's where the Notes "share as PDF" feature on the Mac is handy.

On the Mac, select the single note that you wish to export, then choose File > Export as PDF. Instantly, a PDF file is created that brings over all of the content in the original note. If you had photos or drawings in your note, they come across looking just like the original.

Apple didn't add this feature to the iOS version, but that doesn't mean that you can't export notes from an iPhone or iPad as PDF files. You'll just need to have a third-party app that provides conversion of documents to PDF format. My iOS app of choice for this is Printer Pro ($6.99) from Readdle, which not only provides a way to print almost anything on your iPhone or iPad as a PDF file, but also does a great job setting up printing to wireless printers when the built-in iOS print function just won't work.


Have any favorite hints or tips you'd like to pass along to other readers of the Rocket Yard? Use the comments section below to give all of us your Notes power user kung fu.


http://feedproxy.google.com/~r/owc/~3/NoIxkQwMy1U/35588-friday-five-the-new-power-of-notes-in-ios-9-3-os-x-10-11-4

Sent with Reeder


Brief message sent from a mobile device

Monday, March 14, 2016

Why is Backup so Hard?

Petri IT Knowledgebase Why is Backup so Hard?

headache-hero-img

headache-hero-img

I've been thinking about a question for the past few months that I'm sure many of you have wondered about while sweating over the restore of a mailbox for a director or a lost line-of-business virtual machine. Why is backup and restore so difficult?

Thinking Out Loud

You might be able to guess from the nature of some of my recent posts that I've been doing a lot of work with Azure backup and disaster recovery solutions over the last 18 months. I've delivered a lot of presentations on the subjects to technical and sales staffs, and I've been challenging them to consider new ways to implement old requirements. Some see the need for change, others bring with them what I call "same old IT."

I've not put my thoughts into one place before, so I thought that I'd write what I've been thinking down for Petri and see what the readers think. In this article, I'm going to share my opinions on why I think that backup, which should be nothing more than just a glorified file copy, is overly complicated, unreliable, a business and job risk, and usually downright sucks. I'd love to hear what you think; so don't be shy — please post what you think in the comments below.

We Won't Get Fooled Again

I've encountered many kinds of IT staff since I started working in IT many moons ago. Some enjoyed a loud discussion, while others would hide when there was anything more vigorous than a whisper. Some were self-educators that were keen to do better, and others were clock-punchers who just wanted to serve their time. Some were keen to listen, and some were cynical of everything. I admired many and learned from them. But a few… they were the sort that really made me want to scream. These were the people that afflicted the "same old IT" on the business.

You know the person I'm talking about — when offered an alternative, something that's better, they'll respond with a line that goes along the lines of:

  • I just buy what my boss tells me to.
  • We've always bought this yellow-box-backup product, and we always will.

I can feel the rage building already. Here's the kind of response my angry gut wants to go with:

  • Aren't you employed to be an IT expert? Are you not supposed to provide feedback when something just doesn't work and there's a better alternative? Wouldn't your employers value that?
  • If you were sick and a treatment wasn't curing you, would you give up, or would you seek a better alternative?
  • You are what is wrong with IT.

There is plenty of blame to go around here:

  • The business hired a CIO/IT manager that allows this behavior. Good IT people question things and are problem solvers. If I'm not being questioned, then I'm scared.
  • The CIO/IT manager has hired lambs or service providers that won't do their complete job. If I hire skills, then I expect those experts to give me advice. Do you want an accountant that just pays the taxes, or do you want one that finds legal ways to minimize your payments?
  • The IT staff person isn't doing their complete job, and to be honest, this is the person that is to blame for much of what's wrong in IT.

OK; maybe the rage is leaking out a little! Until a business deals with "same old IT" in a tangible way, then there will be no improvements and further conversation is a waste. To quote George R. R. Martin: "Words are wind."

Dirty Deeds Done Dirt Cheap

Many IT decisions are incorrectly made based on the sticker price of a product. You can get backup product X for $75 less than product Y, so go for X. Backup is a technology that is there to save and protect a business. So do you want to opt for what's cheap or what works?

I should note that there are some extremely good backup products are very affordable, so don't misread this text.

Start considering the total cost of a backup solution and not just the sticker cost. How much will it cost to buy the backup media and run it for 30 days, 1 year, 10 years or however long you need to retain backups for? What does the software cost and how much will vendor support cost? What time will be spent on fixing backups every day? And what will be the cost of losing a document, an email, or a virtual machine when the backup product continues to be unreliable? Consider all of those genuine costs when you're trying to shave a few pennies from a purchase.

Sponsored

Letting Go of Archaic Technologies

Do you really need tape backup? Tape drives are unreliable and tapes are expensive. Off-site storage with tape drives are slow and are not going to be terribly reliable when there's a wide-scale disaster outside. You don't use 8-track or cassette tapes to listen to music because they age badly and are unreliable, but you want to protect your business on something similar? I'm sorry, but I'm confused, because I bet most of your music collection currently sits on something that wasn't invented in 1951.

Disk storage has never been so cheap. You can use commodity hardware solutions, such as Storage Spaces, or aggregate big and cheap SATA disks with RAID 5. This can give you large amounts of storage for short-term retention.

No More Cloudy Days

At first mention of the cloud, many questions will arise. But the cloud has many answers, too:

  • OPEX: Switching from CAPEX to OPEX allows a business to embrace drip-feed-payment solutions that otherwise requires either a bank loan or salaries not to be paid or stock not to be acquired in order to fund them.
  • Affordability: See the comments above about comparing sticker prices. The cloud offers really cheap storage.
  • Reliability: A cloud solution should have a lot of customers, constantly hammering it, instead of your one-off deployment in the computer room or data center. And when things go wrong, the vendor can patch the problem to prevent it from happening again.

Cloud and backup are not new bedfellows. Online backup has been around for over a decade. What has changed is that the big three clouds that have developed, which are offering solutions that evolve more quickly and are a lot more affordable. You can use cloud features in many ways, including:

  • Disk-Cloud backup: Remove backup servers from your office, assuming that you still have one, and back up machines directly to the cloud.
  • Disk-Disk-Cloud backup: Back up your services locally to more reliable disk storage for short-term retention. Use the cloud's cheap storage for long-term retention by automatically forwarding selected data to a secure cloud backup vault.

Can we fix it?

Yes, we can! If you're willing to change, then things can improve. I see four generations of backup product:

  • Mainframe and Server: These are the products that existed before 2005, and before the rise of virtualization. The products focused on backing up legacy platforms to tape. When challenged by newer solutions, they have tried to McGuyver in disk-disk backup or cloud solutions, but they rarely work, or work well, or work for long. These are the vendors that prevent innovation. These are the products that don't really support Live Migration or vMotion. These are the vendors that a lot of businesses have started to dump, and these are the products that cause the most headaches in backup and preconceptions on what a backup solution is or should offer.
  • Virtualization: The rise of vSphere and Hyper-V created a new generation of startup software companies that realized that they could do backup better than the old guard. They realized that if virtualization is the norm, and improvements to virtualization platforms are frequent, then why are old server/mainframe backup solutions preventing customers from taking advantage of what they own or want to own. Disk-disk backup is the norm, and support for new versions of virtualization is something that takes days or weeks, not years.
  • Online backup: A huge number of vendors launched online backup solutions over the last decade or so. Some of these solutions are well-tried, reliable, and trusted. But some, particularly those launched by legacy hardware vendors, come and go like ships in the night. A common factor is that these mature solutions are built on legacy storage, so they are not necessarily as affordable as they could be.
  • Cloud: The big three vendors, Microsoft, AWS, and Google, acquire and deploy at scales that we 'little' IT people cannot fathom. They use commodity hardware that is acquired at huge discounts, aggregate it with software-defined storage systems (there are no SANs in the big-3 clouds), and they can sell storage at a rate that cannot be beat by online backup competition.
Sponsored

Choosing a Backup Solution

Right now, I believe there are two correct choices when choosing backup solutions:

  • Those that were designed from the ground up for virtualization, with an emphasis on disk-disk backup.
  • Backup solutions that are designed to leverage the cheap long-term storage of the big three clouds, subject to regulatory requirements.

Again, feel free to let us know your thoughts in the article comments below. I'd love to hear what you think on this topic.

The post Why is Backup so Hard? appeared first on Petri.


http://feedproxy.google.com/~r/Petri/~3/w1byIGylumI/why-is-backup-so-hard

Sent with Reeder


Aron

Brief message sent from a handheld device.

Thursday, February 25, 2016

Audi A3 Door Puddle and Warning Lights

My 2015 A3 2.0 Quattro (A3 8V body type, of the MQB chassis) did not come with the optional ‘interior light package’, which in the US is part of the very expensive ‘Prestige’ package.  However, there were some nice bits that it has that I missed from previous Audis I’ve owned.  There are several parts to it, which I’m slowly retrofitting as I find more things out about my car and source the parts (many of which are coming from China or Germany).  One that had a lot of people on the forums stumped was the puddle and exit light coding for the rear doors.

For my front and rear door exit and puddle lamps, I sourced the parts from AliExpress.  It took about 2 weeks for the parts to arrive but it was all very nice with pre-built harnesses wrapped in the German-style fabric tape, all terminations complete and the LED lights were all branded VAG (Volkswagen Audi Group).  Installation was straight forward with just popping out the original reflector and then cutting out the indentation in the bottom of the door panel.

For the front electrical, you’ll plug the prebuilt terminal into slot 16 on the terminal block and pin 5 is ground so you’ll splice into that, preferably with solder and fuzzy fabric tape.  It’s pretty obvious how to route the wires and you may want to wrap the new supplemental harness in with the factory harness.

Some nice illustrations are here:  

http://garage.jenare.com/pack-eclairage-dans-les-portieres/

One thing to note is that most people have reported that after you’ve reassembled and coded it with VCDS, you will need to power cycle the ignition for it to take effect.

There’s more information on the front door panels online and in the forums than there is in the rear.  In fact, the rears have some conflicting information so I can tell you what worked in mine.  My car has rear door modules so you’ll extract the individual white terminal block from the plug that goes into the door module and drop the positive feed for the harness into pin 12 of the 16 pin connector.  Then you need a ground and pin 13 is a brown wire, which is typically used in VAG cars as the ground, so I spliced into that and soldered it.  After reassembly, the door controller has to be coded to acknowledge the light and turn it on when the door is opened.  Again, the front doors were simple (using VCDS).  The rear doors need to be added via module 19 in the installation list, you’ll add BB & BC, close the controller and go back in to the module list.  Then you’ll see the rear doors.  These will only be temporarily added as you’ll need to remove them from the installation list once you’ve coded them.

Now, go into each door module and go to Long Coding.  Copy and paste the existing coding into a text editor document that you won’t lose.  You always want to be able to go back to the original configuration if something goes awry.  Plan for the worst and hope for the best.

In my case, the original coding was this for both rear doors:

004117204000048000000002

I then edited the 4th from the left digit to be a ‘5’.  This is the only change I had to make.

004517204000048000000002

Below is an image borrowed from the Ross-Tech forums for a different model but similar car that illustrates the entries.  As of right now on my A3 8V using VCDS v. 15.7.4, there are no label mappings for the rear doors.

NewImage

As soon as you commit the coding, the rear lights should be active.  Don’t forget to go back into module 19 (CAN) and uncheck the boxes for BB & BC.


Parts to purchase:

AliExpress LED Door Light Kit:  http://www.aliexpress.com/item/1-set-OEM-Audi-A3-LED-lamp-foot-stepping-foot-nest-lamp-lights-footlights-Package/32482255651.html

Necessary/Suggested Tools

VCDS or ODIS hardware and software coding

Torx driver set, I believe T20

Interior panel removal tools (I got mine from ECS Tuning)

Wire splicing mechanism, solder and fabric tape recommened

Time to Complete

The first door took me about 45 minutes on the hardware, each subsequent door was about 20 minutes, then about 15 minutes to code it with VCDS

Friday, February 19, 2016

How to improve autocorrect on iPhone and iPad

TechRadar: All latest feeds How to improve autocorrect on iPhone and iPad

How to improve autocorrect on iPhone and iPad

Even if you've never experienced a full-on, mortifying 'Damn you, autocorrect!' moment, you've probably still had irritations with the system on your iPad. We happen to think it's quite good, but even if you opt to switch off the Predictive engine it's still useful to know how to manage autocorrect.

The first thing to remember is that you can cancel corrections either as they're happening or just after. When you're typing a word, and the autocorrect thinks it should be something else, it will highlight the word and suggest the new one in the middle of the QuickType bar.

Tap the option in quote marks to keep what you've typed. If you realise it's corrected a word after typing, just tap backspace to delete into the word and retype – autocorrect won't kick in again unless you drastically change the word.

When you fix autocorrect's changes, the dictionary learns your new words, so it won't bug you for corrections next time. You can turn autocorrect off in Settings > General > Keyboard; and if you feel you'd be better off starting over with the system afresh, you can simply reset your autocorrect dictionary in Settings > General > Reset > Reset Keyboard Dictionary.

How to improve autocorrect on iPhone and iPad

1. Teach TextExpander

There's a great but little-used feature in iOS called TextExpander, which enables you to set 'shortcuts' for longer messages – Apple's example is that you can just type 'omw' and it autocorrects to 'On my way'.

This system ties into the general autocorrect system, so we can use it to make some cunning tweaks. To begin, tap Settings > General > Keyboard > Shortcuts.

How to improve autocorrect on iPhone and iPad

2. Specific replacements

If you've accidentally made autocorrect learn a common mistake that it should be correcting (such as 'youre'), you can fix it with TextExpander. Tap the + sign (top right), and in the Phrase field, enter the correct word.

In the Shortcut field, type in the one that you got wrong before. Tap Save, and now when you write the latter, it changes to the former.

How to improve autocorrect on iPhone and iPad

3. Manually add words

If you want to add words to autocorrect's library in advance, use TextExpander. Add a new shortcut, and type the word you want into the Phrase field, with capitalisation as you want it.

Don't put anything in the Shortcut field. Save this, and the word is effectively added to your autocorrect dictionary. To remove an entry in the shortcuts list, swipe it to the left and tap Delete.


http://www.techradar.com/how-to/phone-and-communications/mobile-phones/how-to-improve-autocorrect-on-iphone-and-ipad-1315227?src=rss&attr=all

Sent with Reeder


Aron

Brief message sent from a handheld device.

Sunday, February 7, 2016

Use a Raspberry Pi to remotely watch your home

TechRadar: All latest feeds Use a Raspberry Pi to remotely watch your home

Use a Raspberry Pi to remotely watch your home

For this Raspberry Pi project we'll create a remote monitor for tracking activity in a home. Before we begin, make sure that your webcam is plugged into your Raspberry Pi. To update our system and install the webcam motion software, you'll need to open XTerminal and type:

$ sudo apt-get update && sudo apt-get install motion

With motion installed let's configure it with:

$ sudo nano /etc/default/motion

You'll see start_motion_daemon=no change this to yes.

Now press Ctrl+o to save and Ctrl+x to quit. Now we need to make a few changes to our motion.conf file. Open it with $ sudo nano /etc/motion/motion.conf . Ensure the following is correct before saving (Ctrl+o) and exiting (CtrlL+x) nano

daemon on

width 640

height 480

framerate 100

stream_localhost off

Reboot your Raspberry Pi before continuing. Now let's test our stream. In a terminal type $ sudo service motion start .

Now in a browser on another machine type in the IP address of your Raspberry Pi, you can find this in the terminal by typing hostname -I followed by :8081 so for example my IP address was 192.168.0.3:8081.

You should now see a video stream in your browser. Now that we have the stream working let's embed it into a live web page. To do this we will need to install Apache. In a terminal type $ sudo apt-get install apache2 -y . This will also create a new directory in /var/ called /www/ which we shall use to serve our pages.

Open the text editor on your Raspberry Pi. We will now write a few lines of HTML to build a simple web page.

<!DOCTYPE html>

<html>

<title>Puppy/Baby Monitor</title>

<body>

<xmp theme="cyborg">

## I wonder what the dog/baby is up to?

<img

src="http://192.168.0.3:8081/">

</xmp>

</body>

<script src="http://strapdownjs.com/v/0.2/strapdown.js"></

script>

</html>

We start by declaring the document as a valid HTML document and give the page a title to identify it in our browser. Now we move to the <body> where we use a framework called strapdown, which mixes markdown – a popular writing format – with Twitter's bootstrap framework.

In essence we can make a nice page rather quickly. We're using the cyborg style as it's dark and looks great on devices. To create a headline we use two hashes (#) and then type the contents of the headline. Next, we add an image whose source is the IP address of the webcam stream.

To make sure the IP address matches that of your Pi we add :8081 at the end. We then instruct the browser to load a JavaScript file containing the strapdown functionality. Save your file as index.html to your home directory. Open a terminal and type the following to copy the file to our web server:

$ sudo cp /home/pi/index.html /var/www/html/

Finally, we need to start our web server and restart the motion service.

$ sudo service apache2 start

$ sudo service motion restart

Now visit your Raspberry Pi's IP address – you no longer need to add :8081 to the end of the IP) – and you will now see a video stream from your Raspberry Pi.

CCTV

The Raspberry Pi has made many different types of projects possible and one that's popular is CCTV. The official Raspberry Pi Camera, along with the Pi offer a low cost, high quality and low-power project you can build quickly.

In this project, we used motion to stream our webcam to a webpage, but motion can be used to search for motion and stream as well, eg we can record a video stream to a local or cloud device which will be triggered by a burglar, baby or Jack Russell terrier.

Add a Passive Infra Red (PIR) sensor to this code, such as the one used in our delivery watch project, and you have a powerful application that can alert you to incidents and record the evidence. Another great application to use with a webcam is Zoneminder which also works with the Raspberry Pi.

Using Zoneminder, you'll be able to monitor multiple streams and set up zones which will trigger an alert, eg a zone drawn around a door frame would trigger if a person used the door, but the surrounding area wouldn't be monitored for activity.


http://www.techradar.com/us/how-to/computing/use-a-raspberry-pi-to-remotely-watch-your-home-1314466?src=rss&attr=all

Sent with Reeder


Aron

Brief message sent from a handheld device.

Thursday, January 21, 2016

How to take photos of stars, star-trails and the International Space Station

TechRadar: All latest feeds How to take photos of stars, star-trails and the International Space Station

How to take photos of stars, star-trails and the International Space Station

How to take photos of stars

How to take photos of stars

Think astrophotography is for experts who stay out all night in deserts and national parks with expensive lenses? Although you do need a DSLR or a compact camera with manual settings – a smartphone just won't do – it's possible to take images of the International Space Station (ISS) and stars, and even create hypnotic concentric circles of star-trails using a basic lens and some simple techniques.

In this guide we'll show you the equipment, software and knowledge you need to take spectacular photos of celestial bodies – including man-made ones – in the night sky.

1. Gear & location

How to take photos of stars

Taking images of the night sky requires three things: a DSLR (or compact camera with manual exposure), a tripod, and dark, clear skies. You might think the latter is hard to find, but even in the most light polluted cities it's possible to photograph stars – and the super-bright ISS is visible from everywhere. If you do want the blackest sky possible then get yourself into a rural area about 40km from a major town or city, or even better, an International Dark Sky Reserve or Park.

Whatever your location, since you're going to be opening the shutter for long periods, position the camera away from direct lights, such as streetlights or car lights. If you're in your back garden or yard, switch off all lights at the back of your house, and disable any motion-sensing lights. Using a shutter release cable, remote control or your camera's self-timer function will reduce blur.

2. Wait for the ISS

How to take photos of stars

Fancy photographing six astronauts in flight? It's easy to produce an ISS trail if you know how. Finding the ISS is the easy bit. First visit NASA's Spot The Station for imminent flybys at your location (which could be a few weeks away… or could be tonight). Since the ISS always appears in the west and crosses the sky to sink in the east – most visibly near sunset or sunrise – position your camera accordingly, using the compass on your smartphone if you don't know your cardinal points.

20 minutes before the flyby, and with your camera in manual mode and a wide-angle lens on infinity focus, take some test exposures for 30 seconds, using ISO 100 and with the aperture at f/2.8 or so (depending on the lens). When you see the ISS, open the shutter. When the shot is complete and you've captured an ISS trail, swivel the camera and do the same again as the ISS drops into the camera's field of view. An open landscape such as a park is great for this.

3. Understand the night sky

How to take photos of stars

As Earth rotates, the stars appear to move, rising in the east and sinking in the west as the night progresses. It may seem a slow process, but take a 30-second exposure and zoom in on the viewfinder, and you'll see that the stars have actually blurred already.

What you don't want is moonlight bleaching out the night sky. To avoid that, check the phases of the Moon with an app like Luna Solaria. If you're under a Moon-less dark sky, you might even capture the Milky Way, too.

4. Photographing the Milky Way

How to take photos of stars

When it comes to photographing the Milky Way, it's all about keeping the shutter open long enough to allow the light to enter the camera, but not so long that the stars blur. Using the widest angle lens you have, set the aperture (f-stop) to as low (wide) as possible to let in the starlight.

With the manual focus on infinity, open the shutter for 5 seconds, 10 seconds, 20 seconds and so on until you get something you're happy with. Zoom in on the LCD screen to see if it's sharp. If it's blurred, nudge the focus to just shy of infinity, and take another shot. If it's too light, shorten the exposure time and put the ISO on 100. If it's too dark, open the shutter for longer and increase the ISO. Adjust the white balance to Tungsten to help the stars look more natural, and even colourful.

5. How to find Polaris, the North Star

How to take photos of stars

The night sky in the Northern Hemisphere appears to revolve around a central point; Polaris, the North Star. Why? It sits directly above the North Pole, so the Earth's axis appears to point directly at it.

If you want to shoot a star-trail where the stars draw circles around Polaris, you need to find it. You can use a compass app or a planetarium app like Sky Safari to help, though you can quite easily find the Plough/Big Dipper in the night sky without tech.

Find the two stars at the far end of the bowl, and go from Merak at the bottom to Dubhe at the top of the bowl. Then continue this imaginary line on for about four times the distance. The lonely looking star you come to is Polaris, which is the point your star-trails will circle around. For those in the Southern Hemisphere, look for a point roughly between the Southern Cross and bright star Achernar.

6. Stack a star-trail

How to take photos of stars

Take test shots of the night sky until you're happy, then leave the camera exactly where it is. Take an exposure every 30 seconds or so for an hour or more (the longer the better – two hours looks awesome).

Many cameras will do this automatically using a time-lapse mode, or similar. Free software – StarStaX for Mac and Startrails for Windows (both less fiddly than using Photoshop) – will then combine all your images together to create a star-trail (if you take a "dark frame" with the lens cap on, it will also remove dead pixel marks).

If you have a Canon DSLR camera with no timelapse mode, consider a cheap timelapse timer/remote like the Canon TC-80N3 or the very inexpensive Alpine Labs Michron, which can be programmed via a smartphone app.

7. Choosing the foreground

How to take photos of stars

Although images of the stars in the night sky or of a star-trail that shows the Earth's rotation are both impressive on their own, something in the foreground will make it even better.

Interesting houses, barns, rock formations or trees work well; experiment with illuminating your subject with a flashlight for a short period (if you're taking multiple exposures, you can always remove these frames if you're not happy with them).

8. Capturing the movement of the stars

How to take photos of stars

You also don't have to point your camera at Polaris. Turn 180 degrees and photograph the night sky to the south and you'll capture the apparent movement of the stars above the Earth's equator. Over the course of a long exposure (or multiple exposures), the stars will form sensational semicircular trails.

Producing star-trails can quickly become an obsession – and a whole new (if time consuming!) way to approach landscape or travel photography.


http://www.techradar.com/us/how-to/photography-video-capture/how-to-take-photos-of-stars-star-trails-and-the-international-space-station-1313499?src=rss&attr=all

Sent with Reeder


Aron

Brief message sent from a handheld device.

Tuesday, January 12, 2016

Mac Tips: How to selectively empty trash in Mac OS X

TechRadar: All latest feeds Mac Tips: How to selectively empty trash in Mac OS X

Mac Tips: How to selectively empty trash in Mac OS X

OS X El Capitan added a little-known feature that is sure to make Mac power users happy when it comes to taking out the trash...from the OS X Trash bin, that is. Have you ever dragged several items to the trash, but then decided that instead of deleting everything that was in there you only wanted to dump a select few items, just in case? Well, with this feature, you can selectively delete just the items you want to from the trash, and in this article, we'll show you how it's done.

If you haven't upgraded to OS X El Capitan, the only method to selectively delete items in the Trash is to drag the files you want to keep out of the trash, empty the Trash, then move the items you kept back to the Trash.

With OS X El Capitan, however, you can do the following to selectively delete files:

1. Add files you want to delete to the Trash.

2. Open the Trash by clicking it in the Dock.

3. Select one or more files you wish to delete immediately.

4. Right-click on the selected file(s) and select the option to "Delete Immediately."

Selectively Delete

You will receive a prompt asking if you wish to delete the selected file, if you do, then click the Delete option.

Selectively Delete Trash

This will remove the selected file(s) and will leave the other non-selected files safely in the Trash where you can safely keep them for the time being.


http://www.techradar.com/us/how-to/computing/apple/how-to-selectively-empty-trash-in-mac-os-x-1312947?src=rss&attr=all

Sent with Reeder


Aron

Brief message sent from a handheld device.