Seamlessly sync your data across devices | PCWorld
http://www.pcworld.com/article/2045685/seamlessly-sync-your-data-across-devices.html#jump
shared via http://feedly.com
Seamlessly sync your data across devices | PCWorld
http://www.pcworld.com/article/2045685/seamlessly-sync-your-data-across-devices.html#jump
shared via http://feedly.com
TechRadar: All latest feeds Blip: Getting spammed on iMessage? Spam Apple about it

If, like us, you don't look too favourably on rogue iMessages that spam you with discounts and lies, the time has come to stand up and take action.
Apple has set up a direct email line at imessage.spam@icloud.com to which you can send hard screenshot evidence of your spam assault. You'll also need to send the phone number or email address of the perpetrator along with the date and time that the spam flinging took place.
Then the Apple signal with light up the sky and Tim Cook will leap into his iMobile, track down the offender and dole out a big wallop of Apple-flavoured justice.
At least that's what we're choosing to believe.
There's no spam to be found in TechRadar's news blips. None. Zero. Zilch.
     |
Sent with Reeder
Travelers turning to European-style minivan campers for vacations | abc7news.com
http://feedly.com/k/1bXqrxG
shared via http://feedly.com
10 ways to optimize your SMB technology investment - TechRepublic
10 things you should consider before implementing a chat support program - TechRepublic
10 tips for coping with international business travel - TechRepublic
Windows Server 2012 Hyper-V Live Migration Explained - Petri
What to do if mouse input stops working in OS X | MacFixIt - CNET Reviews
Security Hardening in Windows Server 2008 R2 - Petri, good read and reminder!
Last week's big Microsoft reorganization should have caught exactly zero people by surprise. A couple of high-ranking executives departed, and departments were shifted so the senior leadership team can purportedly focus on engineering excellence and becoming more relevant across a spectrum of devices.
Read PCWorld's analysis of what Microsoft's new product groups mean for you
But what does this mean for the CIO? What do Microsoft's internal machinations imply for its corporate customers? From my perspective, it means four different things for you. Let's take a look at each of them.
When CEO Steve Ballmer wrote in his memo to the troops that this was a reorganization "that will enable us to innovate with greater speed, efficiency and capability in a fast changing world," he wasn't kidding about the greater speed part.
To read this article in full or to leave a comment, please click here
Generate a list of Reading List URLs - Mac OS X Hints
Top iOS 7 Features for IT Pros - Petri
How to delete or move a lot of Gmail messages | PCWorld
Ten fabulous Finder commands you should be using | Macworld
The Roentgens' Berlin Secretary Cabinet - YouTube
Four things CIOs need to know about Microsoft's reorg | PCWorld
Stephen Gillett's Rise From CIO Of Starbucks To COO Of Symantec - Forbes
Lewis Black: New York City is better than Texas because ‘F*ck you, Texas’ | The Raw Story
You can greatly narrow search results in the Finder by adding logical operators to include and exclude specific files.

When searching for items in OS X, you can use the Spotlight menu or perform a Finder search routine. Finder, unlike the Spotlight menu, offers a number of filtering options you can add to your search to narrow down results, and you can even save them as canned searches that Apple calls Smart Folders.
To create a filtered search, simply press Command-F in the Finder, and the foremost window will convert to a search window, or you can start entering a search term in the Finder search bar at the top right of each window.
With the search window active, you can choose to search the computer ("This Mac"), the current folder, or mounted shares for specific files. Below this search scope, you can add a number of metadata filters to narrow your search results. The search may have Kind set to "Any," though you can designate audio files, PDFs, folders, and images, and you can click the plus button to add more filters.

Adding logic to searches, in this case, will yield all PDF documents modified within the last week, excluding files that have the name "test" or "TimeSheet."
(Credit: Screenshot by Topher Kessler/CNET)By default when you add more filters they are all included, so filter 1 and filter 2 would both be applied to the search results. However, you can apply different logic operators such as "or" and "not" to the search results.
To do this, hold the Option key when clicking the plus button, and filters added will be placed under an operator selector, where you can have the results include "any" of the following filters (logical "or"), have it exclude the items found in the filters (logical "not"), or go with the default "all" inclusive (logical "and").
In this way, you can for example build a search result that will include all PDF documents that were opened within the last week, but not located within a specific folder, and then nest a couple of filters to exclude files with one or more key words in their names.
The possibilities for customizing searches in this manner are almost endless. And as with any other custom search, you can save these searches so you can quickly access them, if needed.
In addition to smart searches, you can apply logic to searches in the Spotlight menu. Simply include capital AND and OR. For example, to locate a file with a name or contents containing either "MacBook" or "Apple," you would search for "MacBook OR Apple" in Spotlight.
Questions? Comments? Have a fix? Post them below or e-mail us!
Be sure to check us out on Twitter and the CNET Mac forums.
How to password-protect a PDF before e-mailing in OS X | MacFixIt - CNET Reviews
http://reviews.cnet.com/8301-13727_7-57593348-263/how-to-password-protect-a-pdf-before-e-mailing-in-os-x/?part=rss&subj=news&tag=title

The print-to-PDF feature in OS X is convenient for quickly preserving a document's layout in the PDF format, so it can be viewed on most computers and tablets. If you would like to send someone a formatted document that contains sensitive information, you may want to add the step of protecting it with a password.
To do this, you can use a container format such as a ZIP file or an encrypted disk image (using the Disk Utility program in OS X); however, these may be a bit cumbersome to manage, both for the sender and recipient.
An alternative is to send the PDF as an encrypted PDF file with a password that must be entered by the recipient before the PDF can be read.

After choosing Print to PDF and opening in Preview, save the document and click the Encrypt option (circle). Then send the encrypted PDF using the Share button (arrow) as an e-mail attachment (click for larger view).
(Credit: Screenshot by Topher Kessler/CNET)There isn't a specific option to print a document to an encrypted PDF format in OS X, but the procedure is simple enough:
This action will create the encrypted PDF and offers a relatively easy way to attach it to a new e-mail message. However, if you use this feature regularly then you may want a slightly more streamlined approach.
Luckily, OS X supports an option for custom print plug-in workflows that you can use to encrypt a PDF directly from the PDF menu in the print dialog window. To do this, open the Automator program (in the Applications folder) and follow these steps:

When creating the workflow, for the encryption action be sure to check the option to show the action's input when the workflow runs (click for larger view).
(Credit: Screenshot by Topher Kessler/CNET)Save the workflow with a name like "Mail Encrypted PDF" and you should be good to go. Now whenever you print a document you can choose this workflow from the PDF menu and after you supply the password to use, the system will generate the secured PDF document in a new e-mail message.
Questions? Comments? Have a fix? Post them below or !
Be sure to check us out on Twitter and the CNET Mac forums.
(via Instapaper)
Microsoft worked closely with multiple U.S. intelligence agencies, going as far as providing a workaround for encrypted emails, according to a new report today.
This damning account of cooperation with the U.S. government's Prism surveillance program is said to come from files provided to The Guardian by on-the-run leaker Edward Snowden.
The latest documents allege that Microsoft teamed up with the FBI for a solution that allowed the NSA to circumvent encrypted Outlook.com messages.
The company even went as far as to work with the FBI to help it understand new features to Outlook.com like user-created email ailases.
No word if Microsoft's infamous talking paperclip, Clippy, provided this assistance with an automated: "Looks like you're trying to spy on our users. How can I help?"
Prism was described as a "team sport" in the Snowden-leaked documents, according to the U.K. newspaper.
But Outlook.com isn't the only Microsoft product that is said to be part of the close collaboration between it and the U.S. government's contrversial spying program.
SkyDrive is said to have put Prism first, allowing it to access the cloud storage service without separate authorization.
And while Prism monitoring came to Skype eight months before Microsoft bought the VoIP service in 2011, surveillance tripled within the last 12 months.
"The audio portions of these sessions have been processed correctly all along, but without the accompanying video," noted the leaked PRISM documents acquired by The Guardian.
"Now, analysts will have the complete 'picture',".
Microsoft and other top Internet firms have denied providing backdoor access to the NSA, FBI and CIA for their data mining programs.
However, that's exactly what today's Snowden-leaked documents seem to indicate.
In response, Microsoft issued a statement on its website, denying blanket or direct access to its products including Outlook and Skype.
"We have clear principles which guide the response across our entire company to government demands for customer information for both law enforcement and national security issues."
"To be clear, Microsoft does not provide any government with blanket or direct access to SkyDrive, Outlook.com, Skype or any Microsoft product."
Microsoft, like Google, has expressed its desire to give customers a more detailed picture of its role in Prism, but a FISA gag order prevents the company from doing so.
"There are aspects of this debate that we wish we were able to discuss more freely," Microsoft said to wrap-up its statement today.
"That's why we've argued for additional transparency that would help everyone understand and debate these important issues."
| |
Create a Network Map in Windows 7 - Petri
Learn how to manage workstations withouth being a member of the Domain Admins group - Petri
Power up your PDFs with these five free tools | PCWorld
Secrets of the paperless office: optimizing OCR | Macworld
How to password-protect a PDF before e-mailing in OS X | MacFixIt - CNET Reviews - Very cool tip!
Navigate directly to recently accessed files and apps - Mac OS X Hints
10 new Excel 2013 functions that can save you time | TechRepublic
How to add logic to search results in OS X | MacFixIt - CNET Reviews
Petri IT Knowledgebase Manage Workstations Without Domain Admin Rights
It's common that IT staff are given domain administrator rights for a number of reasons, one being that it's a convenient way to log on to workstations with local administrator privileges. But from a security standpoint, giving high-level access to Active Directory (AD) for the sake of an easy life, puts your IT infrastructure at risk.

Read this How To from SolarWinds and learn the best practices for monitoring the health & performance of your Microsoft Exchange Servers.
Don't wait until it's too late!
Read How To>>
First we need to create a management group in Active Directory for users who will have rights to log on to workstations with administrative privileges.
Now I'm going to create a GPO to add the new AD group to the local Administrators group on all my workstations. I recommend that you create a separate Organizational Unit (OU) for your workstation computer accounts. While it's possible to apply Group Policy to computer objects in the default Computers container, it would mean linking the GPO to the domain and filtering out domain controllers and member servers.

The next time Group Policy applies to computers in the workstations OU, the AD\Workstation Administrators group will be added to the local Administrators group, enabling IT administrators to manage workstations without domain admin privileges.
Sent with Reeder

Wander the streets of Venice, the boardwalks of Brazil or even just the aisles of a grubby Boeing 737 and you'll quickly notice tourists abusing their gadgets with ill abandon, as if nobody is watching.
But as well as red-faced foreigners using iPads as cameras and show-off friends checking in on Facebook while still at the airport McDonalds, the usually tech-savvy can be prone to the odd holiday slip-up, too - usually by massively over-estimating their gadget needs.
Here are 10 of the most common tech-related errors that make travellers look stupid. Stop yourself from committing these sins to avoid irritating locals and embarrassing your fellow tourists.

Airports are exotic only to children. "Look everybody, I'm in New York City!" is a half-decent boast. Posting that you're wandering around the duty-free shops at the airport, on the other hand, is more a cry for help.
Facebook is at its best when informing us where trusted friends are on the globe, particularly if they're somewhere unusual and also post some stunning photos. Knowing friends are enjoying themselves somewhere special is certainly more interesting than knowing how boring their day at work was, for sure.
But if you're busy queuing in a large concrete block to get to an airline seat that's already been allocated to you, please keep your powder dry. Nobody is interested.
There was a time when the phrase, "we're just about to take-off, I'll call you later," was generally uttered into a mobile phone when boarding the plane or settling into one's seat. Now it appears to have moved back 20 minutes to the actual point when the pilot has already rattled down the runway at 100mph and is tilting towards the clouds.
We don't blame the flight attendants, but couldn't their breeze down the aisle to check seat belts also involve spotting - and possibly tranquillising - covert smartphone users who rate the importance of their business call with Derek from Distribution far higher than the safety of 149 people crammed into a long tin tube attempting to float?

Your phone's alarm goes off at 4am. You silence it to prevent the battery draining further: you've a long journey ahead, and in the airport you barely check Facebook at all while you hop between charging points - at one stage sitting on the floor behind a bin just to avoid dipping below 99% as your flight starts to board.
You've bought yourself an emergency battery that's good for a full recharge, and packed a worldwide adaptor just in case it's possible to charge up on the plane. You've even put an old MP3 player in your now bulging carry-on bag just in case.
And what happens when you get on the plane? You watch The Dark Knight Rises on the in-flight system, drift into a Zen-like trance and drink cheap wine until you fall asleep, finally arriving at your hotel many hours later with a healthy 97%.
We live in a throwaway age where SD cards are capable of holding thousands of photos, but do try to consider what it is you're photographing. On a recent trip to the ultimate honeypot of world tourism - Machu Picchu in Peru - we spotted more than a few fellow tourists so desperate not to miss out on the ultimate shot (read: overdone clichés that you'll never look at twice) that they were snapping away with a camera while looking in the opposite direction.
Spend less time taking indiscriminate pictures and more time thinking about light, subject and composition, to get nice photos.
Oh, and when a couple give you their camera and ask you to take a picture of them in front of the Taj Mahal or the Sydney Opera House, remember that it's probably the only photo of them together on their honeymoon, so don't absent mindedly cut their heads off.

The ultimate tech faux pas? The iPad is a quite brilliant boredom-beater, but wielding an iPad above your sunburned head to film rudimentary video is the new sandals with socks.
Whether it's during a guided tour, a show at Disney Land, a sporting event or - worst of all - a gig where that 10-inch screen is an unwanted beacon of bright light, we nevertheless predicted this worrying trend years ago. After all, the two-gadgets-in-one concept is always hard to resist, and who wants to carry a camcorder?
Please just use a phone - it's more discreet, it's safer and it's far less intrusive. Or perhaps you are actually on holiday specifically to spend quality time with your iPad. If that's the case, point the thing at your own face and take a long, hard look at yourself (yes, we know it has a front-facing camera).
You want to take a professional, nicely framed picture of your significant other in front of Buckingham Palace to keep forever on a hard drive when you get home. On the other hand, you want the instant gratification of about 10 meaningful 'likes' and perhaps a 'LOL' on Facebook, too.
So as well as lugging a DSLR across the globe you insist on composing the identical shot on your phone exclusively for uploading. If you're in a busy tourist spot, taking twice the time is likely to get you shoved out of the way, and rightly so.
Until all cameras come with Wi-Fi, like the Samsung Galaxy Camera, Panasonic LF1 and friends, why not try waiting a few hours or days and then just uploading your well-composed, considered pictures from the DSLR?

What if you get bored? It depends what kind of trips you take, but any amount of lazing by the pool/long train journeys/killing time in airports demands a Plan B comprised of music, movies and books.
So a week prior to your holiday you get busy compiling playlists on your phone, stuffing it full of music, endless reams of podcasts, movies, TV shows and more.
But hey, guess what? Being on vacation isn't just about taking a break from the daily routine of work - it's also a getaway from all those digital distractions you fill up your home life with. We predict that you'll consume about 5% of what you actually travel with... and, no, you really don't need that just in case cache of 1001 Ebooks You Must Read, either.
What did you do on your annual leave? Clear your mind? Or just your inbox? The smartphone is a misnomer on holiday and best left at home if you're the type who can't resist checking work email.
The logic is fool's gold; if you check email while on trips away, you can delete some ahead of time and get back to the office with a less-than-overflowing inbox. Whoopee.
If the checking of email on phones wasn't already almost a reflex action for many, it's about to get even easier with the price of data around the globe (especially in the EU) about to drastically reduce, which is the ultimate in false economy if you've spent hundreds to escape the daily grind. Besides, isn't an overflowing inbox the ideal excuse to take it easy on your first day back?

We like learning about space, and our summer holiday is usually the only time of the year when we're likely to be somewhere outdoorsy with a big horizon-to-horizon view of the night sky - perhaps even somewhere dark enough to show the Milky Way in all its glory (at what other time of year does anyone actively seek out a sunset or sunrise?).
We like having someone knowledgeable to point out constellations, star clusters and planets, but that's not the same as having some berk proudly thrust a tablet in our face to "show us" where Venus is by pointing at their free Night Sky app. And on a bright LCD screen that instantly kills our night vision, too.
Those apps - which, incidentally, all get very confused anywhere near the equator - are great for solitary learning. So come back next year when you've learned enough to actually point something out in the sky. We can all use apps.
In theory these are great; what better way to block out the din of air travel than by donning a massive pair of headphones that cleverly create a sheen of calculated silence?
Except, when the flight is complete, they're virtually useless - too big and clumsy to wear around your neck in hot climates and a pain to stow in a backpack, they're another symptom of our obsession with how awful flying is. They almost always come with massive protective cases, and most of them don't have a passive non-battery mode.
Still, it could be worse. On a recent trip we spotted a family of five - including three kids no older than 10 years old - all sporting a pair of Beats by Dr Dre. We're sure they had a lot of fun on their holiday.
Did we forget any other irritating tech habits of tourists? Seen anyone doing all of the above at once, or something even weirder? Leave your suggestions in the comments below.
| |
MacworldOur top five Dropbox tricks
If you asked Macworld editors to name the technologies they can't live without, you'd inevitably hear about Dropbox. This file-synchronization service lets you access your files from anywhere—not just your Mac, iPad, and iPhone, but also any Web browser. It provides easy cloud-based backup, too. But all that's just the beginning. Here are five of our favorite ways to use it:
Anyone who passes around photos, videos, or other big files has most certainly discovered the puny file-size limits of most email servers. Dropbox can help. First, make sure you're running the very latest version of the app by downloading it from Dropbox's website. Then, in the Finder, find a file in your Dropbox folder, and Control-click, right-click, or two-finger-click it. In the contextual menu that appears, select Share Dropbox Link. (In older versions of Dropbox, choose Dropbox > Share Dropbox Link.) Select this option to copy a shareable URL for the file in question to your clipboard, ready for pasting into an email message or a chat window. Recipients don't even need a Dropbox account to use links. There's no quicker way to share large files.—Lex Friedman
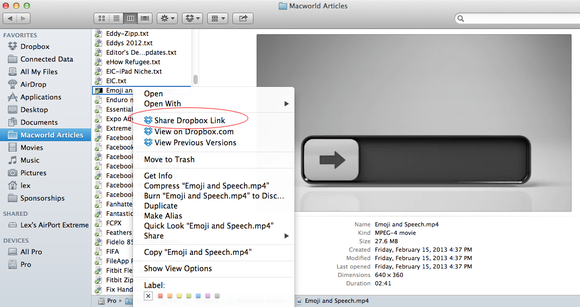 To share a big file, just Control-click an item in your Dropbox folder and choose Share Dropbox Link (circled) from the contextual menu.
If you maintain more than one Mac, you know the annoyance of setting up the same app again and again to work just the way you like it. That's where Dropbox can help. Store an app's preferences in Dropbox, and as you make changes to settings on one computer, those settings also get updated on your other computers. Not all apps let you store preferences in Dropbox, but some notable ones do, including AgileBits' $50 1Password ( ), Running With Crayons' free Alfred () with the £15 Powerpack add-on (about $23), Bare Bones Software's $50 BBEdit (), and Smile's $35 TextExpander (
 ). Once you get used to it, you'll wonder why more apps don't support this great feature.—Dan Moren
Need to collaborate with a group of people who use Macs and PCs? Dropbox offers an easy way—the shared folder. First you need everyone to sign up for a free account at Dropbox.com. Then, in the Finder, Control-click (or right-click) on a folder inside your Dropbox folder. In the contextual menu that appears, choose Share This Folder. (In older versions, choose Dropbox > Share This Folder.) Your browser will open to Dropbox.com, and a window will prompt you to type in the group members' email addresses along with a short message for them. Once this is done, the group can add, delete, and edit files in the folder, and the files will stay synced. Since you can access Dropbox through a browser, group members don't need to download any software to participate.—Scholle Sawyer McFarland
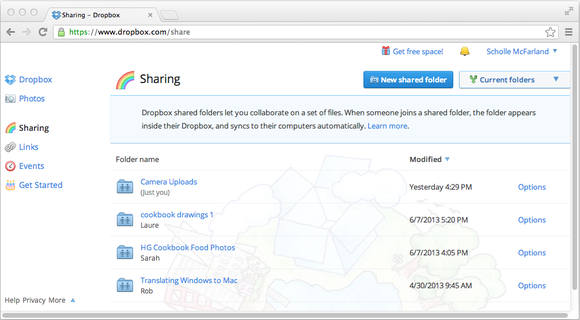 You can see all your shared folders by clicking the Sharing link (shown on the left) at Dropbox.com.
Lots of people upload pictures to Facebook or other services, but not everybody's Web savvy. For example, at a relative's recent 50th wedding anniversary, plenty of folks were snapping pictures, but they weren't sure how to share all of them. My solution? I used the free service Send to Dropbox to create an email address where people could send photos, which I collected into a folder. Then I sent everyone a link to that folder. Easy peasy, and everybody with an email address and Web browser can take part, without having to install any software.—Dan Moren
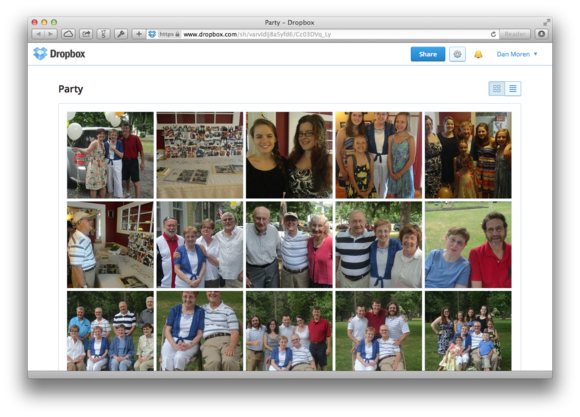 Need to collect photos from a group of people? The free 'Send to Dropbox' service lets them email their images directly to your Dropbox folder.
Have you ever accidentally deleted an important file from your Dropbox folder, or pressed Save and immediately regretted it? Then you'll be glad to know that Dropbox automatically saves versions of your files from the last 30 days, letting you roll the clock back to an earlier version, or even restore a completely deleted file.
To find earlier versions of files, Control-click (or right-click) on one in your Dropbox folder in the Finder and select View Previous Versions. (In older versions, select Dropbox > View Previous Versions.) Or if you're viewing your Dropbox folder on the Web, choose Previous versions from the contextual menu. You'll see a list of numbered versions in reverse chronological order. Dropbox includes other useful information, too: who edited the file, the device on which that editing was done, the date the snapshot was made, and the file size. You can see the contents of any version by clicking its name (Version 44, for example). When you find the one you want, select the radio box next to it and click Restore at the bottom of the screen.
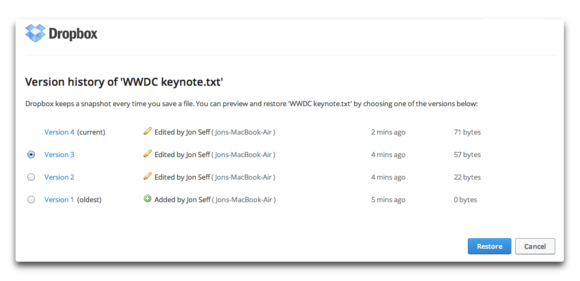 Dropbox automatically saves versions of your files from the last 30 days. Select one and click the Restore button to roll back the clock.
If you want to resurrect a deleted file, the process is slightly different. Visit your folder on the Dropbox website and click the trash-can icon immediately to the left of the search box. This toggles between showing and hiding all deleted files. Deleted files and folders appear in gray and with the Kind deleted file, deleted document, deleted folder, and so on. To bring back a file, click it and find the version you want. Then select that version and restore it.
If you end up using this feature a lot, consider signing up for Dropbox's $39-per-year Packrat service. It saves unlimited undo history and is available for Dropbox Pro and Dropbox Business users.—Jonathan Seff
Sent with Reeder
50 handy Office 2013 tips, tricks and hints | News | TechRadar
Export Active Directory User Information to Excel - Petri
10 purchases SMBs really need to make | TechRepublic
11 Habits You Need to Give-Up to Be Happy
Switch to Mac: Security basics | Macworld
Outgrown iPhoto? How to step up to Aperture | News | TechRadar