Anything that speeds up email communication in Microsoft Outlook has to be a bonus. Typing and retyping the same paragraphs, the same information, explanations, directions, instructions, and so on is half the problem—one that can be easily solved with these five, easy, time-saving tips.
1. Managing one or more signatures
You should never have to retype your signature line, even if you have multiple versions of your contact information—such as one for work, one for home, and one for your side business.
Open a new email, select the Insert tab, click the Signature icon, and choose Signatures from the dropdown list. In the Signatures and Stationery window, click New. Enter a name for this signature in the New Signature dialog and click OK. Type the contact information for this new signature in the Edit Signature box, click Save, then click OK—unless you want this signature to be the default. If you want this signature to print on every email, select it from the New Messages and Replies/Forwards list boxes under Choose Default Signature, and then click OK.
To insert a signature on your email, position your cursor, select the Insert tab, click the Signature icon, then choose one from the list. To change a signature, right-click anywhere on the current signature and select another one from the popup list.
JD Sartain
Save time and use custom email signatures instead of retyping your contact info.
2. Create an Outlook business card
The other option for a quick and more professional signature is to use a business card. Open a new email, select the Insert tab, click the Signature icon, and choose Signatures from the drop-down list. In the Signatures and Stationery window, click the Business Card button. In the Insert Business Card window, scroll down to the contact name you want added to a business card. When the correct business card appears in the Edit Signature box, click OK.
To insert a business card, select the Insert tab, click the Business Card button, then choose one from the list. The card inserts at the cursor position. Stay tuned for another article about how to customize your Outlook business cards.
JD Sartain
Add a custom business card instead of typing your contact information at the end of each email.
3. Use Quick Parts to create reusable text blocks
If you're retyping the same paragraphs or blocks of texts, then you'll really like this cool feature. Quick Parts (previously called Auto Text, and also called Building Blocks) is a way for you to copy and save blocks of redundant text into a Gallery where you can retrieve and insert them instantly into your current email.
Type a block of text that you use over and over, or locate a previous email with a message you've retyped a hundred times. Highlight the text block, select the Insert tab, click the Quick Parts button, then click Save Selection to Quick Parts Gallery from the drop-down menu.
In the Create New Building Block dialog box, type a name for your Quick Part block of text; skip the Gallery field (because you want this saved in the Quick Part Gallery). For Category, General is fine, unless you want to create some custom categories based on the types of text blocks you save. For Description, enter a brief description about this text block. Don't change the Save In field. And finally, select a placement option from the last field Options, and click OK.
JD Sartain
Save repetitive text blocks in Quick Parts to access and re-use over and over.
To insert a text block, select the Insert tab, click the Quick Parts button, then select the applicable text block from the list. The block inserts at the cursor position. You can also right-click the applicable text block and select an insert location from the list. in both cases, the text block drops into the email immediately.
JD Sartain
How to insert text blocks (Quick Parts) into your emails.
You cannot currently edit a text block in Outlook 2013. If you need to change the text in a block that's saved in the Gallery, you must retype and resave the edited text block, then delete the old one.
To delete an old or unused text block, select the Insert tab and click the Quick Parts button. Right-click the applicable text block and select Organize and Delete from the list. In the Building Blocks Organizer window, ensure the correct text block is selected, then click Delete > Yes > Close.
JD Sartain
How to delete old or unused text blocks for your Quick Parts gallery.
4. Make templates for repetitive emails
If you have multiple paragraphs, a full page, or several pages of repetitive text, forget the Quick Parts text blocks and create a Template instead. For example, proposals, bids, marketing info, product updates, client queries, and questionnaires are all "form" types of data that can be saved and reused as templates.
To create an email template, open a New email (or press Ctrl+Shift+M) and enter the "form" content, or open a current email with the content you want saved as a template. Select the File tab, click Save As, enter a template name, select Outlook Template from the Save As Type list, then click Save.
Note: Templates are saved in: C:\users\username\appdata\roaming\microsoft\templates.
To open and use your templates, select the Developer tab, then click the Choose Form button. In the Choose Form window, click the arrow on the Look In field box and select User Templates in File System from the list. Click your template, then click Open, and the template email opens immediately. If you need to make changes, edit the template you just opened and resave it using the same instructions above.
JD Sartain
Use templates to save and reuse long, full-page or multiple page emails.
5: Email your calendar
If you use your Outlook calendar to keep track of appointments, then this feature will come in handy. Instead of trying to plan and synchronize appointments with your friends and colleagues, just email your calendar directly to them.
Open a new email, select the Insert tab, and click the Calendar button. In the Send a Calendar Via Email dialog box, select the date range and click OK. The calendar drops in and shows your entire schedule for the data range you selected.
JD Sartain
Send your colleagues a calendar instead of typing out your schedule.
I was one of the first administrators to put Hyper-V into production, using the Windows Server 2008 version to power a startup hosting company just hours after it was released. I have been one the biggest advocates of Microsoft's hypervisor from its introduction, where I have stood in front of uninterested and aggressive audiences to evangelize Hyper-V. I was even told once that a team of VMware employees allegedly formed a team to attack me via social media. I have provided feedback to the Hyper-V product group over the years, happily seeing some of my contributions turn into something real. Since those early rough days, it's been a pleasure to see Hyper-V build on its reliability and performance and evolve into a cloud-scale virtualization platform that's fit for everyone from the largest cloud hosters and enterprises all the way to small business.
And this is why I need to talk about the elephant in the Microsoft datacenter. Hyper-V management has some real problems, as has been discussed by The Register recently, and has led to some strong feedback on Microsoft's User Voice site for Windows Server. Some who are familiar with me might have expected a strong response from me on The Register's article, but I actually agreed with the writer's sentiments.
Some might call me a Microsoft fanboy, but they would be wrong. I criticize Microsoft as much as I praise them, where there are some people at Microsoft who dislike me. But I've learned through my hobby of photography that constructive criticism is a tool that can be used to improve. This article explains what I think is the biggest weakness of Hyper-V and the Microsoft virtualization, cloud stack.
Hyper-V Management Tools
Let's look at an important question, what tools do you use to deploy and manage Hyper-V?
Windows Azure Pack (WAPack)
Windows Azure Pack is Microsoft's preferred cloud solution. I've attended several TechEd sessions on WAPack, and I've left not learning much other than you need a lot of stuff to make this work, and you need to put a huge investment in learning and deploying with WAPack. Quite honestly, WAPack is only for the largest of customers that need a true cloud that features self-service.
System Center Virtual Machine Manager (SCVMM)
I was once a huge advocate of System Center Virtual Machine Manager (SCVMM), but that started to change with the 2012 version. What I saw was a product that had some great ideas that were poorly implemented. The product is unstable, the UI is a nightmare from the minds of a Symantec designer, and the quarterly update rollups should come with a pharmaceutical-like list of possible side-effects, assuming that they were adequately tested, which they are not. Let's also not forget that you can only get Microsoft's answer to vCenter if you cough up an additional $1,323 per host for two VMs or $3,607 per host for unlimited VMs to get the complete licensing bundle of System Center. SCVMM cannot be purchased alone, which is why I no longer work with SCVMM, as no one in my market is buying it and few in the Enterprise Agreement market choose to deploy it.
PowerShell
PowerShell is the Microsoft vision for management. While visions are great, history shows us that visionaries usually get assassinated. I am a big fan of PowerShell, as I use it in all of my deployments, and I automate a lot of change with it. Although PowerShell really is a time saver, I am a realist. The GUI is here to stay — why? Well, we humans are designed for vision. Techies are normally people who visualize things, and their natural UI is a graphical one. If I want to explore, learn, teach, troubleshoot, and so on, then the GUI is where I do it best. For example, when Jeffrey Snover's demo of expanding a Nano Server cluster failed at Ignite, I probably could have solved that in very little time by using Failover Cluster Manager. Having said that, I also have a very nifty PowerShell script for creating a Hyper-V cluster while I make coffee!
Hyper-V Manager (HVM)
Hyper-V Manager (HVM) is a GUI tool that comes with Windows Server. It allows you to configure most features of core Hyper-V, such as host and VM settings, and virtual switch and virtual fiber channel configuration. If you are running non-clustered Hyper-V hosts, then HVM is your go-to tool when everything else fails. Combined with Event Viewer, you can diagnose those issues, which you might fix using HVM or with PowerShell. The few administration experience changes to HVM since Windows Server 2008 are mostly cosmetic.
Failover Cluster Manager (FCM)
If you want highly-available hosts, then Failover Cluster Manager (FCM) is great for managing your virtual machines, as well as being able to configure and manage clustering. This creates an issue for many newbies to Hyper-V, where they are unsure of whether to use HVM or FCM.
Hyper V's Core Issues
There are three issues at hand with managing Hyper-V, which include confusion, tool quality, and customer abandonment.
Confusion
Did you ever see a Microsoft fanboy give VMware a compliment? If there's one thing that VMware has gotten right, it's virtualization administration. VMware does virtualization administration through vCenter, which includes an easy-to-use GUI console that provides centralized administration of vSphere hosts, clusters, and virtual machines.
This is where some Microsoft defenders will say that the platform is irrelevant because it's all about the cloud. If the platform is dead, then don't come running to the likes of me when you want to know how to fix or troubleshoot your Hyper-V hosts or cluster. The cloud does not function without the hypervisor and the fabric, and it's folks like me that make that stuff function and work well.
What is Microsoft's answer to vCenter? The response is most of the solutions listed above, but there are simply too many 'what ifs' to consider when managing Hyper-V.
Sponsored
Tool Quality
As I said before, I am a huge supporter of Hyper-V and part of the reason is the quality of the hypervisor. I typically experience issues when trying to scale up the management of Hyper-V, where Microsoft advises to deploy SCVMM. Anyone using SCVMM has experienced a strange scenario, where they spend more time trying to figure out and troubleshoot SCVMM than they do in managing Hyper-V! A quality management product should be an enabler, provide feature discoverability, require little effort to use and be available to all markets. Unfortunately, SCVMM, and therefore the Microsoft stack, has failed in this regard.
Customer Abandonment
Ninety nine percent of all European businesses are small-to-medium enterprises with up to €43 million in turnover or balance sheet. I doubt that percentage is much different in North America or the rest of the world. This fact really does make me wonder why Microsoft chose to abandon this market to VMware when they made System Center unaffordable by removing per-product licensing and forced customers into licensing System Center using the SML bundle, doubling the cost of licensing a host.
Don't get me wrong, I can manage a Hyper-V farm perfectly well using HVM, FCM, and PowerShell. . . but I'm not the typical user of Hyper-V. Most find the mixture confusing, and many of the powerful features are lost to the perceived mystery of PowerShell.
My Wish for Hyper-V in the Future
Let me get this out of the way, nothing will change by the time that Windows Server 2016 is released because there's simply not enough time. If I had a wish, it would be that the various architects of Windows Server and System Center would sit down and completely re-factor the management of Hyper-V, the underpinning of the Microsoft private and partner-hosted public cloud.
The entire solution starts with SCVMM being deprecated. Maybe a Fabric Manager product is created to replace the role of deploying hosts and servers from System Center. My goal is that all management has a clear delineation between cloud and virtualization. We already know that Azure Stack is bypassing SCVMM using new providers to manage Windows Server 2016 Hyper-V, and this is perfect for cloud fabric and tenancy administration. PowerShell must continue as a way to script and automate deployment and configuration.
My biggest desire is that there is a single GUI for managing Hyper-V, replacing:
The current Hyper-V Manager
Failover Cluster Manager
The virtualization elements of SCVMM
My ideal Hyper-V Management Stack (Image Credit: Aidan Finn)
This new Hyper-V Manager, let's call it HVM 2.0, would be a part of Windows Server and manage everything from networking, storage, and clustering, all the way through to virtual machine deployment. Some of the foundations to make this possible are there in Windows Server 2016 Hyper-V, a new generalized administration model was added in TPv2 to abstract no-HA and HA VMs. HVM 2.0 would be the one tool to rule all Hyper-V hosts. And if one wants a cloud, then Azure Stack is deployed on top or side-by-side with HVM 2.0.
Sponsored
This approach would embody the "One Microsoft" mindset to have one consolidated effort for managing Hyper-V. The easy to understand tool for best managing Hyper-V would be available to all and quality would be more achievable.
I have been and continue to be a huge believer in Hyper-V. In my opinion, and that of others, it has become clear that the management of Hyper-V has become fragmented and has suffered over the years. It is time for architects to revisit the cost and experience of ownership of Hyper-V. If you agree, then please let your voice be heard.
Editor's Note: This blog post was originally published by Marius Vieth. It is being syndicated here with permission.
This is the story of how I wrestled with death twice to live for photography. Before I wrote this article, I told a couple of people about it since it means so much to me. Although some didn't understand how I could talk so openly about this topic, I decided that it's my duty to generate awareness and help others even if it means that I'm revealing my biggest weakness in front of the world.
Ever since I could think, I loved being creative. I drew a lot of pictures when I was younger and not one day passed where I didn't build something new with Lego or just another tree house. When I was a teenager, I wanted to apply my creative drive to as many outlets as possible. It all started with gaming, finding creative, daring strategies to win Counter-Strike clan wars. After a while, building my own maps fascinated me more than anything. I spent day and night coming up with my very own digital worlds to play in. Luckily, one of my maps even made it to the biggest gaming magazine in Germany. To maybe work in the gaming industry one day, I started with coding. If my grades weren't obvious already, this endeavor soon made me realize how math retarded I actually am.
I wanted to find something new, so I kept myself busy with film editing and Photoshop. It was fun, but being color-blind i.e. having a red-green weakness makes it way harder to work as a designer one day. I found something new then. Loving music more than anything else in the world, I lived the rock star life on the smallest of all stages with my bass and my punk band for a year or two only to realize: yeah, you may love music, but that doesn't translate well into creating it.
I left for university in the Netherlands in 2007 and during my college years this fun creative exploration all of a sudden had this bitter new flavor called real life. My biggest dream was always to work creatively. The only creative passion left was coming up with advertising ideas and slogans. Coming up with fun ways to advertise something always fascinated me. I applied for a side job in a marketing agency to pay my tuition fees and rent and learn more about it. It just felt so good. Getting payed for being creative. After a while the dream arose in me that I wanted to become the next Don Draper, the big shot creative director who's working for clients worldwide. At the end of my bachelor I applied for an internship at one of Germany most successful advertising agencies, passed the creative test and made it there in February 2010!
Completely overworked from my side job and my international study abroad, I burned out after 3 months and suffered from severe depressions and anxieties for the next half year. I couldn't write anymore, I couldn't live anymore and I just didn't want to be there anymore. I was scared to leave my room let alone the house. I was 21 at the time and couldn't handle seeing my dreams shatter in front of my young, innocent eyes. I thought I'll never be able to live my creative dream because I didn't have anything else that I felt on a creative level. I was utterly devastated and trapped in the infinite depths of depression. The grim reaper was breathing down my neck day in and day out. When you are depressed, he becomes your "companion" that doesn't leave you alone until you give in and kill yourself – or you take hundreds leaps of faith and kick his goddam ass!
Every day I did something I wasn't able to do the day before. Get out of bed before 6 PM, write two sentences, do the dishes, cook something, leave the house for a couple of minutes, do the groceries, talk to people again, continue with the rest of my bachelor study. It took me more than half a year to swim all the way from the bottom of this suffocating lifeless ocean of nothingness to the top again. I woke up into a nightmare every day with the grim reaper giving me a vicious good morning kiss for so long that I even felt sorry for him when I beat the hell out of him at the end of 2011.
He was gone. I was there again. I finished my bachelor's and was left with no creative career to pursue. The only thing I could do was for once in my life stop giving a crap. What I had left was my interest in analyzing things and doing research though. So I did that and poured all my energy into my minor in Psychology and my master's degree in Consumer Psychology. After the first weeks of living the badass researcher's life, my creative thirst was unstoppable. I had to do something!
My best childhood friend Felix bought a camera and showed me the photos he took. Although my father's urge to capture every second of our family vacations annoyed me to no end back then, I loved the idea of being able to express my feelings through photography. I bought my first camera.
I spent the next two years until the first half year of my market researcher job right after college with taking photos of nearly everything around me – without ever finding myself. I mean, it was fun and I always liked it, but it just didn't feel right. I took photos, but not of myself. I couldn't pour my eye, heart and soul into them. I was about to give up because I couldn't even take portraits and I still can't.
My old market research demanded so little energy on the creative side that I had to release it somewhere. At the end of 2012 I was about to quit photography and find something new that could be my creative outlet. I've been doing it for two years and I thought: if you quit, then go out with a huge bang. So without any preparation I started a 365 Project on January 1st in 2013, which is the day I signed up for Flickr as you still can see.
Being forced to find something every day I like to shoot, I stumbled upon my oasis called street photography soon. All of a sudden it made sense. All these years I loved to observe strangers in the city, the way they looked when they were under a street lamp or passing through a dark alley. I always loved it, but I never knew how to express it. I would love to draw or paint these scenes, but I paint worse then the elephants I saw in Chiang Mai Thailand after my Master's degree. So I never really gave it a try. After about 2 months I dedicated my 365 project to capturing strangers on the street and I've been doing this ever since. Till the end of the project this urge to live street photography and leave my safe and secure well-paying 9-5 job became bigger with every day.
During my travels in Israel and South Korea people were always asking me what I was doing for a living. I always said: "I doing market research for a living, but I'm actually living for photography!" After the 10th time of saying that, I couldn't look in the mirror anymore. When I came back from Seoul I told my supervisor: "That's it, I have to live my dream! I quit."
Since I didn't want to work with the galleries and art dealers that have been approaching me with their degrading conditions, I founded my own International Fine Arts Label NEOPRIME with my dear friend, highly talented photographer and business partner Martin Dietrich. We wanted to sell our art as signed and limited prints the way we wanted to see it: with the highest quality available on the market, 3% donations to worldwide charities for every sale (most of them go to depression help so far) and more than fair conditions for our signed artists. But doing this on your own with no art background, influential friends and almost no money was the biggest challenge I ever had to face.
I spent the next months building NEOPRIME from scratch with Martin and I burned through my savings with investments in the label and paying the rent. Although I sold a good amount of prints when the label launched in May 2014, it wasn't enough yet to keep me above water. A few months later me and my long-time girlfriend broke up and my dream of living life as an artist shattered again. Do I have to go back to my cubicle farm now? Will I ever make it? I love this so much, but it doesn't pay the bills enough yet. Since my ex-girlfriend stayed in our apartment, I had nowhere to go except for my parents.
There I was, 26 years old, broke, back again in this rural place that doesn't let me breathe in life and of course he came back: the grim reaper.
I was severely depressed again. Not as bad as the first time, but the grim reaper was hugging me with his cold, lifeless arms again whispering "I'm back, buddy" after giving me a kiss of death on the mouth. I sunk to the bottom of this 20,000-mile deep sea again. I though I'd never experience this again, but I did. Waking up to this nightmare, hanging out with death all day, not being able to live life and you know what the worst was: I didn't love photography anymore. It meant nothing to me. That's what depression does to you. It tells you that you are a failure. This sickness convinced me every day that because I couldn't live off my dream that I'm simply not good enough and it isn't meant for me. I couldn't take photos for half a year again till the end of 2014. That's why there is a huge gap in my Flickr during that time.
At this point I want to express my deepest gratitude to Martin who was managing NEOPRIME basically on his own during my sickness. Without him the label would've gone downhill and I'm so happy to have him as my friend, daily inspiration and label partner.
At the beginning of 2015 I knocked out the grim reaper after the 14th round with tears and blood all over my face. But I did it. I survived this horrible disease called depression again thanks to great medical help and loving friends and family. So if you are reading this right now and you have the feeling that you might be suffering from depression, get help no matter how stigmatized it may be in your country. Don't feel ashamed. It's a sickness just like diabetes, cancer or the flu. Talk to your family doctor, neurologist, psychiatrist, psychologist or your best friends and family. If you have no one to talk to, please send me a mail to marius[at]mariusvieth[dot]com and I'm there for you!
After every dark night comes a bright day and after every winter a beautiful spring. If you know someone who's suffering from depressions, bipolar disorder, schizophrenia or any other mental health problems, call them right now. I mean it. They need it more than anyone else. Tell them that you are there for them and that you and the world need them. I want to live in a world where everyone with mental disorders can speak openly about it like any other disease and get proper treatment. This article may reveal my biggest weakness, but if I can help one single person out there to feel only one tiny bit better, it was worth it!
I though a lot about life and photography and once I saw the light of life again, I saw photography again. I wanted to grab my cam, go out there and create art again. In order to truly live life as an artist, I had to go back to the one place where I never suffered from depression and where I always could be myself: the Netherlands. I moved to Amsterdam and after only a couple of days I couldn't have felt more at home. It's the most liberal and international city in the world. 187 nationalities under one roof, the most important thing here is loving life and being yourself and that was exactly what I needed to live fully through photography. So if you are ever in Amsterdam, let's love life together.
After my 21st international award recently and making it to the shortlist of the Sony World Photography Awards 2015, I sold more signed and limited print than ever before in my life. I realized again that maybe I'm not that bad of a photographer that depression made me think I am. I also realized that the only thing that keeps me healthy and alive is photography. I have to do this. I have to live this life. There's no plan B, no exit plan, no return ticket. Mark Twain once said that there are two important days in your life, the day you are born and the day you find out why.
I not only had to experience these two days, but also two deaths to find my passion and purpose. It may have been as hurtful as it gets, but I always look on the bright side of things and I'm happy to appreciate life even more now. Will I suffer from depression again one day? I don't know.
The only thing I know is that if the grim reaper ever decides to come back again, he better make sure that I'm as old and weak as it gets.
Dear grim reaper, you may take me then, but if you want to get me now, you better come with two blades, because this time you won't fight me alone!
PS: In order to show you how depression feels like, how I overcame it and the fears that came along with it, check out the following video I made. It also shows three highly effective methods to overcome your fear of capturing strangers, becoming invisible on the street and handling any kind of confrontation.
On the surface, searching with Spotlight is pretty straightforward. In my previous article, I explained how to perform basic searches, and how to access other Spotlight features. But if your search involves multiple terms, or if you need to narrow down your results to dig up a particularly elusive file, knowing how to put together a good search query will pay off.
By mastering a few simple tricks, such as using keywords to limit your search to specific dates, authors, or file types, you can narrow down your search to specific types of data, exclude terms, and more, helping Spotlight to locate exactly what you need.
Using the right words
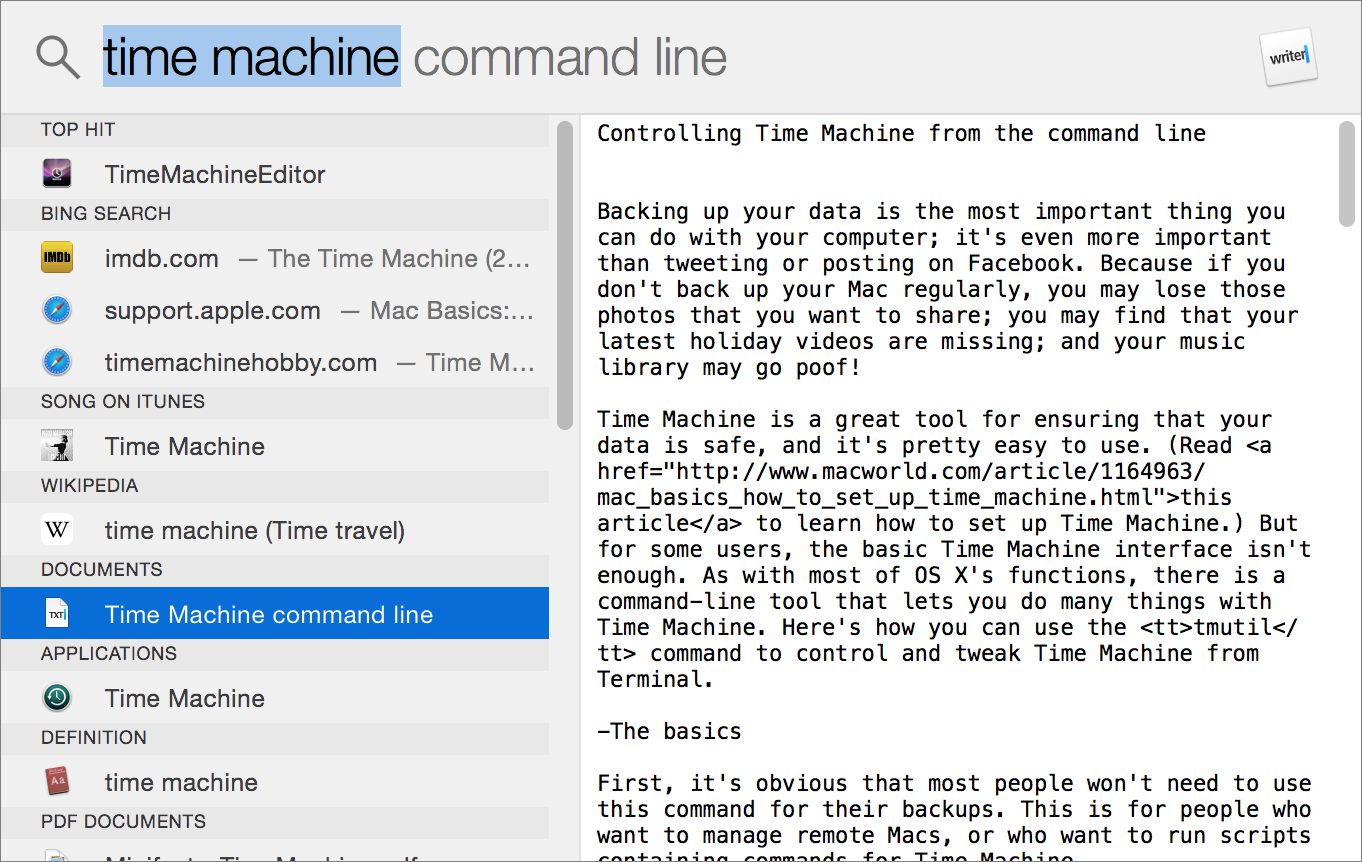
If you search for just one word in Spotlight, the results are pretty simple. But if you search for more than one word, things get a bit more complex. Type time machine in the Spotlight search menu, and you'll get a list of every file containing both words.
Every Spotlight query is an AND search by default. This means the program looks for files containing all the words you type. This search will turn up any files that mention Yosemite's Time Machine backup feature, but also an IMDB search result for a movie of that name, a Wikipedia article on time travel, an article I wrote a few years ago about using the command line to control Time Machine, but it may also find an email from a friend discussing the best time to swing by and fix a machine.
Type time machine in the Spotlight search menu, and you'll get a list of every file containing both words. If you use quotation marks around the term, you can limit the search to a much smaller group of files that contain the exact phrase "time machine".
You can narrow down the search results by using quotation marks; this tells Spotlight that the words must appear next to one another. If you type "time machine" Spotlight will look only for files that contain the exact phrase that you've typed inside the quotation marks. It will find Time Machine.doc and any file containing the term "time machine" but it will skip over your presentation on the evolution of machines through time. You don't even have to use both quotation marks; typing only the first one tells Spotlight that the words following it must appear together.
Use Boolean searching
Spotlight also supports true Boolean searching, which uses logical operators (AND, OR, and NOT) to pinpoint results.
For example, if you type "time machine" OR morlock, you'll get references to Yosemite's backup tool, as well as any files related to H. G. Wells's fictional species.
To find files that include time machine but make no mention of H. G. Wells, type "time machine" NOT Wells. When you perform a Boolean search, make sure to type operators in capital letters.
Use Metadata
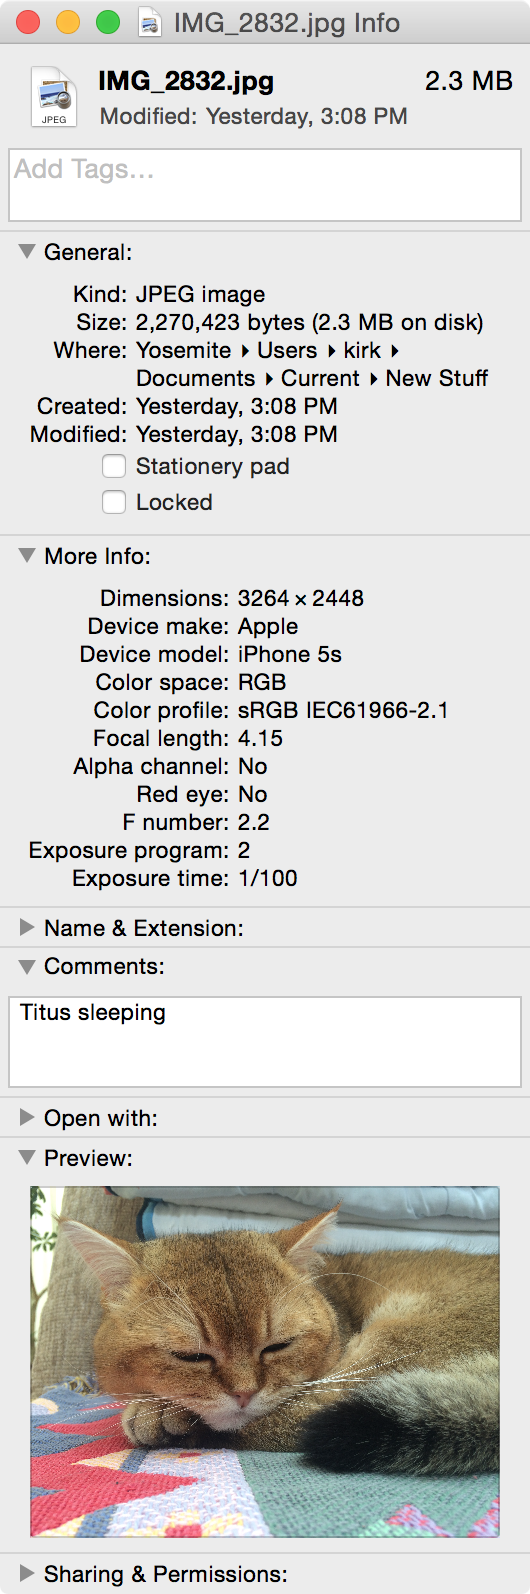
The Info window displays a number of interesting tidbits about this JPG file, including the camera and the focal length used to capture the image. You can also add your own keywords, that you can later use as search terms, in the Comments field.
In addition to scouring your files' names and contents, Spotlight peruses metadata; file information generated by the program or device that created the file. For example, a digital photo's metadata may include information about the camera used to take the photo and about how the photo was taken: the camera type, focal length, color space, exposure time, and so on. If you want to find all photos taken with a certain camera, just enter its name or model number in the search field.
To see what sort of metadata a file is storing, select it in the Finder, press Command-I to open the Get Info window, and click on the triangle next to More Info. However, you're not limited to the metadata you see here. You can add your own keywords to any file. In the Info window, click on the triangle next to Comments. In the text field that appears, enter any keywords that might help you in future searches, such as the project the file is related to or the last name of a person you associate with it.
For example, by adding the comment HouseProject to any files having to do with the purchase and remodeling of your new home, you'll be able to find all those files with one easy search. It's a good idea to use "HouseProject" rather than "House Project" because that way Spotlight only searches for the single, uncommon word, instead of finding every file with the words "house" and "project."
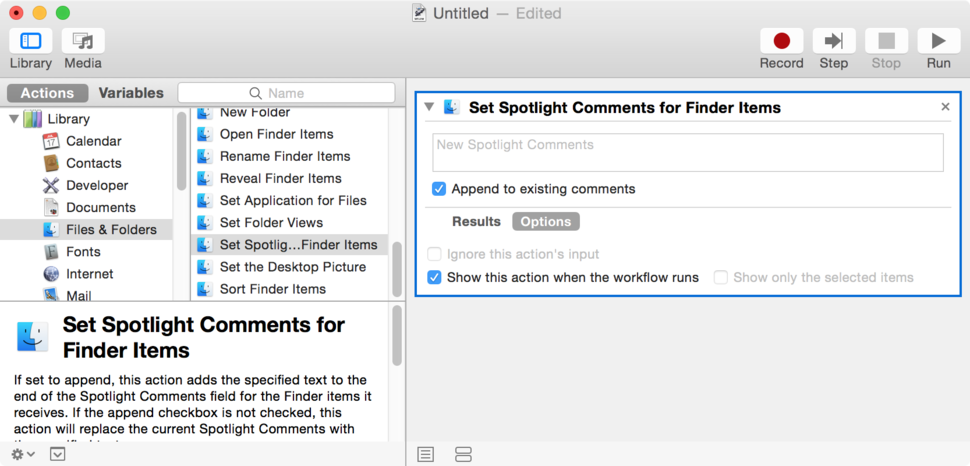
If you use this trick often, you may want to create an Automator workflow that lets you apply the same comment to multiple files at once. To do this:
Launch Automator. Create a new document and select Service for the type.
Select Files & Folders from the Library column.
Drag Set Spotlight Comments For Finder Items from the Actions list to the workflow pane.
Click on Options, and enable the Show This Action When Workflow Runs option.
Press Command-S to save the file, and choose to save it as an application.
To put your new Automator workflow to use, simply drag any files on its icon. A dialog box will appear, allowing you to add your comments to dozens of files at once.
Adding Spotlight keywords doesn't have to be a hassle. This Automator workflow lets you apply comments to dozens of files simultaneously.
Take advantage of keywords
Even when you know what you're looking for, you may get an overwhelming number of search results. To help limit searches to certain file types or time periods, use one of the many useful keywords that Spotlight understands. Place the appropriate keyword and a colon in front of your search term (but don't insert a space before the colon). Here how to take advantage of Spotlight's keywords.
Search for File Names: If you know the name of the file you're looking for, you can limit your search to file names by using the name:keyword. For example, when you type name:machine, Spotlight will find only files that contain the word "machine" in their names (though your search results may also turn up bookmarks, iCal events, and other items). As with regular search queries, you'll need to use quotation marks to identify phrases, such as, name:"time machine".
Find an Author: If you can't remember the contents of a file but you know the name of the person who created it, you can try using the author:keyword. To look for a document written by your boss, Herbert, enter author:herbert in the search field. There's just one catch: Spotlight will find only files produced by programs that save this attribute, such as Mail, iChat, Word, Excel, Pages, Numbers, and a few others.
Check the Date: Looking for a file that was created during a specific time period? Spotlight has a handle on dates. Typing date:today will bring up files you created, read, received, or opened today, including applications, if you have that category in your search results. You can also use the date:keyword with yesterday and tomorrow (for the latter, Spotlight can't tell which files you're going to use or create, but restricts its results to iCal events and to-do items).
You can also specify more parameters, such as whether a file was created or modified on a certain date, an exact date, or a range of dates. For example, you can type created:12/25/13 to find files authored on that date; this is a good way to find photos you took on a specific date. Type modified:<11/30/14 to look for files changed before that date; or type created:1/1/12-12/31/14 to locate files created between these two dates.
Search by Kind: One of the most useful ways to narrow down a search is by using kind:keyword. This allows you to restrict your list of results to a certain type of file. For instance, if you type time machine kind:pdf, Spotlight will pull up only PDF files containing the words time and machine. You can also limit your search to email messages, music files, System Preferences, applications, and more.
Spotlight can look for files created by specific applications, as well as certain file formats. Searching for kind:mp3 or kind:tiff will find files in one of those formats, and searching for kind:pages or kind:powerpoint will show only documents created in one of those programs.
For a list of useful keywords, see My Kind of Keyword, below. But remember, for the keywords to work, you must have the appropriate categories enabled in Spotlight's preferences.
Below is a suggested response and recovery plan so educational institutions are better prepared for incident management:
1. Assemble Incident Response (IR) Team:The response team should include top management including the Principal, Chancellor, PR Manager, IT Manager and anyone else who can contribute to issue resolution.
2. Identify What Has Been Impacted:Verify if the incident has actually happened and if the answer is yes, identify what has been compromised, how, and what the anticipated loss is. In most of the cases, the data breach happens through a combination of people, processes and technology.
3. Data Exposure Assessment:It is important to assess the data compromised and components of the data including names, addresses, telephone numbers, social security numbers and financial aid. As the first step, it is crucial to identify what all data is stored in the current systems and the second step is to classify the data as per their criticality. Even the identification and removal of unnecessary data lessens the burden on the system and helps to organize and improve data security.
4. Damage Control:Once the type and scope of data exposed is determined, it should be immediately resolved by deleting the shared email, destroying the copies, or whatever is possible. After that, steps should be taken to reduce the exposure of the impacted data for repeat threat.
5. Response Plan:The response team should create a proper response plan as the reputation and branding of the institute gets directly impacted by the amount of response time taken after the breach detection. If required, the impacted individuals should be informed about it including source of the breach, emergency point of contact, means to resolve their queries and compensation, if required. It is also mandatory in some states to inform governing authorities about data breaches as part of the Federal Law.
6. Act Now:Identify the lessons learnt from the incident and take necessary actions on immediate basis to avoid such situations from happening again in future, including implementation of various data loss prevention tools.
While the institute may have to spend time, money and effort in diagnosing and taking preventive measures for enhancing data security, any proactive measure taken will help in preventing future financial loss as well as the loss of reputation and trust.
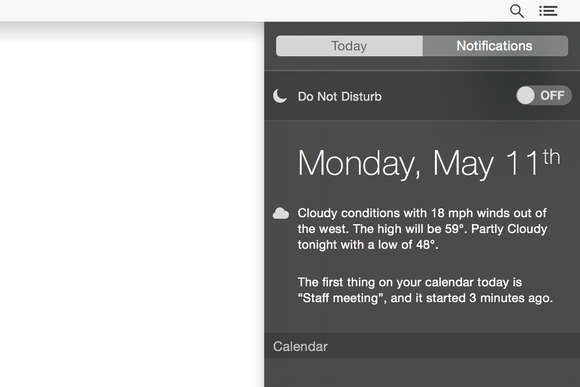
The Do Not Disturb mode can be activated and configured in System Preferences > Notifications, but you can ultra-quickly activate it in two ways.
Hold down Option (Alt on some keyboards) and click the Notification icon at the top right of the screen. The icon will go grey to indicate its in Do Not Disturb mode.
A system image, otherwise referred to as a hard drive snapshot, is an image of your computer at its current state that can be stored and applied to a hard drive at any given time. If you're a hardcore gamer, a computer enthusiast, or just a normal person who hates having to reinstall their operating system whenever there is a problem, having a system image of your files, programs, settings, music, and movies is a great way to quickly return to a previous stage of your computer's life.
There are a ton of tools you can use to do this, some third party and others built into the OS, but I will cover the ways I do it in my home for my PC.
Now, before we begin, I am going to write this assuming you are going to be setting up a computer with a fresh install of the operating system. You can follow these steps regardless, but just note that if you follow these steps and your computer is filled with viruses or the operating system is corrupt, well all that bad data will be saved.
What you will need:
A USB Flash Drive (with no data on it or one that is expendable)
Maybe an hour (depending on how big your hard drive is)
A storage disk to save the image (I'll be saving this to a USB stick but you can do an external drive, a secondary drive in your computer, or an image file to be migrated elsewhere later)
Once you have installed all the programs, settings, and have all the data you want, do the following:
1. Download Tuxboot and CloneZilla. CloneZilla will be the application we will use to create an image of the hard drive, and Tuxboot is what we will use to mount it to the USB Flash Drive so that we can boot to it.
2. Once these applications are downloaded, plug in the Flash Drive that you will be using and format it clean, as we will be using this Flash Drive for CloneZilla. Go to Windows/My Computer, and right-click on My Computer and select Manage. Select the disk (making sure you do NOT select C: drive or another drive you are using) and right click and format it to NTFS Quick, and give it a Drive Letter.
3. Open up Tuxboot. Once Tuxboot opens, click on the bottom and choose ISO and click the button to find the location of the CloneZilla live .ISO file. Once that is complete, make sure that the drive you are mounting CloneZilla to is the USB Flash Drive. Hit OK.
4. Reboot the computer and boot off of the USB Flash Drive. Go into BIOS. I don't know what key that is for your computer but it is either F2 or the DEL key by default. Once you are in, go into your BOOT section and manually boot off of the USB Flash Drive. This will start CloneZilla.
Steps 5-11
5. Choose the default CloneZilla Start option, choose your Language Keyboard, choose Do Not Touch KeyMap, and choose the first option: "Start CloneZilla Live." For expert users you may use Command Prompt but that seems overly difficult. This will bring you to the main screen. Those who are less familiar with open source tools may be unnerved by the lack of a pretty user interface. Have no fear, follow my steps and you should be fine.
6. The main window of CloneZilla will ask you to choose where to save the image of your computer. There are different options, Local Disk, SSH, Samba Server, NFS server, and WebDav Server. We are going to want to choose Local Disk. When you hit enter, a warning will pop up saying that if you want to use a USB device as storage, you should plug it in now. Plug in an External Hard Drive (if you're using one) if you have not done so already. Once that completes, CloneZilla will do a full system scan of all the hard disks associated with the computer.
7. The next window asks where you will want to save your image of your hard disk. Choose that drive now. I am using an External USB Drive to save my images to. If you have a secondary hard drive, make sure you choose the correct one. CloneZilla is good to point out the name of the HDD (if given in Windows) and shows the HDD size making it pretty clear what drive to use. After you have selected the hard drive choice, CloneZilla will ask you if you want to use a specific directory. Hit enter for Top Level unless you have created a Sub Directory that you would prefer.
8. Once the "Saved Directory" is chosen, we can now start to take a snapshot of our hard drive and save this to the external drive. At the next prompt choose "Beginner Mode." It's just easier and more straightforward. Then, what we are going to do is choose Save Disk. This will take an image of the whole disk as opposed to Saveparts (partitions), which will only take a segment of the drive. The next prompt will ask you to name the image. I've chosen "COMPUTER-BACKUP-(and date)." Press Enter.
9. Select the hard drive you will be taking an image of. I happen to know that my main drive is the Patriot Ignite 480GB, and CloneZilla will show it, again, by name and size.
10. Here is an important tip for beginners, you may see three drives listed if you have multiple partitions and the names will be shown as sdg, hdg1 and hdg2. You will want to choose sdg, which will represent the entire disk and all of your partitions (boot, C:, etc.).The next two prompts may be defaulted through as they are optional, but the options you can can choose are: Automatic Checking of Disk before the image process begins, and Encryption, which allows you to encrypt the image.
11. Once you pass through this you, the system will automatically start the process. It will take time, more or less depending on the type of hardware you are using, but mine took about 20 mins copying the image of an SSD drive to a USB 2.0 External drive. Then you have a full copy of your disk that you can restore onto another hard drive.
 JD Sartain
  JD Sartain
  JD Sartain
  JD Sartain
  JD Sartain
  JD Sartain
  JD Sartain