http://rss.nytimes.com/c/34625/f/640350/s/4b1d6126/sc/28/l/0L0Snytimes0N0C20A150C10A0C30A0Carts0Ctelevision0Cthe0Ex0Efiles0Ehome0Escary0Etv0Bhtml0Dpartner0Frss0Gemc0Frss/story01.htm
Aron
Brief message sent from a handheld device.
Friday, October 30, 2015
Mac Tips: 25 time-saving Mac keyboard shortcuts
TechRadar: All latest feeds Mac Tips: 25 time-saving Mac keyboard shortcuts

If you're clicking on the Menu bar all the time to get things done, you're putting in a lot more effort than you need to. OS X includes key commands for just about everything, so people who develop dexterous digits can make windows pop open and fly around the screen like they're hacking the Matrix or something. So your mission is clear: master the shortcuts below to save humanity from the robots.
We'll assume you know the ridiculously common shortcuts (y'know, Command + P to print, Command + S to save, Command + C/V to copy/paste, etc.) and skip ahead to some slightly more advanced stuff. A single shortcut can change the way you work for the better, so be sure to give our list a good look!
Note: Our picks pertain specifically to commands found in OS X El Capitan, but most of these shortcuts were introduced in earlier versions of OS X a long time ago. Another note: If you're using a Windows keyboard, substitute the Alt key for the Options key, and the Windows logo key for Command.
- Command + Space bar: Spotlight
- Command + Option + Escape: Force Quit an app
- Command + Tab: Switch apps
- Command + Shift + Tilde ( ): Switch windows
- Command + Comma: Open Preferences
- Fn + Delete: Forward delete (great for keyboards that don't have a dedicated Forward Delete key)
- Command + Option + I: Show/hide the inspector window
- Command + Shift + Minus sign (-): Zoom out
- Command + Shift + Plus sign (+): Zoom in
- Command + Shift + Question mark (?): Open the Help menu
- Command + E: Eject the selected disk or volume
- Command + Shift + I: Open iCloud Drive
- Command + Option + D: Show/hide the Dock
- Command + Shift + Option + Delete: Empty the trash while skipping the confirmation window
- Command + Shift + D: Open the Desktop folder
- Command + Shift + L: Open the Downloads folder
- Command + Shift + O: Open the Documents folder
- Command + Shift + R: Open the AirDrop window
- Command + Shift + U: Open the Utilities folder
- Command + Shift + K: Open the Connect to Server window
- Command + Brightness Down: Turn off display mirroring when using more than one display
- Command + M: Minimize the front window to the Dock
- Command + Shift + Q: Log out of your OS X user account
- Space Bar: Preview the selected item
- Shift + Control + Power Button: Put all displays to sleep
http://rss.feedsportal.com/c/669/f/9809/s/4b16a8f7/sc/15/l/0L0Stechradar0N0Cus0Chow0Eto0Ccomputing0C250Etime0Esaving0Emac0Ekeyboard0Eshortcuts0E130A78360Dsrc0Frss0Gattr0Fall/story01.htm
Sent with Reeder
Brief message sent from a mobile device
Friday, October 23, 2015
How to set up an iTunes library on a network-attached server
Macworld How to set up an iTunes library on a network-attached server
If you have a large iTunes library, you may have reached the point where you need to offload some of your media files to another drive. There are several ways you can do this. You can connect an external hard drive to your Mac, and use that to store your iTunes Media folder. If you use an iMac, this is probably the easiest choice. However, if you use a laptop, you may not want the hassle of connecting and disconnecting an external drive whenever you want to use iTunes.
Another option is to use a network attached storage device, or NAS. This is a storage device that your Mac connects to over your network—usually via Wi-Fi, but you can also use Ethernet—and that can give you vastly more storage, especially if your Mac has an internal SSD.
If you use both iTunes and another network device or app—such as Plex, a hi-fi media streamer, or Sonos' wireless home audio system—you can use the NAS to store media that other devices can access too. You won't need to ensure that your Mac is always on.
In this article, I'll discuss how you can set up iTunes to use a NAS, and I'll point out some issues you need to be aware of to ensure that iTunes works correctly.
Choosing a NAS
There is a plethora of NAS devices available, from simple, single-drive units to larger, multi-drive RAID-capable storage devices. Depending on your needs, you may spend a couple hundred dollars for a simple NAS without drives (you may have some hard drives you can recycle), or much more for a unit with five drives and RAID capabilities. Remember that if you get a simple NAS with a single drive, you still need to consider adding an additional external hard drive to back up the files on the NAS itself.
I recently bought a WD MyCloud Ex2 NAS. This two-bay device is available without drives, selling for around $159, and it allowed me to use two 2TB hard drives I had in a closet, having upgraded another storage device to 4TB drives. (The MyCloud is also available in versions with drives, with capacities from 4TB to 10TB.)
If you're going to choose a NAS to store your iTunes library, first consider what other way you can use the device. I use one of the hard drives on my NAS for my MacBook's iTunes library, and the other for Time Machine backups. Many NAS devices support Time Machine backups, so if you want a device for this purpose, check its specs.
The MyCloud, like some other NAS devices, also has an iTunes server feature, which lets you stream music from the device to a computer running iTunes or to an Apple TV. This means that any computer in your house can stream your media files, without the Mac whose library is stored on the NAS running.
Moving your iTunes library
When you've chosen your device and set it up, it's time to move your iTunes library. There are two ways you can do this, and each option has pros and cons.
- You can move just your media files to the NAS, and keep your iTunes library files on your Mac.
- You can move all your iTunes files (media and library files) to the NAS.
Move just your media files
In your home folder is a Music folder, and, in that, an iTunes folder. This contains a number of files, such as your actual iTunes library file, and some support files. There's also an Album Artwork folder (which caches artwork from your media files), and an iTunes Media folder, which contains sub-folders for different types of media: Music, Movies, TV Shows, etc.

These are the files in your iTunes folder.
If you move just your media files, then your Mac retains your iTunes library file, as well as some other files; all those in the screenshot above, other than the iTunes Media folder. The advantage to keeping these files on your Mac is that when iTunes updates its library file—which happens any time you make changes to any files in your iTunes library—this process won't be slowed down by your network. However, if you have a fast Wi-Fi router, such as a recent AirPort Extreme, you shouldn't notice any lag.
However, if you move just your media files, you must ensure that your NAS (or any external drive) is mounted when iTunes launches. If iTunes doesn't see that drive, it will search in your Music folder for your media, and won't find it. It will then switch the location of the media folder in its preferences to that local folder, and copy any new files there. And this gets messy.
If you want to move just the media files, do the following:
- Back up all your files; because accidents happen.
- Ensure that the NAS is mounted in the Finder.
- Create a new folder on the NAS; call it iTunes, or something similar.
- Launch iTunes, choose iTunes > Preferences, and then click Advanced.
- In the iTunes Media folder location section, click Change.
- Navigate to the folder you created in step 2 and click Open, and then click OK.
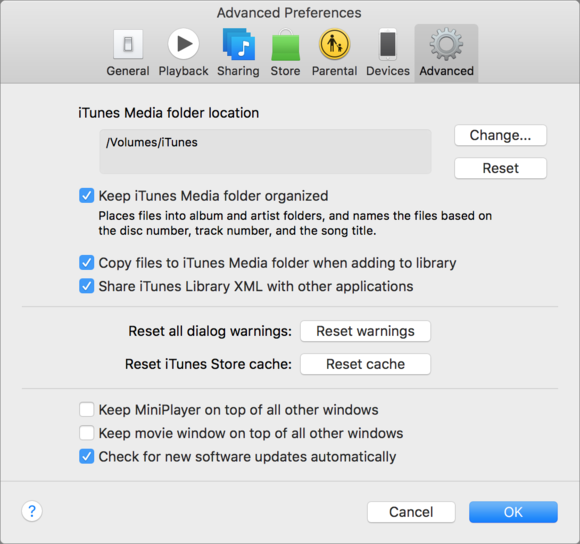
Change the location of your iTunes Media folder in the iTunes preferences.
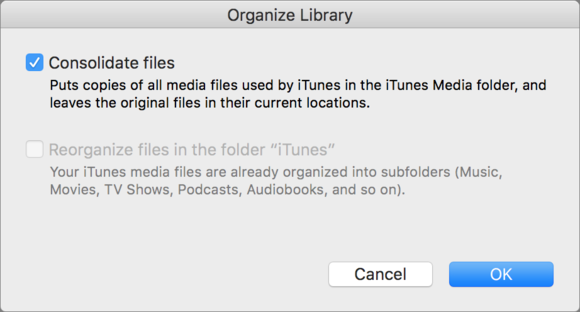
- Choose File > Library > Organize Library, and check Consolidate files. This tells iTunes to copy all the media files currently on your Mac to the new location. This may take a while, depending on how many files you have, and how fast your network is. This may mean allowing the copy to run overnight.


When the copy is finished, you can play music, watch movies, and listen to podcasts from your copy of iTunes as if the content was on your Mac.
One tip for this scenario: when the NAS is mounted in the Finder, open System Preferences > Users & Groups, and click your account. Click Login Items, and drag the NAS volume to that list. This ensures that your Mac mounts the volume when you start up your Mac and log in.
Move your entire iTunes folder
This is a simpler process. Just copy the iTunes folder in your home folder's Music folder to the NAS. As above, this may take a long time.
The first time you launch iTunes after the move has completed, press the Option key immediately after clicking the iTunes icon. Click Choose Library, and then navigate to the iTunes folder on the NAS. iTunes will then use this library, and, if it's not available on the network, will alert you. It won't revert its settings to your local drive.
However, if you have a slow network, you may have issues with searches and you may see a bit of lag when making changes to files or their tags. Also, you need to ensure that not only your media files but your iTunes Library file gets backed up regularly. Leaving the non-media files on your Mac ensures that Time Machine backs them up; putting all these files on the NAS means that you need to set up another backup routine.
What's next?
Once your iTunes media files (or all your iTunes files) are on the NAS, you use iTunes exactly as before. As long as the NAS is mounted, iTunes uses that library. The only difference you'll see is when you copy files to your iTunes libraries. You won't notice much delay with music files, but you'll definitely see that movies take a lot longer to copy to the NAS over your network.
Syncing to iOS devices will also be slower. Again, you won't notice this if you're only syncing some new music, but if you set up a new iOS device, and sync a lot of content, this will take quite a while.
Using a NAS, you can have a large iTunes library accessible from a laptop with a compact SSD, and, as I pointed out earlier, also access that content easily from other hi-fi streaming devices that can read files from a network volume. Just remember to back up your iTunes library on the NAS, especially if you've moved all your files to the device. If not, and you lose files, you may have trouble rebuilding your iTunes library and playlists.
http://www.macworld.com/article/2996002/streaming-media/how-to-set-up-an-itunes-library-on-a-network-attached-server.html#tk.rss_all
Sent with Reeder
Brief message sent from a mobile device
Monday, October 19, 2015
Black and white photography tips
TechRadar: All latest feeds Black and white photography tips

Set up your camera
Shooting great black-and-white images isn't just about converting your images in Photoshop or Elements, it starts before you press the shutter release.
Choosing the right subjects and lighting conditions is the first step, and bright sunny days can be perfect for monochrome shots. Next, it's essential to set up your camera correctly for the best results and get a better idea of how the final image will look before you shoot.
We can't promise that you can do everything to get stunning monochrome photographs in-camera, so you'll need to use some basic software techniques to improve your shots. Follow our advice, and you'll get better black-and-white results and save yourself time by using the right settings and shooting techniques.
Set up your camera
Shooting black and white when it's bright and sunny may seem counter-intuitive, but there are plenty of reasons it's a great option. Bright sunshine creates strong shadows, which produce really striking black-and-white images.
Similarly, fluffy white clouds against a blue sky can look stunning in black and white photography. However, the high-contrast light produced by intense, direct sunshine means that you have to pay attention to your exposure.
In general, you should try to keep detail in the highlights, in the same way that you would when shooting colour images.
Shades of grey
One of the trickiest aspects of shooting in black and white is understanding how the colours in the subject will translate into different shades of grey in your final image.
Selecting the monochrome Picture Style or Picture Control will give you the ability to see exactly how your shot will look.
Once you've selected the monochrome Picture Style, you can preview how the image will look by using Live View, rather than an optical viewfinder. You can also review your images in black and white to give you instant feedback for those that will work in monochrome, and those that won't.
Step by step: Use Picture Styles

1. Set the Picture Style
You can set the monochrome Picture Style or Picture Control in the camera settings menu of most cameras. For your first steps in black and white photography, leave it on the default settings, without any filters or toning applied to the image.

2. Switch to Live View
Using Live View or an electronic viewfinder, instead of the optical viewfinder, enables you to preview the scene in black and white. This makes it much easier to get a feel for how the tones and colours in the scene will translate in mono.

3. Take a test shot
Live View can give you a good idea of how the image will look, but you'll find that taking a test shot and reviewing it on the rear LCD will often make it easier to really assess the success or failure of the image in black and white.
Black and white photography: Choose your subject
The key to successful black and white images is a combination of finding the right subjects, the right lighting and using some simple camera techniques.
Let's start with how to spot subjects and scenes that will work well in black and white.
The first step is recognising the best lighting conditions. One of the essential elements for adding impact to your images is the contrast between light and shade.

Bright sunlight is perfect for creating dark shadows, which create strong lines and graphic elements for your mono shots. To make the most of the shadows, try shooting with the sun just behind the subject so that the shadows are in the foreground of your image.
You don't have to stop there, though, because you can also use these shadows as a subject in themselves. Shooting just the shadow, rather than the subject that has created it, can produce abstract and surreal black-and-white images.
Textures and tones
As well as strong graphic elements, the more subtle appearance of textures and tones can also help to add depth and interest to mono images.
Strong side lighting, on a bright, sunny day will help to bring out texture in the subject, while a softer, more diffuse light such as shooting when it's cloudy is best for capturing subtle tones.
Because you can't use colours to help the composition, black and white images can appear much flatter and less interesting than the scene in front of you.
Using the monochrome Picture Control will help you to get a good idea of how the scene will look in black and white, but remember that you can also add impact to your images by increasing the contrast.
You can do this both in-camera using the contrast adjustments in the Picture Style settings, or later on in your processing software. But even the most skilful image processing isn't a substitute for good camera technique, composition and the right lighting conditions for successful shots.
Top black and white photography tip: using the histogram display
When using the monochrome Picture Style, the histogram displayed on the camera is generated from the black-and-white JPEG image.
So, while it's still useful for assessing the overall exposure, when you open the raw file it will display the colour histogram.
How to learn what works in black and white
You can shoot any subject in black and white, but it's not always the best option.

Sunrise or sunset
You will lose much of the impact when the colours and tones are crucial to the mood of a scene, such as sunrise or sunset.

Colour contrast
Scenes that rely on strong colour contrasts such as the red poppy in this shot don't work well in mono.
How to take dramatic black and white shots
Back in the days of film, you could control the way that different colours were translated into black and white by using coloured filters in front of the lens.
These traditional filters don't work with digital cameras. Instead, you can alter the contrast of your black and white images by using the filter effects that are available in the monochrome Picture Style menu.
Filter effects
These filter effects give the same results as traditional filters, so they lighten areas that are the same colour as the 'filter' and darken areas of the opposite colour.
For example, using a red filter effect will produce a black-and-white image where the blue areas are dark, and yellow and red areas much lighter than an unfiltered black and white image.
You'll find all of these filter effects in the detailed menu in the monochrome Picture Style or Picture Control settings.

How to use real filters for black and white photography
There are two main types of filter you can use to get good monochrome results. The first is a polariser, which can help you to add contrast to skies and cut out reflections in non-metallic objects such as water.
These two effects will help you to get much more punchy, high-contrast mono images in-camera.
The other filter for shooting landscapes is a neutral density grad filter. This filter, which is half dark and half clear, is perfect for reducing the contrast between the sky and the foreground.

Like when shooting colour images, an ND grad filter enables you to avoid over-exposing the sky or underexposing the foreground in your mono shots.
This can save you loads of time processing and editing your shots to darken or lighten certain areas.
Top black and white photography tip: preset modes
You can create custom or user-defined Picture Styles on many cameras. You normally have to access the Save/Edit controls through the shooting menu, then select the monochrome Picture Style and the filter effect you want.

Some models give you the option to give this user setting a name, such as 'mono red filter' so you can easily find it among the other styles.
How to shoot infrared
The inky black skies and high-contrast look of mono infrared is a sure-fire way to give your images impact, but you need the right conditions, and a special filter to get the best results in-camera.
An infrared filter blocks out most of the visible light from entering the lens, but allows infrared light through, so it's almost impossible to see through the camera to focus, and your camera's meter will struggle to measure the infrared light accurately.
This means you'll need to use a tripod and compose your shot before you fit the filter to the lens. You should then set the focus and exposure manually.

Using an infrared filter will produce odd-looking results if you shoot in colour. The image will be completely red, with no other colours, so it's much easier to predict the end result and see the effects by shooting in a monochrome Picture Style.
Infrared filters
There are several types of infrared filter, in both square and round screw-in designs. On a standard digital camera they all have a similar effect.
Hoya produces the R72 in a range of sizes that screws onto the filter thread of your lens. Cokin offers the Infrared 89B for its three different systems, the A, P and Z-Pro. They shouldn't cost more than about £30 (around US$46, AU$64).
The key to shooting infrared black and white is the weather conditions, because this will influence how much infrared light there will be for you to shoot.
Infrared light is essentially heat, so there's much more infrared light around on a warm, sunny day than when it's overcast and cold. This means that summer is the ideal time to try infrared, especially when the sky is blue, and trees and plants have plenty of foliage.
Top black and white photography tip: Get the infrared look
You can get a similar look by applying an infrared effect in software. In Photoshop CS4 or later and Elements 11, select the infrared setting from the preset options in the black-and-white conversion.
You can fine-tune the effect to adjust how colours are converted.
Step by step: Infrared filters

1. Frame your shot
With the infrared filter over the lens it's extremely difficult to see through the viewfinder. This means that you need to put your camera on a tripod and then frame your shot before fitting the filter in place.

2. Fit the filter
Once you've fixed the camera in position, you can fit the infrared filter. If you're using one of the square filter systems, slot the filter in place without moving the camera. For a screw-in filter, you need to attach the filter carefully.

3. Set up the camera
Set the camera to manual focus, and also manual exposure mode. With the ISO set to 200, set an exposure of 10 secs at f/16. If you're shooting in bright sunlight Take a test shot and alter the shutter speed as necessary.
http://rss.feedsportal.com/c/669/f/9809/s/4acb73dc/sc/23/l/0L0Stechradar0N0Cus0Chow0Eto0Cphotography0Evideo0Ecapture0Cblack0Eand0Ewhite0Ephotography0Etips0E130A70A580Dsrc0Frss0Gattr0Fall/story01.htm
Sent with Reeder
Aron
Brief message sent from a handheld device.
Saturday, October 17, 2015
How to speed up your PC for free
TechRadar: All latest feeds How to speed up your PC for free

Speed up your PC for free
After a while, every PC starts to show its age. Programs that used to be lightning fast suddenly start to go slow, tasks that used to take five minutes now take 10.
Using your computer for anything in fact starts to feel like a chore. In short, a once-lovely machine becomes a liability, dragging your productivity through the dirt and wasting your precious time.
Fortunately, there's always a way to speed up a PC, whether it's a seven-year-old clunker or last year's model that's just starting to slow. You can even wring some extra performance out of a brand new PC if you know what to do.
In this article, we're going to share a whopping 31 ways to get more horsepower out of any PC, covering hardware, software and operating system tweaks.
Best of all, every one of them is completely free.
Operating system tweaks
The operating system you're using is the foundation of your computer, which means that even the fastest software will limp slowly if the operating system it runs on is sluggish and simply not up to the task.
Accordingly, the first place you should always look for speed-boosting tweaks is within Windows itself.

1. Change the power settings to high performance
If your computer seems like it's going slower than it should, check the Power Options menu in the Hardware and Sound section of the Control Panel and make sure you have the 'High Performance' setting selected.
On a laptop, Windows will sacrifice performance in the name of increased battery life, by putting components like hard drives to sleep faster, or even capping the maximum output of the CPU.
For fine-grained control over your PC's power settings, click the 'Change plan settings' link next to the power plan you've selected, then click 'Change advanced settings'.
2. Turn off Aero
First introduced in Windows Vista, Aero is the name for the set of interface eye candy that includes transparent UI elements and animated window transitions.
It makes post-XP Windows look slicker and more modern, but it can have a surprising effect on system performance. In particular, older systems without discrete graphics hardware can get a substantial performance boost by disabling Aero in the Appearance section of the Control Panel.
You'll miss out on a bit of graphical flair, but the actual functioning of Windows will be completely unaffected.

3. Manually set the processor priority level
Nothing will bring your computer grinding to a halt faster than a program that's monopolizing your processor. Even if your PC isn't actually locked up, other software you try and use will be miserably laggy.
When the resource-hogging program in question is something you actually need to let finish, it can leave you with no good option – you either don't let the program finish, or you give up on doing anything else until it's done.
Fortunately, Windows has an easy way to manually set processor priority. Just open the Task Manager, click over to the 'Processes' or 'Details' tab, then right-click on the offending program, and set the priority to 'Low'.
Now Windows will know to allocate resources to other programs first, and your original program will still be able to complete without a fuss.

4. Use resource monitor to spot the slow coaches
Speaking of the Task Manager, you should know there's a more powerful version of that tool built right into Windows 7, Windows 8 and Windows 10. Just open the Task Manager, then click on the 'Performance' tab.
Towards the bottom of that menu, you'll see a button to open the Resource Monitor. The Resource Monitor is an exceptional tool for finding the programs that are slowing down your PC, with very detailed usage charts for CPU, memory, hard disk space and even network bandwidth that they're taking up.
5. Clean up your startup folder
A major sign of a computer in need of maintenance is a slow boot time. If your computer takes forever to get started, it generally means you've got a lot of software starting up whenever your operating system starts, that's bad for a number of reasons.
First, it means Windows has to get more done before it finishes booting. Also, all that software running in the background drains system resources and causes an overall slowdown.

One of the best things you can do to speed up your PC is to use a free program such as Autoruns to examine what's starting up with your PC.
Chances are you'll find a lot of stuff on the list that shouldn't be there. Have a thorough look through it and disable anything you really don't need.
Other software tweaks
Software can be part of the problem or part of the solution. Some programs are well-intentioned, but make your whole system slower, while others are actively malicious.
On the other hand, the right software can help you reclaim lost speed and keep you safe. In this section we'll look at both.
6. Clear up wasted space with CCleaner
It never pays to be a software hoarder. As with the startup folder items described in the previous tip, excess installed software eats up your hard drive space and jams up your Start Menu, context menus and more.
You can try and uninstall unnecessary programs by hand, but it's a lot easier with the aid of an uninstaller app such as CCleaner, which presents a list of your installed applications, and lets you perform one-click uninstalls.
7. Do a malware scan
If your computer has experienced a sudden and dramatic slowdown, the most likely culprit is malware. Even if you're sure you never installed anything untoward, it's a good idea to periodically run a malware scan.
You can't go wrong with Malwarebyte Anti-Malware, which is an excellent free anti-virus program.
8. Drop the commercial antivirus
These days, commercial antivirus is likely to cause as many problems as it fixes. If you keep Windows current, then the included Windows Defender antivirus will be enough to protect your computer from common attacks.
Practice basic web safety (don't open email attachments from people you don't know, etc.) and you'll stay safe without any security bloatware.

9. Make sure Windows is always up to date
As described previously, you have to keep Windows current in order for Defender to do its job. Automatic updates might be a pain when they happen, but you'll save time in the long run if you keep your computer secure.
You can find Windows update settings in the System and Security tab of the Control Panel.
10. Update your video driver
Most drivers are handled automatically these days, but you should still regularly check your video driver is up to date, especially if you plan to do any gaming.
The video driver is performance-critical, and can be the source of a lot of in-game glitches.
Additionally, updates are frequently published that increase speed in newly-released games, so check back often and you might be pleasantly surprised.
Reinstall Windows or another OS
Most of the issues that slow your computer down can be fixed with a little TLC. As we've been discussing, malware can be cleaned up, application clutter can be pruned and so forth.
Still, sometimes a computer can become so completely, utterly hosed that no amount of maintenance can fix it. The only way to un-hose such a machine is to start fresh with a new Windows installation.
If you've reached that point with your computer, here's a few things to keep in mind as you reinstall Windows.
11. Reclaim your product keys
It's frustrating to reinstall your OS only to realise you've forgotten a CD key and can't reinstall important software.
A program such as Enchanted Key Finder can automatically find most or all of the active CD keys on your system. Especially for industry-level applications like Photoshop, you should manually deactivate your software before uninstalling, in order to save yourself time later on.

12. Make a recovery disc
Make your life easier next time you have to reinstall by creating a recovery disc of your newly-clean PC.
In Windows 8, you access the recovery media utility by opening the Start screen, typing "recovery" and selecting the option labelled "Create a recovery drive".
The recovery drive will allow you to restore your computer to exactly this lovely fresh state without having to do a full reinstall.
If you're using Windows 10 then check out our guide on how to create a Windows 10 recovery disk.
13. Back up your files
This goes without saying, and is something you should be doing anyway. Make sure you've got all your important files backed up to an external drive or the cloud.
Even if your files are on a separate partition from your Windows install, it's better to be safe than sorry.

14. Minty fresh
You could also try a shiny new installation of a free alternative OS from the Linux family. Linux OSes are lighter-weight than Windows, and generally have much easier system requirements.
You can install one as a secondary OS, and only boot to it when you want a more minimal desktop experience.
If you've never tried Linux before, it might seem daunting, but it's actually not that tricky with today's user-friendly Linux distros. In fact, the hardest part might be picking which distro (a specific Linux-based operating system) to install.
For years, the standard recommendation for newbies has been Ubuntu, which is polished, well-supported and very user friendly.
It's still a great option, but lately we've taken to recommending Linux Mint instead. Linux Mint is based on Ubuntu, and offers the same professional-quality experience and easy installation.
Where it differs is in the user interface – the UI in Mint is a little more minimalist and will be more familiar to those coming from Microsoft operating systems.
There will obviously still be a learning curve, but you can generally get set up with a fully functional Linux desktop in an afternoon. Check out our guide on how to install Linux to get started.
Try different apps
Sometimes the best way to get a quick performance boost is to replace an often-used piece of software with a speedier alternative.
That can mean giving up some functionality, but more often than not that's a tradeoff worth making. Here are five common apps you might replace:

15. Internet Explorer
It used to be the case that the best advice you could give someone regarding their web browser was to drop Internet Explorer as fast as humanly possible.
Fortunately, IE isn't the absolute stinker it used to be, and IE 11 is actually very competitive in some benchmarks, such as JavaScript performance, where it blows away the competition.
Still, for most common browsing, you're going to see a speed increase if you switch from IE to Chrome or Firefox. Chrome is arguably the fastest of the bunch overall, but it's also noticeably more system resource intensive than Firefox, so if you're trying to speed up an old PC, the latter might be a better choice.
16. Microsoft Word
Microsoft Word is the industry standard for text editing, but its expansive feature set comes at a hefty price to your system's resources.
Ask yourself if you really need everything that Word has to offer, and if you wouldn't be better off using an alternative.
If you need a full-featured word processor with a smaller footprint, you can try Writer, part of the LibreOffice suite of free Office replacement applications.
It offers nearly all the features of Word, with a much lighter set of system requirements.
If you want to do some very light writing or note taking, consider the WordPad app that comes installed with Windows – it's low on features, but very fast.
17. Photoshop
Adobe's Photoshop is another widely-used app that can put a major strain on your system resources.
If you're using an older system that's not up to running Photoshop CC (or if you just want to save a lot of cash), check out GIMP. It's an open-source image editor that can do almost everything Photoshop can.
The interface is a little clunky and has a steepish learning curve, but GIMP will run much better on old PCs than newer versions of Photoshop.
18. Adobe Reader
Not to spend too much time harping on about Adobe, but the basic PDF Reader is one of the slowest, most frustrating pieces of software on your computer.
You wouldn't think something as simple as displaying a multimedia document (which your browser does in fractions of a second) would be slow and require a bulky install—and it doesn't have to.
To reclaim lost speed, install the alternative, a free version of Foxit reader. It has a nice interface, takes up very little disk space, and runs faster than Adobe Reader.
19. Replace Windows Media Player with VLC
Speed is only one of the many reasons to replace the default Windows Media Player with a different application, such as VLC. Though VLC is quicker to start playback on media files, the real time savings come from the app's flexibility.
Watching a video in other players can be a stop-and-go experience involving tracking down codecs or differently-formatted media files. With VLC, you know most any file will just work, and it'll work fast.
Also with Windows 10 Microsoft has stopped including Windows Media Player, so you have the perfect excuse to move to VLC.
20. Hand-tune graphics settings in games
If you're experiencing slowdown in games, make sure you're taking advantage of customisation options available in the preferences menu.
Lowering resolution is the obvious way to get better performance, but make sure you're looking at other options as well – turning down anti-aliasing or shadow quality can make a huge difference.
21. Customise your graphics settings automatically
Try out GeForce Experience (for NVIDIA GPUs) or AMD Gaming Evolved, both of which automatically tweak game settings.
They profile your hardware, then consult a constantly refined database of hardware data to suggest optimum settings, without any trial and error.
22. Learn to love jumplists
Introduced in Windows 7, jumplists are a fast way to access recent or frequently used documents or features of programs. Instead of left-clicking on an icon to open it, right-click on it instead – you'll see a context-sensitive list of shortcuts or documents for that program.

23. Free up disk space
Freeing up hard drive space won't always make your computer faster, but it can make a big difference if your drives are almost at capacity.
If you're having a hard time figuring out what to delete, use a free drive visualiser such as WinDirStat to pinpoint greedy programs and docs.
24. Clear up unnecessary browser extensions
It's great how extendable modern browsers are, but it's easy to slow down your web browsing by installing too many add-ons and extensions.
Go into the settings for your browser, and make sure you actually use any active extensions. If you have a toolbar that you can't figure out how to uninstall, try CCleaner.
Hardware tweaks
If you've never done it before, overclocking might seem like black magic. the practitioner delves into the shadowy, mysterious world of the BiOS, tweaks some arcane symbols, and when they resurface, the PC is somehow faster.
But the truth is, anyone with the right hardware can overclock with just a little patience.
25. Overclock your CPU
Before we get into the process, we should point out that only certain CPUs can be overclocked, so you should do a search to see if you have an 'unlocked' processor.
The basic rule for recent Intel processors is that CPUs with model numbers ending in the letter "K" are unlocked.
Check out our how to overclock your CPU guide for the full details on maxing out your processor.

26. Overclock your GPU
For a gaming PC, your GPU performance may well be more important than your processor's. Most modern games are GPU-bound, so eking a little more performance out of your GPU will have a more dramatic effect on your gaming experience than a similar improvement in the CPU.
Head over to how to overclock your GPU to see a step-by-step guide to boosting your graphics for free.
27. Defrag hard drives
One of the oldest computer tricks in the book, defragging your hard drive isn't quite the performance booster it used to be. For one, more and more computers now come with SSDs, which do not benefit from defragging.
Also, Windows 7 and 8 defragment on an automatic schedule, so it's unlikely your drives are fragmented if you use one of those systems. On older versions of Windows, fragmentation can still slow your hard drives down, so it's worth running a disk defragmentation program, such as the built in Windows Dfrg.msc or the free Defraggler.
28. Keep it trim
SSDs don't need to be defragged, but there is one optimisation that can make a big difference, called TRIM support. TRIM prevents an SSD from slowing down as it gets filled with data, and increases its expected life span.
The good (or bad) news is that Windows 7, Windows 8 and Windows 10 automatically enable TRIM for SSDs, so you won't be able to get a speed boost there.
However, if you're running Windows XP or Vista, it's definitely worth enabling it. To do this, you'll have to use the third-party management software available from the manufacturer of your SSD.
29. Clean out fans
Not every problem that slows your PC is a high-tech one. Old-fashioned dirt and dust can build up, blocking fans and vents. It may seem trivial, but a jammed vent can cause your PC to overheat and chug.
Airflow obstructions are especially likely in homes with hairy pets. In the worst cases, high heat will cause your components to degrade faster. Get in there with a can of compressed air and make sure nothing's blocking your vents, fans or the fins of your CPU cooler.

30. Adjust USB storage for better performance
If you have an external USB drive you frequently transfer data to or from, you can get a small speed boost by disabling write caching on the drive.
The drawback is that write caching protects USB drives from data loss if they're removed in the midst of a transfer. If you're willing to make sure to press the 'safely remove drive' button every time, you can improve performance by opening the Device Manager, navigating to the drive, then right-clicking it and opening the Properties menu.
In the Policies tab, click 'Better Performance'.
31. Run a smart test
Hard drive failure is one of the most alarming things. Even with a back-up strategy (which you have, right?) the temporary loss of your data is a major inconvenience.
Save yourself some time down the line by running a SMART test on your hard drive – a process that will help you identify soon-to-fail drives. Just download a free SMART diagnostic tool like CrystalDiskCheck, and run it to test your drive.
If the drive fails any of the tests, it's time to get a new one.
http://rss.feedsportal.com/c/669/f/9809/s/4ac07e96/sc/15/l/0L0Stechradar0N0Cus0Chow0Eto0Ccomputing0Chow0Eto0Espeed0Eup0Eyour0Epc0Efor0Efree0E130A69710Dsrc0Frss0Gattr0Fall/story01.htm
Sent with Reeder
Brief message sent from a mobile device
Tuesday, October 13, 2015
Introducing Microsoft Azure Backup Server
Petri IT Knowledgebase Introducing Microsoft Azure Backup Server

Microsoft announced Project Venus at the Worldwide Partner Conference earlier this year. Venus is a plan to gradually improve Microsoft Azure Backup, a cloud backup service that's based on low-cost block blob storage. Microsoft recently released the first phase of Venus, the Microsoft Azure Backup Server (MABS), which will expand what Azure Backup can protect from your on-premises infrastructure and offer an on-premises local backup repository. I'll explain what this product is in this article.
A Look at Azure Backup's History
I like the potential of Azure Backup, but like Azure Site Recovery (ASR) when it was launched, Microsoft's cloud backup service wasn't suitable for the market that's most likely to use it — the small-to-medium enterprise (SME). I was one of many that gave Microsoft feedback on these kinds of services, and I wanted an integrated solution that works best with my on-premises infrastructure and fits in with my plans for the cloud. Azure Site Recovery started to evolve late in 2014, and it's a superb solution both for SMEs and large enterprises, whether they have vSphere, Hyper-V, or physical machines running Windows or Linux. A similar change has started to happen to Azure Backup, too.
What has been missing from Azure Backup up to now?
- Support for SME: The focus of Azure Backup hybrid backup services for on-premises solutions was on customers with System Center Data Protection Manager (DPM). Unfortunately, DPM is licensed via the System Center Server Management License (SML), which is unaffordable for SMEs, as the sales of System Center to SMEs flat-lined in early 2012. And of those customers buying System Center, most choose an alternative backup product, most of which do not offer good or any hybrid backup solution with Azure.
- Service Support: Azure Backup without DPM can only backup files and folders; the MARS agent is very limited at this time.
- There is no cloud portal: Hybrid backup is managed on each machine that the agent is installed in if you do not have DPM.
Project Venus aims to solve all of these problems. But this is a big project, so improvement will be gradual. Microsoft wanted to solve a big issue, where they wanted to allow SMEs to back up more than just files and folders.
Sponsored
Microsoft Azure Backup Server
Microsoft quietly released Microsoft Azure Backup Server on October 5th and modified how the Azure Backup cloud service will work for on-premises customers. You can download MABS directly or using a link from an Azure backup vault. What is Microsoft Azure Backup Server? When you install, you'll get:
- SQL Server 2014: A free license of MABS that you can only use for MABS.
- The MABS: A customized version of System Center Data Protection Manager 2012 R2.
Microsoft Azure Backup Server can only be used by Azure customers, and the setup requires you to provide backup vault credentials. Although the Microsoft Azure Backup Server licensing is free, you'll need a Windows Server license to run it on.
Microsoft Azure Backup Server offers:
- On-premises backup: The ability to backup services on-premises and store data locally on disk. There is no support for tape drives, so you'll need the full DPM license for that.
- Online Backup: You can select a subset or all of the backup data in your local repository and forward that, up to twice per day with throttling controls, to an Azure backup vault. This offers up to 99 years of retention.
- New service support: You can protect anything that DPM can, such as clients, Hyper-V, SQL Server, Exchange and SharePoint. And didn't Microsoft announce that vSphere support will be coming to DPM in the future?
So what you get with Microsoft Azure Backup Server is disk-disk-cloud backup with centralized local management and economic cloud-based off-site storage. All you need is an Azure subscription to back up to, some hardware and virtual capacity to install Microsoft Azure Backup Server, and a Windows Server license.
System Requirements
Below are the system requirements for Microsoft Azure Backup Server:
- Windows Server: Windows Server 2008 R2 SP1, Windows Server 2012, Windows Server 2012 R2
- Processor: Minimum: 1 GHz, dual-core CPU, Recommended: 2.33 GHz quad-core CPU
- RAM: Minimum: 4GB, Recommended: 8GB
- Hard Drive Space: Minimum: 3GB Recommended: 3GB
- Disks for backup storage pool: 1.5 times size of data to be protected
Also note that DPM and MABS require space for a scratch space; this is a folder that has enough capacity to temporarily store the largest restore from the cloud.
Sponsored
My Thoughts on Microsoft Azure Backup Server
Microsoft Azure Backup Server is a great start to Project Venus. SMEs that have the capacity to install Microsoft Azure Backup Server will now have the ability to backup all of their valuable Microsoft services to Azure. I know it's not perfect yet, as there's no cloud-based portal, and it does require Microsoft Azure Backup Server to be installed locally. But we should keep in mind that this is just the start of Microsoft Azure Backup Server, and, based on my conversations, the Azure Backup team now has a great understanding of the potential of the SME market and what the requirements are to displace incumbent competitors.
The post Introducing Microsoft Azure Backup Server appeared first on Petri.
http://feedproxy.google.com/~r/Petri/~3/s_X3dyboErA/introducing-microsoft-azure-backup-server
Sent with Reeder
Brief message sent from a mobile device
Friday, October 9, 2015
The A Through Zs Of Managing SMB IT
The A Through Zs Of Managing SMB IT http://cbspulse.com/2015/10/09/a-through-z-managing-smb-it/
10 legal areas that IT managers should know about
10 legal areas that IT managers should know about http://www.techrepublic.com/blog/10-things/10-legal-areas-that-it-managers-should-know-about/
Friday, October 2, 2015
Review: OS X 10.11 El Capitan
TechRadar: All latest feeds Review: OS X 10.11 El Capitan

Introduction
Following a period of public beta testing, Apple's latest desktop OS refresh has arrived in its official capacity in the form of OS X El Capitan. While the changes in El Capitan are a far cry from the sweeping visual refresh that came in-step with 2014's Yosemite update, that doesn't mean Apple has skimped out on providing a solid delivery.
It's much better to think of El Capitan as an OS X update that adds some spit and polish to Yosemite while also providing some convenient tweaks and features. And despite some minor pain points, Apple has succeeded in that respect.
If you're wondering whether you should make the leap from Yosemite to El Capitan, the answer is ostensibly yes. That being said, let's take a deeper look at Apple's latest, including its highs and lows, to see why you should consider the upgrade.

Interface
Upon first booting your Mac back up after installing OS X El Capitan, you're not going to notice many visually apparent changes. El Capitan largely carries over the same flat, iOS 7-inspired design cues that arrived with Yosemite, and, frankly, that's a good thing.
You are likely to see to changes if you're astute and do a little poking around. The first, and most aesthetically pleasing change is the adoption of a new system font. Yes, after initially switching to Helvetica Neue in Yosemite, Apple has once again switched things up with its own, specially designed font called San Francisco that also appears in iOS 9 and on the Apple Watch. Overall, this is a welcome change that only further unifies the Apple ecosystem.
The second main interface element change you're likely to notice also happens to be one of convenience. Now, if you're struggling to find your mouse cursor, simply wiggling the mouse back and forth will cause the cursor to temporarily inflate in size. It's an extremely minor detail, but it's a nice change that keeps with Apple's focus on the little things in El Capitan.
Split View and Mission Control
General interface sameness notwithstanding, Apple has managed to bring some pretty major changes to multitasking in El Capitan. On the minor side of things, the new Mission Control features few tweaks that clean things up a bit.

Now, when you swipe up with three fingers on your trackpad, you'll notice that Mission Control's overall view of your open windows is more spread out. The multitasking feature no longer overlaps windows, which could make it a bit easier to spot the window you want at a glance.
Meanwhile, the Space Bar at the top of Mission Control now features labels, rather than thumbnails by default. Thumbnails aren't totally gone, however, as hovering over the labels will give you a peek at the thumbnails. And as an added bonus, you can now drag windows up to the Space Bar to create new desktops.
None of the Mission Control changes are what I'd consider essential, but they aren't off-putting either. Where multitasking has really taken off, however, is with the new Split View.
Anyone who has used a Windows PC in the last half-decade will be familiar with Split View. The feature essentially lets you more easily manage side-by-side windows on your desktop with a couple of clicks, rather than going through the cumbersome process of manually resizing each window.
There are a couple of different methods for accessing Split View. The first involves clicking and holding on the green full-screen icon in the upper-left corner of a window. One side of your screen will then turn blue and you can then drop the windows on that side. After that's done, OS X will show you other open Split View-compatible apps that you can then drop on the other half of the screen.

The second method involves the Space Bar in Mission Control. If you have an app already expanded to full screen, you can swipe with three fingers to open Mission Control. From there, you can drag a compatible app up to that desktop in Space Bar to add it in Split View.
Overall, Split View is a fantastic step forward for multitasking on OS X. However, already being familiar with Microsoft's implementation of Snap in Windows, I do have one misgiving about Apple's methods. Just getting apps into Split View feels like it takes too many clicks, and I would have liked to see Apple move more towards a "drag-and-snap" method. That being said, it's still a great feeling to know I don't have to manually fiddle with a window's size and position to work on two things at once.
Spotlight
Another area receiving some big love in El Capitan is the improved Spotlight Search. We saw Spotlight get a touch-up in Yosemite, but El Capitan works to bring it in-line with its counterpart on iOS.
Spotlight in El Capitan can now pull from more sources for data, bringing you weather, stock, and sports information directly to the Spotlight Search box with a click on the menu bar.
Perhaps the largest change to Spotlight, however, is the addition of natural language recognition. Essentially, this means you can ping Spotlight with complex queries like "emails from Bill in June" or "documents I edited last week." This also extends to Spotlight's new web sources, allowing you to enter phrases like "what's the weather in Cupertino."

There's no doubt that the Spotlight Search's new smarts are a vast improvement over its previous iterations, but I found the natural language input to be a bit finicky with how I worded things at times. Additionally, while Apple has brought Spotlight a little bit closer to its iOS counterpart in El Capitan, I can't help but feel it's high time to go all-in and bring Siri to the desktop. After all, what's more natural than simply asking a question with your voice?
Notes
The diminutive Notes app has perhaps seen some of the biggest changes of any stock app in El Capitan. Whereas Notes was previously a pretty barebones affair, it is now expanded with the ability to add new types of content, more ways to format your notes, and more.
Users now have the option to add videos, PDFs, and Maps locations to notes, making it that much easier to flesh out your ideas. In tandem, Apple has expanded Notes to be an option in the Share Sheet across many of its own apps – something developers also have access to – so pulling that content in is a smooth as a couple of clicks.

To keep track of these elements, the Notes app now includes an attachments browser, which provides a running list of media elements you've attached over time. Combine that with the ability to finally add proper checklists (as in, you can actually check items off), as well as the addition of a third "categories" pane, and it's hard to complain about this update. Some users will still flock to third-party solutions like Evernote and Wunderlist for their needs, but the stock Notes app is now much more viable.
Safari, Mail and Maps
Though its changes are minor (on par with the rest of the OS), Safari has caught up with the competition in some respects as well. First and foremost is the addition of site pinning, which can really help out if you find yourself frequenting the same group of sites on a daily basis.
To use site pins, you control-click the tab for a particular site and click the "Pin Tab" menu option. From then on, no matter what else you do in your browser, that site will be loaded up and ready to go in a miniature tab on left of the tabs bar. For those of us that rely on constantly checking specific pages, whether it be Gmail or Facebook, for our workflow, pinned tabs add a bit of convenience.
More minor, but no less useful, is that tracking down a rogue sound clip or video that starts playing in one of potentially dozens of open tabs is now much easier. Similar to Chrome's implementation, Safari now displays a tiny speaker icon on any tab that is playing sound. To put an end to the noise, you simply click the icon and the tab is now muted. Finally, Safari now sports compatibility with Apple's AirPlay. With this, you can now cast videos to your Apple TV while getting a bit of work done on your Mac.

Combined with Safari's already great speed on OS X, these are all solid improvements that could make the browser worth another look for those that are tired of Chrome's constant assault on both battery and memory. However, if you're tied to Chrome's larger extension library, you may not be sold.
Mail has also picked up some nice enhancements, but it's still far from the type of redesign that would make customers rush back to the oft-maligned email client.
Perhaps the most prominent change in Mail is that it now supports gestures not dissimilar to those that appear in its iOS cousin. You can now use a two-fingered left swipe to delete an email, while a right swipe will open up options to mark an email as read. I was already used to this behavior with my go-to third-party client, Mailbox, so the transition was easy and welcomed.
Mail also now features tabs for your drafts while in full-screen mode, which makes working through multiple threads at once less of a chore. Also appearing in the revamped Mail are some new smarts that will automatically detect times and dates, giving you a quick-access link to your calendar in response. The same applies for phone numbers and addresses, with Mail prompting you to easily add such information to your contacts. It's the type of thing that initially evokes an approving shrug of the shoulders, but becomes invaluable the first time you use it to add a meeting or due date to your calendar.
Maps

You're allowed to sing your praises from the rooftops on this one: transit maps are finally here. Okay, so it's a much bigger deal on iOS 9, since that's on the device in your pocket at all times, but it's no less intriguing a prospect on a Mac.
True, the transit directions are only available for a handful of cities in the U.S. and Europe at the moment, along with hundreds in China, but more will be added as time goes on. The feature works as you'd expect, allowing you to enter start and end points, then showing you which subway or bus line to take and where to switch. Even better is that Handoff allows you to easily plot your course on your Mac and then send it off to your iPhone before you head out the door.
Verdict
OS X El Capitan doesn't represent a sweeping departure from the foundation set by Yosemite by any means, but, overall, that feels okay for an update following on the heels of the overhaul we saw in 2014. There are certainly some areas where I would have liked to see Apple push further, but El Capitan feels like a solid spit-and-polish type of update.

We liked
Despite its somewhat clunky implementation, Split View is a welcome, sorely needed addition. The ability to easily get a couple of apps side-by-side for an intense multitasking session means there is no need to fiddle with manually resizing and placing windows in just the right spot. Similarly, Spotlight Search is now handier than ever, and I'm looking forward to seeing how Apple improves on not only the natural language detection, but the sources Spotlight draws from as well.
And while none of the app changes may seem striking or revolutionary, they add up to form a nice package that brings Apple's offerings closer in-line with third-party options. The sheer quality-of-life improvements brought to Safari in the form of pinned tabs and tab muting are particularly noteworthy. Add in a revamped Notes app that has me questioning my loyalty to Evernote, and the updates feel solid all around.
Finally, there's performance to consider. Apple has clearly done a bit of work under-the-hood to speed up OS X, and it's noticeable from the get-go. Apps load and switch more quickly, and there's a definite feeling of freshness when you load El Capitan for the first time. Perhaps best of all, El Capitan still retains compatibility with a massive list of Macs going back to 2007, so nearly everyone can get in on the action.
We disliked
Despite its utility, Split View feels cumbersome compared to Microsoft's implementation in Windows. Anyone that has used Snap on Windows 7, 8 or 10 is likely familiar with the simple click-and-drag gesture used to invoke it, and Apple would have done well to take a cue from Microsoft in this department. The time spent waiting after you initially click on the full screen icon feels wasted, and the process overall simply doesn't feel as modern as it could be.
Ultimately, I would have liked to see Apple go further with its apps as well. Outside of the refreshed Notes app, the other changes feel like a game of catch-up. Safari will certainly see more use thanks to its added features, and its memory and battery consumption are second-to-none on the Mac, but I'm still not convinced it's enough to cause users to switch from alternatives. Similarly, I don't see Mail's changes as being enough to cause those tied to their Gmail tab to give it a second thought.
Final verdict
OS X El Capitan isn't going to please anyone looking for a revolution, but it's a solid update overall. Between the performance improvements, new app features, and multitasking tweaks, there's no reason not to dislike what Apple has accomplished here. And the lack of major design changes is good news for those who may have been a bit shellshocked by Yosemite's redesign in 2014.
In musical parlance, the upbeat is less pronounced than the downbeat, but it's no less important, and the same thing can be said when comparing El Capitan to Yosemite. In short, if you're still considering whether it's worth the free upgrade to El Capitan, the answer is a resounding yes.
http://rss.feedsportal.com/c/669/f/9809/s/4a5af9be/sc/28/l/0L0Stechradar0N0Cus0Creviews0Cpc0Emac0Csoftware0Coperating0Esystems0Cos0Ex0E10A0E110Eel0Ecapitan0E130A590A40Creview0Dsrc0Frss0Gattr0Fall/story01.htm
Sent with Reeder
Aron
Brief message sent from a handheld device.
Subscribe to:
Comments (Atom)