Macworld How to import photos into Aperture 3 | Photography
http://www.macworld.com/article/161525/2011/08/understanding_aperture_importing.html

How to import photos into Aperture 3
One of the most important tasks you perform in Aperture is importing images. New users often overlook critical import settings that will impact their workflow. Issues such as where your master files live and the data that's going to be added to them are easier to deal with up front rather than once a library is bulging with images.
What requires some advance planning is deciding where the master image files will be stored, and then choosing the right settings to put them there.
Referenced or managed library?
The first decision you have to make is where your master photos are going to live. The simplest method is to use the managed library approach. In this case, Aperture copies the master files from your memory cards into its Aperture Library container. By default, the container lives in your Pictures folder, but you can move it anywhere.
The advantage of this approach is that when you back up your Aperture library, everything is in one place: your masters, previews, metadata, and all the work you've done. It's neat and tidy. The disadvantage, especially for people who capture videos or raw images, is that your Aperture container can swell to hundreds of gigabytes, putting a strangle-hold on your hard drive.


This is why some prolific shooters opt for a referenced library instead. This method keeps your master images outside the Aperture container and on, say, a separate hard drive that's connected to your Mac. With this approach, your Aperture container grows at a slower pace, because it's generating only previews, thumbnails, and data. The big files are stored elsewhere. The disadvantage of a referenced library is that you have to back up both your Aperture container and the various places where your master files live.
The general rule of thumb is that if you're a light shooter or someone who captures mainly in JPEG format, go with a managed library. If you're a photographer who shoots in raw mode and fills up big memory cards, you should opt for the referenced library approach.
When you connect your camera or card reader to a Mac with Aperture open, the Import window box will appear. In the Import Settings pane on the right, you'll see an area labeled Aperture Library. Look for the Store Files pop-up menu, and from it choose the location for your master files.
To create a managed library, select In The Aperture Library. For a referenced library, select Choose from the pop-up menu and navigate to the location where you want the files on the memory card copied. A second pop-up menu will appear, letting you choose a subfolder. I recommend selecting Project Name so that your master image folders will have the same name as their corresponding projects in Aperture.
Project destination and name
All photos added to Aperture must live in a project. When you import, you can add images to an existing project or create a new one. This is where it pays to have a clear philosophy on your library structure. In my case, I create a new project for all major shoots. The projects are grouped within folders to keep clutter to a minimum.
In the Import window, choose New Project in the Destination pop-up menu. In the field below it—Project Name—I typically use a standard naming convention of MM-YY-NAME for the new project. If you want to add the images to an existing project, navigate to the desired location in the Library pane on the left side and click on the name of the project where you want the images to reside. Aperture will automatically fill in that name in the Destination field.
More options under the import settings pop-up menu

There are a wealth of customizable options under the Import Settings pop-up menu in the upper right corner. Here's a little detail about what's in there.
File Info: At first, this seems like just a basic info box listing name, date, size, dimensions, and attachment. But I recommend that you keep this box open because additional information will appear here when you start working with other options such as file renaming and date modification. To see the File Info for any photo to be imported, just click on its thumbnail in the import browser.
Rename Files: The file names our cameras assign images are pretty dull, such as IMG_4432.CR2. During import, you can instruct Aperture to append those file names or replace them altogether. In the Version Name pop-up menu there are a handful of preset formats you can choose from. If you don't like what's there, just go to the bottom of the menu and select "Edit…" That allows you to configure your own preset.
If you do rename a file, a new field appears in the File Info box called Version Name. Click a thumbnail and you'll see what the renamed file string will look like. You can also change the original file name by checking the box next to Rename Master File. But I don't feel that's necessary since your new version name will be available in Aperture, and can be applied to the files on export too.
Time Zone: Do you ever forget to adjust your camera's internal clock when traveling to different locations? If so, your timestamp will be incorrect for the entire trip. Aperture helps you recover from this oversight via the two pop-up menus in the Time Zone pane. In the first pop-up, choose the time zone your camera was set to. In the second, select the actual time zone where you took the pictures. Aperture will adjust the timestamp for you during import.
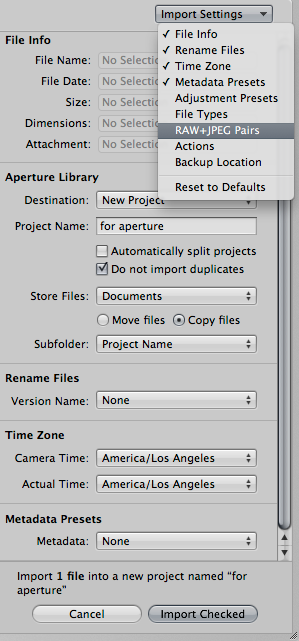
The Import Settings drop-down menu is extremely useful when organizing your library.
Metadata Presets: One of the most powerful features in the import dialog box, this pane allows you to add metadata to images as they are loaded into Aperture. If you choose Basic Info from the Metadata pop-up menu, you'll see blank fields for Caption, Keywords, Copyright, and Location. Type in any of those fields, such as Keywords, and that information will be associated with every imported picture. And when you export the image out of Aperture, you can have your personalized metadata go with it.
Select Edit… at the bottom of the Metadata pop-up menu and you get a second dialog box that allows you to create your own custom template. You choose only the fields that are important to you. For information that doesn't change often (such as copyright), you can pre-populate that field so that it's automatically filled in for you. This saves a lot of typing time and speeds up the process of adding metadata to your images.
Adjustment Presets: This area is for those times when you've captured an entire series of landscape shots with the camera's White Balance set to Tungsten (perhaps leftover from an indoor shoot the night before). Enable the Adjustment Presets pane, choose White Balance -> Daylight from the Preset pop-up menu and Aperture will make the correction for you during import. There are a variety of presets available for exposure, color, and B&W conversion. If you don't see what you need, go to the Edit option at the bottom of the pop-up menu to create your own preset.
File Types: When you have a variety of media on your memory card, such as movies and still images, you may want to separate them during the import. You can quickly sort through these different types by checking the appropriate box or boxes in the File Types pane.

In Backup Location, you can automatically backup your photos on an external hard drive.
Raw+JPEG Pairs: If you ever need to capture both raws and JPEGs at the same time, you can manage those files on import by enabling the Raw+JPEG Pairs pane. You have five options for import: Raw only, JPEG only, Raw and JPEG as separate masters, both (JPEG as master), and both (Raw as master). Raw shooters should keep in mind that Aperture automatically generates a high quality JPEG preview for each shot after import. So shooting Raw+JPEG isn't necessary unless you have a specific need.
Actions: You can enable an AppleScript to run upon import into Aperture. This might happen in the workplace where a specific workflow is mapped out and has been automated. If you have such a need, you can choose the AppleScript (created outside of Aperture) in the Actions pane.
Backup Location: This feature allows you to send your master files to two separate locations during the import process. Once you enable Backup Location, you need to choose which connected hard drive will be used for the second set of masters. This is a nice feature for those who want to erase their memory cards right after import.
Tips for managing the import settings pane
You can turn these individual controls on and off in the Import Settings pop-up menu in the upper right corner. Decide which controls you need, turn them on, then leave everything else unchecked. This will keep your import dialog box uncluttered allowing you to focus on the images and the proper data to go with them.
Also, take a few moments to create custom Metadata Presets. You can have one for your personal work, one for a specific client, and so on. By doing so, you're more likely to have important information attached to your images because it was so easy to do during the import process.
Final thought
During my two-day Aperture workshops, I spend at least two hours on the Import dialog box. It's that important. I recommend that you take time to learn these controls before bringing images into Aperture. By doing so, your odds of having a wonderful Aperture experience increase dramatically.
[Derrick Story is the Aperture instructor for Lynda.com, which currently features over 8 hours of online training for his latest title, Aperture 3: Essential Training.]
Return to

(via Instapaper)
Brief message sent from a handheld device.
No comments:
Post a Comment