Geek Tech 10 tips for mastering Microsoft Outlook 2013
Keeping track of emails, calendars and contacts can suck untold time out of any workday. If you use Outlook, anything that speeds up your work can boost your productivity measurably. Imagine if your inbox only showed the messages you wanted to see. Consider if you could locate vital contact information in seconds. What if you finally knew why some of the hyped Outlook features aren't working as advertised?
These 10 tips will help you zip through your messages and agenda, and work more effectively overall.
1. View your inbox your way
 Once your organize the screen the way you want it to look, save the View settings so you can return to them anytime.
When you first open your inbox, the default view of your email appears, but it doesn't have to look this way. To see Oulook's many customization options, click the View tab on the ribbon toolbar and choose Change View. There are multiple preset views you can choose, like one that displays the most recent emails only.
Also on the View tab, you can select Message Previews and choose Off to turn the preview off. Or, choose either 1, 2 or 3 to view that number of lines of the message below its header. You can configure any of these options either for the current folder or for all mailboxes.
Click View Settings to see options for customizing a view, such as adding columns or rearranging their order. The Arrangement options let you sort emails by Date, Subject and so on. The Layout options let you customize the Folder Pane and Reading Pane.
Once you have arranged the inbox to your liking, click Change View > Save Current View As a New View. Then type a name for the view, and specify which folders it can be used on and by whom. In the future, return to this view by selecting Change View and selecting your saved view.
2. Redefine what marks an email as already "read"
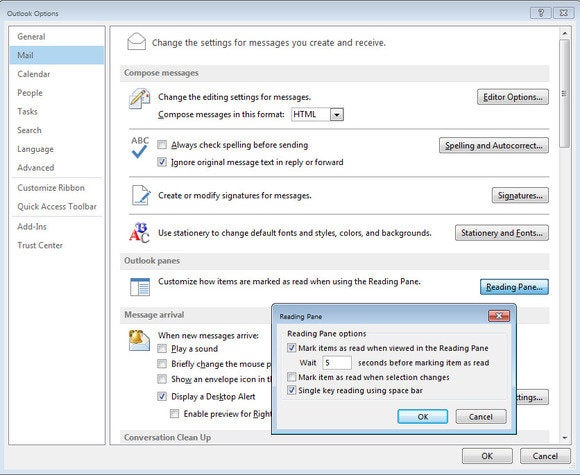 Automatically mark messages as read-only if they appear in the Reading Pane for longer than a preset amount of time.
Outlook colors unread emails differently from messages you've already read. However, it's all too easy for an email to be marked as "read" when you've barely given it a passing glance, which can make you overlook something important.
To prevent this, you can make Outlook less sensitive. Start by selecting File > Options > Mail, and then click the Reading Pane button. Check the "Mark items as read when viewed in the Reading Pane" checkbox, and adjust the number of seconds you want the message to appear in the Reading Pane before Outlook marks it as read. The default is 5 seconds.
After that, while you preview messages in the Reading Pane, only the emails that appear there longer than your preset amount of time will be marked automatically as read.
3. Apply conditional formatting to messages
 The blue color that is used for unread messages is applied using a conditional format. You can change this, and can create your own formats for different messages.
Outlook 2013 has a new way of indicating that messages are unread. There's a blue bar to the left of the message in your inbox, and the message header also appears blue.
This blue is applied using conditional formatting. However, you can change both the color and font. Better still, you can write your own rules and format your emails using colors of your choice.
You can assign a certain color to emails based upon who sent them, or upon which words appear in the subject line. To do this, choose View > View Settings > Conditional Formatting. You will see the Unread Messages rule and the blue color. Here you can change the font or color as you wish.
You can also click Add to add a new rule. Start by typing a name for the rule in the Name box. Then click Font and choose a font and font color to apply to the email header. Finally. click the Condition button. When the Filter dialog opens, select the options that describe which emails will be formatted with your new settings. Click OK three times to save your settings.
4. Reinstate the to-do bar
 You can display the To-Do bar in Outlook 201,3 but it doesn't function as effectively as in past versions of versions.
Outlook 2013 disables the To-Do bar by default, but it's easy to bring back. Click the View tab, select To-Do Bar, and from the dropdown list select which items should appear on the To-Do bar. The options are to turn the To-Do Bar Off (the default) or for it to display a combination of Tasks, People and Calendar. The order in which you select these options determines the order they appear in the To-Do Bar. For example, Task, selected first, is at the top. The second item, People, appears below that and the third, Calendar, appears at the bottom of the bar.
However, the To-Do bar no longer functions as it did in earlier versions of Outlook. Regardless of how wide the bar is, you only see a one calendar month. In addition, if you don't have appointments scheduled for today, then no appointments show even if you have some scheduled tomorrow.
5. Connect to your social media accounts
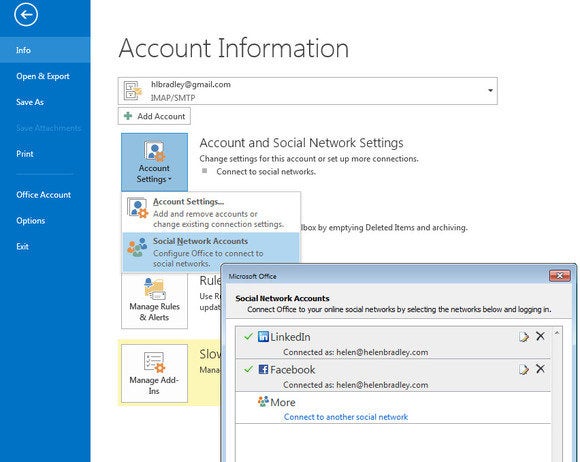 Use the Social Network Accounts dialog to link Outlook with LinkedIn and Facebook so your contact's details will be accessible from within Outlook.
When you connect Outlook to your social media accounts, the People module can display data about your contacts and their activities.
To link a social network account to Outlook 2013, choose File > Info > Account Settings > Social Network Accounts. Connect to LinkedIn and Facebook by selecting the desired service, typing your account details, and giving Outlook permission to access your account. Now details from people in your contact list who use the social site you've added will appear in the People area of Outlook.
6. Clean up contact information
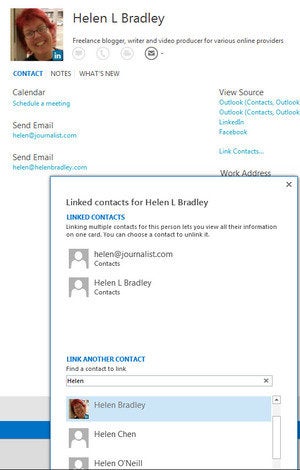 Use the Link Contacts feature to link multiple contact entries for a person together so that the information is more easily accessible.
New features in Outlook's People module let you access information about contacts from places including Facebook and LinkedIn.In some cases you will have multiple contact entries in the contact list for a single person, with different details in each place.
You can link these multiple entries for a single contact to unify the data in one place. Click the contact you're interested in and view their information by choosing Home > People.
On the right of the screen, click Link Contacts, and a dialog will open showing the contact entry or entries for that person. In the Search People box type some identifying information for that person and Outlook will return any other contact entries which may be a match for that person. If they are the same person, click on that entry to link the details.
7. Control where Outlook searches by default
 You can configure Outlook 2013 so it defaults to searching in the folders of your choice.
When you search for emails in Outlook, the default location is your Current Mailbox. However, this is often too limited. If you want a search to return all matching entries in all mailboxes, for instance, you'll need to select this option from the list in the Search box for every search you make.
Alternately, you can change the default location that Outlook uses for searching. To do this, choose File > Options > Search. In the Results area you can select to include results, choosing one of these four options: Current Folder; the Current Folder, Current Mailbox when searching from the inbox; Current Mailbox; or All Mailboxes. Select the option that you want to use and click OK. This will then become the default for Outlook searches although of course you can change it on a search by search basis when needed.
8. Decide whether to use Quick Steps or Rules
 Quick Steps and Rules perform similar tasks but there is a clear choice to be made in which to use for what purpose.
Quick Steps were introduced in Outlook 2010 to give you a method of quickly performing tasks in Outlook. However, you might wonder why you would use a Quick Step rather than a Rule? Quick Steps are flexible so you can choose to apply them when you want to use them - Rules are less flexible and once they are set up they are applied automatically.
The answer to which of these you should use depends on your task. Use Rules, for example, when you can identify a message that should always be handled in a specific way every time. So you would use a rule if you want to move all incoming messages from your boss to a particular folder. A rule will work well here because your boss' emails will be easy to identify by the unique email address.
On the other hand if you store incoming press releases in a special folder this may be a task for a Quick Step if you don't know ahead of time who these emails will come from. Without a way to uniquely identify an email as containing a press release you can't write a rule to automatically process the message. However, you can create a Quick Step that you can click to move any selected message to a specific folder. The Quick Step can't identify that an email contains a press release – you have to do that - but it will speed up the process of moving the email if you decide it needs to be moved. You can create Quick Steps and Rules in the Mail area of Outlook using the tools on the Home tab.
9. Make use of the Favorites
 Make any folder a favorite so it appears at the top of the Folder Pane and is easy to find and use.
If you have a few email accounts your folder pane can become crowded with folders making it time consuming to navigate to find those folders that you use most of the time. You can simplify finding these folders if you add them as Favorites. Favorites appear at the top of the Folder list when you are in the Mail module.
If the Favorites area does not appear switch to Mail and choose View > Folder Pane and click to enable Favorites. Now you can add any folder to the Favorites by right-clicking it in the Folder pane and choose Show in Favorites. You can even set a Search Folder to be a Favorite so it is easy to find and use.
10. Understand the consequences of using IMAP
 If your email service uses the IMAP protocol some features of Outlook won't be available, including detailed message flagging.
If your email account uses the IMAP protocol, certain common functions won't work in Outlook 2013. This will be an issue for an increasing number of Outlook users, since IMAP is used for accessing email from any device. Most people using services like Hotmail and Gmail for example, use IMAP for email.
When you are using IMAP email, in Outlook you can no longer download only the message headers, and decide from there which messages to download. Instead, now all the emails download automatically. In addition, with IMAP you can't add detailed flags to messages. Flags are either on or off, and can't be set to mean different things. You won't be able to allocate messages to Categories either, except for Hotmail account messages. If you have a choice of using POP3 or IMAP and if you don't need to have access to your email from multiple devices you may consider using POP3 in preference to IMAP.
http://www.pcworld.com/article/2038282/10-tips-for-mastering-microsoft-outlook-2013.html#tk.rss_all
Sent with Reeder
Brief message sent from a handheld device.
No comments:
Post a Comment