Monday, November 16, 2015

Deploy and Manage Windows Server Containers using Docker

Petri IT Knowledgebase Deploy and Manage Windows Server Containers using Docker

Docker logo

In today's Ask the Admin, I'll show you how to quickly set up Windows Server 2016 Technical Preview 3 (TP3) in Azure and deploy containers using Docker.

Unless you've been living under a rock for the past couple of years, it's likely you'll have heard of Docker and containers. Docker is a system for managing containers, a technology that's long been native to Linux and is now included in Windows Server 2016 TP3. Nonetheless, if you need a bit of refresher, see What is Docker? and Are Docker Containers Better than VMs? on the Petri IT Knowledgebase.

As it stands in the current technical preview, Windows Server containers can be managed using PowerShell or Docker, but it's worth noting that containers created with Docker can't be managed using PowerShell, and vice versa. Just as in Linux, Windows Server containers can be managed natively, and for more information on that see Aidan Finn's series of articles Managing Windows Server Containers with PowerShell.

For the purposes of this demo, we're going to use Windows Server 2016 TP3 in a virtual machine (VM) running in the Azure cloud because Microsoft has a preconfigured image where the Containers role and Docker agent are preinstalled with the necessary configuration steps already performed, meaning we can get down to the nitty gritty much quicker.

If you want to set up your own containers host on a local server, instead of using the preconfigured Azure VM, you can download and run the following script on a virtual host running Windows Server 2016 TP3 to configure a VM, replacing myVM with the name of the new VM and password with the password for the VM's administrator account.

wget -uri https://aka.ms/newcontainerhost -OutFile New-ContainerHost.ps1    .\New-ContainerHost.ps1 –VmName myVM -Password password

Sponsored

Deploy a Windows Server Containers Host in Azure

I'm not going to perform a complete walkthrough of this step in this article as you can find detailed instructions on how to deploy a VM using the Azure preview portal in an upcoming article titled, Deploy a VM using Azure Resource Manager. All you need to do is select the Windows Server Container Preview image and deploy the VM with the default settings.

Alternatively, you can use the Azure management portal to deploy a VM using the classic model, i.e. in a cloud service. For more information on using the Azure management portal to deploy VMs, see Deploy Windows Server 2012 in an Azure Virtual Machine on Petri.

Create a New Container from an Image

Log in to your Windows Server container host, no matter how you deployed it, using the local administrator account. In the Azure VM, you only have access to the command prompt. If you deployed full Windows Server yourself, you'll need to open a command prompt and then follow the instructions below:

  • Type powershell in the command prompt and press ENTER.
  • To list the existing Docker images on the server, type docker images in the PowerShell console and press ENTER. You should see an image called windowsservercore in the list.
List the available Docker images (Image Credit: Russell Smith)

List the available Docker images (Image Credit: Russell Smith)

  • Now let's create a new container using the windowsservercore image. We'll use the docker run command to do that, which combines two actions: create and start. Run the command below, replacing petricontainer1 with a name for your new container.

docker run -it --name petricontainer1 windowsservercore cmd

The –it parameter specifies an interactive session, and cmd launches access to the new container via a command prompt.

  • Once the docker run command has completed, notice that the command prompt loses its 'PS' prefix and switches to C:\Windows\System32>, indicating that you're now controlling the container and not the host server.

You can now run any command you like in the container. I'm going to create a directory called petricontainer just as a means of checking later whether I'm really running in a container or the host server. To create a directory in the new container, type mkdir c:\petricontainer and press ENTER. Additionally, if you run ipconfig /all, you'll notice the container has a different IP address than the host server.

  • To quit the container session and return to the host server, type exit in the prompt window and press ENTER.

List, Start and Attach Docker Commands

Now that we have a container installed on the host server, you should be able to see it in the list of available containers:

  • To see the available containers on the host server, type docker ps –a in the command prompt window and press ENTER.
Start and connect to a Docker container (Image Credit: Russell Smith)

Start and connect to a Docker container (Image Credit: Russell Smith)

  • To reconnect to the container we just created, you'll first need to start it. Type docker start petricontainer1 and press ENTER, replacing petricontainer1 with the name of the container you deployed.
  • To re-enter the command prompt for administering the container, type docker attach petricontainer1 and press ENTER, again replacing petricontainer1 with the name of the container you deployed.
  • After running the above command, you may need to press ENTER in the command prompt window before getting to a prompt indicating that you are now working inside the container and not the host server.
  • If you list the directory contents of the C drive, you should see the petricontainer folder listed, indicating that you are indeed working in the container and not the host server.
  • Type exit and press ENTER in the command prompt to return to the host server.

Create a New Image

We can now use the container we just modified to create a new image. Follow the instructions below:

  • In the command prompt window, type docker commit petricontainer1 testimage and press ENTER, replacing petricontainer1 with the name of the container you created in the previous steps, and testimage with a name for your new image.
  • To check that the image was created successfully, type docker images and press ENTER. You should see the image listed in the output.
Create a new image from a container using Docker (Image Credit: Russell Smith)

Create a new image from a container using Docker (Image Credit: Russell Smith)

  • Now all you need to do is create and start a new container based on the image we just created. Run the command below, replacing petricontainer2 with a name for your new container, and testimage with the name of the image created in the previous step.

docker run –it --name petricontainer2 testimage cmd

  • Again you can list the directory contents of the C drive, and you should see the petricontainer folder listed, indicating that the container was created from an image based on the first container we set up and modified.
  • Type exit in the console window and press ENTER to return to the host server.
  • Run docker ps –a to see the new container installed on the host server.
Sponsored

Removing Containers and Images

All that leaves us to do is remove the containers and images we created if required. Again it's very easy:

  • To delete a container, type docker rm petricontainer2 and press ENTER, replacing petricontainer2 with the name of the container you want to delete.
Delete containers and images using Docker (Image Credit: Russell Smith)

Delete containers and images using Docker (Image Credit: Russell Smith)

  • To delete an image, type docker rmi testimage and press ENTER, and replace testimage with the name of the image to delete.


The post Deploy and Manage Windows Server Containers using Docker appeared first on Petri.


http://feedproxy.google.com/~r/Petri/~3/xMeKcF6ClA0/deploy-manage-windows-server-containers-using-docker

Sent with Reeder


Aron

Brief message sent from a handheld device.

Five tips for tech start-up success

BBCTech Five tips for tech start-up success

Media captionWikipedia founder: You must 'reboot'

What does it take to be a successful internet entrepreneur? How do you build a global digital brand from scratch like Instagram, Kickstarter or Wikipedia?

What better way to find out, we thought, than to ask the founders who built these companies.

For a few months now we've been asking the bosses who cross our paths at BBC News to share the advice they wish they had known when they started out, as part of our ongoing series CEO Secrets.

Our coverage of the recent Web Summit in Dublin, followed by some fortuitous chief executive visits to London, have allowed us to assemble an impressive line-up of tech talent.

The hope is that the advice they choose to share will both betray something about their personalities, and the environments that fostered their businesses.

Tip one/Wikipedia

The counter-intuitive advice to fail - "fail fast", "fail often", "fail better" - is often heard from the lips of internet entrepreneurs.

Jimmy Wales, cofounder of online encyclopaedia Wikipedia, really believes it.

"The first version of Wikipedia was called Nupedia," recalls Mr Wales. "It was very top-down, very structured," he admits.

"I beat my head against the wall for two years, I knew the system was too complicated, but I didn't want to fail."

Don't invest all your money in one thing, he now advises.

"Give yourself a chance to reboot."

In fact Jimmy Wales was involved in several unsuccessful internet ventures before Wikipedia took off.

Marcus Gibson, editor of the Gibson Index, which monitors small businesses in the UK, says: "American firms are quicker than British firms at acknowledging the end of the line. If only because their investors are much more hands-on.

"Founders can often arrive in the morning to find the locks on the office have been changed overnight by the lead investor."

Tip two/BlaBlaCars

If Jimmy Wales wishes he'd listened to feedback earlier on, another chief executive encourages aspiring entrepreneurs to defy the critics.

"You'll find lots of investors telling you, 'you need to think of the market'," says Nicolas Brusson of BlaBlaCars, one of France's most successful web companies.

"But if you do something truly new, your market does not exist, you are going to create your own market."

BlaBlaCars allows users to pay to take up unused seats on private car journeys.

It defied its early critics by creating a new market for digital hitch-hiking, in the emerging sharing economy.

Tip three:/Kickstarter

"Creativity and integrity are everything," advises Yancey Strickler, chief execuive and cofounder of the crowdfunding site Kickstarter, an online platform which allows anyone to give financial backing to novel business ideas.

"Pursue a solution that you feel proud of, that you know feels right and morally correct."

This kind of idealism - some would say piety - has become the hallmark of many internet companies, particularly in America.

"Don't be evil" was famously adopted as Google's early mantra, while Mark Zuckerberg says Facebook's overarching mission is to "connect the world".

But fellow Silicon Valley entrepreneur Harper Reed, who sold his online payments business start-up Modest to PayPal, told us he has little time for appeals to morality by online businesses. "I don't know how moral ad clicks are," he told us.

However, he immediately relates to Mr Strickler's call for "integrity".

"It's a passion thing," he explains. "You're standing up and saying I can do this better, it needs a level of passion you don't have in normal business."

Tip four/Instagram

A bunch of pasty-faced students in hoodies staring at laptops with empty pizza boxes strewn around them.

This may be the image in your mind of the Silicon Valley start-up, thanks to films like The Social Network.

But Instagram co-founder Mike Krieger cautions against obsessing about work to the detriment of your health.

"We came close to burning ourselves out in the early days," he recalls.

"Your incremental extra two hours between the 12th and 14th hour of work, you are getting diminishing returns," he now realises.

"Take time for yourself, for exercise, it sounds trivial but actually can make a big difference."

He also recommends the camaraderie of well-chosen cofounders.

"If there's somebody you can turn to who is your cofounder," says Mr Krieger, "who you'll look at and say 'alright, we've got this', it really, really helps."

Tip five/Tinder

Last but not least we managed to hook up with Tinder founder Sean Rad.

Perhaps unsurprisingly, he didn't dwell on the importance of cofounders, since the dating app's early history is mired in personal animosity.

"Work can sometimes get overwhelming," he admits.

So he has developed a numerical coping strategy.

"It's very important to identify the three most important things you need to accomplish, to get 80% of the results."

Break the rules: A sixth point

Are these pioneers of the internet goldrush really a different breed of entrepreneur?

Shellye Archambeau, of MetricStream, a software company based in Silicon Valley, told us there is one important factor to consider.

"As soon as you start [your company] now, you can be global," she says.

Not only does the reach of the internet allow you to think on a vast scale from the outset, but it also affects how you find your customers.

"In the old days if a customer found a great product, they might tell five people," says Jimmy Wales.

"But these days someone might tell 300 people on Facebook. So telling the story is key."

The chief executive of a modern internet company needs to be an adept storyteller, it would seem, as well as a passionate leader. Someone who can engage social media users around the world.

How successful this particular crop of internet entrepreneurs are at this, you can judge from the CEO Secrets videos that will appear on the BBC News website this week.


http://www.bbc.co.uk/news/business-34808495#sa-ns_mchannel=rss&ns_source=PublicRSS20-sa

Sent with Reeder


Brief message sent from a mobile device

Tuesday, November 10, 2015

10 cost-effective ways to quickly beef up your company security

10 Things 10 cost-effective ways to quickly beef up your company security

datasecurityhero.jpg

 Image: Jack Wallen

Company security has never been more critical. Data is being breached on a regular basis, from midsize companies to enterprise giants. But even if you're a small mom-and-pop shop, you're not off the hook. All businesses need to keep data security at the front of their minds.

What efforts can you take to step up the security of your company? Will you have to buy expensive equipment? In some cases, yes. But not in every case. There are a number of steps you can take that won't set you or your company back a half-year's budget. Here are 10 cost-effective ways you can beef up your company security.

1: Update, update, update

One of the worst things you can do is ignore updates on your servers and desktops. Many times those updates includes security patches required to keep your hardware current with security policies and vulnerabilities. Without those patches, you might well be opening yourself up to various attacks. Although updating can be time consuming (and could cause a slight bit of downtime on servers), it must be considered a crucial step in keeping your company secure.

2: Stay in the know

If you're in the IT department (which seems likely, if you're reading this), one of your duties is to keep up with the latest security threats and warnings. If you stay abreast of what's going on in the world of PC security, you'll not only be informed of the latest threats but of the newest technology aiming to keep those threats at bay. Be sure to keep tabs on security alerts from the companies that produce products you've deployed as well as on general security issues. Read up on the latest security tech and stay open to learning new methods. Take classes, network with other security experts... get connected.

3: Set and enforce password policies

If you have yet to implement password policies, now's the time. Make sure all passwords are strong and that they're changed every 30 or 60 days—without fail. This should also apply to wireless security passwords as well as any BYOD device that is connected to your wireless network. Yes, changing wireless passwords on a regular basis can be a pain. But if you're serious about all levels of security, this should be considered a must-do.

4: Don't offer open wireless

Ever. Yes, for some companies offering wireless to the public is a necessity. However, that doesn't mean the public Wi-Fi must be sans password. Set a public password and require customers to acquire it from an administrative assistant. Make it policy to change the public wireless password weekly. If possible, take it one step further and ensure the public wireless is in no way attached to your business network (even if that means purchasing a second pipe).

5: Get strict on policy breakers

You've finally managed to set all your security policies to make your company as safe as possible. If an employee undermines those policies, your company data is no longer safe. Security policies should have zero tolerance for infractions. Anyone who breaks them must suffer the consequences. This might be a hard row to hoe, but once you've established the staunch take on the policies—and once your staff understands how serious the issue is—your security will be easier to enforce. Understand, this could mean terminating employees in some cases. But if that's what is necessary to ensure the security of your data, so be it.

6: Require two-step authentication

It never ceases to amaze me that two-step authentication isn't the default for everything... everywhere. If your company makes use of Google, you should require two-step on every account and work with the Google Authenticator. Your internal servers should also use this type of system (You can even employ two-step authentication on a Linux SSH server.) At every possible intersection of authentication, two-step should be the default.

7: Use Chromebooks when possible

These inexpensive devices can actually help improve your company security in ways you may not have considered. First off, if your company uses Google and its two-step authentication (see above), you're already a bit ahead of the curve. But with the addition of Chromebooks, you know your users aren't installing third-party software that could wreak havoc on your network. Chrome OS is, by design, one of the most secure platforms on the planet. Yes, some may find them limiting. But considering most of the work your staff does nowadays is within a browser, a Chromebook might be the ideal solution when security is a prime.

8: Properly vet new hires

Sometimes a security breach doesn't come in the form of a hacker sniffing out data but in the social engineering made possible at the hands of nefarious employees. It can be impossible to know the complete history and intentions of a new hire, but it is your duty to make sure you know as much about new staff as possible.

9: Rid yourself of paper documents

Papers can easily find their way into the wrong hands. Unless you employ a powerful document shredder (and use it regularly) you run the risk of data leaking if the wrong person picks up the wrong paper at the wrong time. Set a policy that all company data be retained only in digital form and that data must be stored on company hardware within the company LAN.

10: Employ full disk encryption

If you're really concerned about the security of your data, you should be using encryption on servers, data drives, desktops, and mobile devices. Making use of encryption might well mean that your IT staff has to endure a short period of long nights and nightmares, but this type of downtime is well worth the effort. In the end, your data will enjoy much-improved security.

Data security is an ever-moving target that you need in your sights at all times. If you're not willing to make some changes and tow the hard line, your company data could easily be at risk. With a few exceptions, this list security "upgrades" should be very simple to put into play.

Also read...

Other steps

Have you found other affordable security measures to protect your information assets? Share your suggestions with fellow TechRepublic members.


http://feedproxy.google.com/~r/techrepublic/10things/~3/ZM8iQY9hm1k/story01.htm

Sent with Reeder


Aron

Brief message sent from a handheld device.

Sunday, November 8, 2015

How to smarten up the kid's room

TechRadar: All latest feeds How to smarten up the kid's room

How to smarten up the kid's room

How to smarten up the kid's room

How to smarten up the kid's room

Smart home gadgets aren't just for the grown-ups. You can use these devices to benefit the kids as well, whether it's keeping tabs on them while they're in and out of the house or helping them with their homework.

Smart safety at home

Belkin Netcam

For kids that are too young to need their own privacy, installing a smart security camera like the Belkin NetCam HD+ offers multiple benefits.

Once it's in place, you can quickly check what the kids are up to from another part of the house by opening the NetCam app on your smartphone or tablet and checking out the live video feed.

The night vision mode also works a treat for checking up on sleeping babies and toddlers, switching to a high-visibility monochrome view courtesy of the 12 infrared LEDs that circle the camera lens.

The Belkin NetCam HD+ can perform a few other tricks, too. Using the built-in two-way intercom, you can tell your kids to come down for dinner or stop fighting with their siblings without having to yell up the stairs like a crazy person.

If you catch your kids doing something particularly adorable (or naughty), you can snap photos or videos from the NetCam app, which are saved to your mobile device.

Since it works over both a Wi-Fi and 3G/4G data connection, you can also set it up as a 'nanny cam' when you've got a babysitter over to check that the kids have gone to bed on time.

Location, location, location

Location sharing

But what if your kids are too old to have a video camera playing big brother in their bedroom?

You can still keep tabs on them without stepping over the line using a smartphone solution, and since this works both in and out of the house, it's actually a more complete solution than the stay-at-home IP camera.

For Apple-only households, the new location-sharing features available since iOS 8 will keep track of where your kids are at any time. To set up family sharing, go to Settings > iCloud and tap 'Set Up Family Sharing'.

You'll need to confirm that you're the family 'organiser' – which essentially means that everyone that you sign in as part of the family will be able to use your credit card to make iTunes and App Store purchases.

Once you're set up as the organiser, you'll need to invite other family members to join the group. This is done by going to Settings > iCloud > Add Family Member, however this step assumes the person already has an Apple ID. For kids that are too young to create one, you can set one up on their behalf by going to Settings > iCloud > Family, tapping the small "Create an Apple ID for a child" at the bottom of the screen, and going through the rest of the prompts.

After your kids have accepted the Family Sharing Invitation and opted to share their location, you'll be able to see their location at any time by downloading the Find My Friends app. From here, you can also set up notifications so that you get an alert whenever that family member arrives or leaves a particular location.

If you wanted to set this up for his school, for instance, tap on 'Notify me', tap 'Leaves' and tap the 'Change location' link to change the location to their school.

Google doesn't have an equivalent feature in Android, but for non-Apple households, Life360 is a decent third party alternative that works across iOS, Android and Windows Phone.

New age note taking

Livescribe 3 Smartpen

Modern kids may be used to lugging laptops and tablets around, but as convenient as these devices are, they may not be the best tools for helping with their schoolwork.

Numerous studies have found that handwriting, as slow as it is compared to typing on a keyboard, is better suited for learning, as the effort of having to summarise what the teacher is saying into written form (as opposed to speedily typing everything out) helps cement that material in their memory. Essentially, noting things down by hand engages the part of the brain that is associated with memory formation more so than typing it out on a keyboard.

Up till now, tablet manufacturers like Microsoft and its Surface Pro 4 have tried to recreate the handwriting experience on a touchscreen, but these still lag significantly behind the manual process.

The same can be said for Bluetooth styluses that are designed to work with iPads. This is where a device like the Livescribe 3 Smartpen comes in handy.

It works much like a regular pen, in that you write things down on paper (albeit specially printed Livescribe dot paper), but everything is then wirelessly transmitted to an iOS or Android device over Bluetooth, and from there, you can convert your handwriting to text (provided your scribbles are neat enough), send it on to schoolmates as a PDF, or share it with popular note-taking platforms OneNote or Evernote.

The steep up-front price of the pen isn't the only thing you'll need to factor in, though. You'll also need to buy special Livescribe notepads, as the digital recognition doesn't work when you write on regular paper.

The good news is that the notepads aren't too expensive, and if you're really skint, you can print Livescribe dot paper for free using a laser printer.

Upgrade your paperbacks

Kindle dictionary

Reading books on paper is for amateurs. Switching to a digital solution will not only save money (popular classics that are out of copyright can be downloaded for free on most e-reader platforms, such as A Tale of Two Cities by Charles Dickens, Othello by William Shakespeare, and The Picture of Dorian Gray by Oscar Wilde), but you can do more with the text while you're reading it.

Using the Kindle app (available iOS, Android, Windows Phone, Windows 10 and Mac), you can tap and hold on any word to see its definition in a dictionary or Wikipedia, and even translate the word to a different language.

You'll never lose your page in a book again, as it automatically opens to the last page you were reading, and you can also search for specific terms in the book, which is handy if you're studying a text and need to find a quote or theme.

Another nifty feature for studying books is X-Ray, which shows you where key people, places and terms appear throughout the book.


http://rss.feedsportal.com/c/669/f/9809/s/4b572a6f/sc/15/l/0L0Stechradar0N0Cus0Chow0Eto0Cworld0Eof0Etech0Chow0Eto0Esmarten0Eup0Ethe0Ekid0Es0Eroom0E130A84770Dsrc0Frss0Gattr0Fall/story01.htm

Sent with Reeder


Aron

Brief message sent from a handheld device.

Friday, November 6, 2015

Here's everything Siri can do on Apple TV

Macworld Here's everything Siri can do on Apple TV

The new Apple TV's biggest selling point—aside from an App Store, which other streaming devices have, too—is Siri integration in the touchpad remote. Siri can search services like Netflix, Hulu, iTunes, HBO, and Showtime for movies and TV shows you want to watch, and Apple is expected to open a universal search API so you can find content to watch across a variety of apps.

But Siri can do much more than just find titles. She can offer recommendations, give you information about what you're watching, and She can even figure out what you're looking for even if you don't know what it's called. Put Siri to the test with these questions and commands, and never lift a finger again. (Though we still hope the new Apple TV will eventually support a keyboard or remote app for easier manual searches. Fingers crossed.)

Let Siri do the work of searching for content across the streaming services you subscribe to.

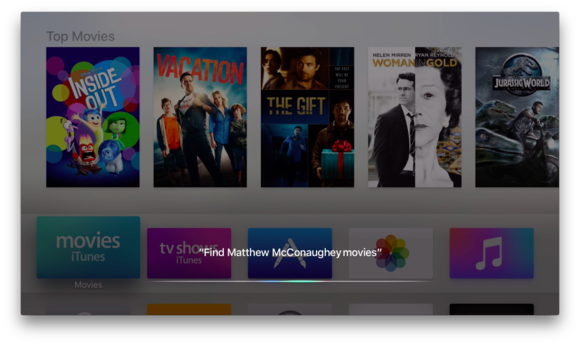
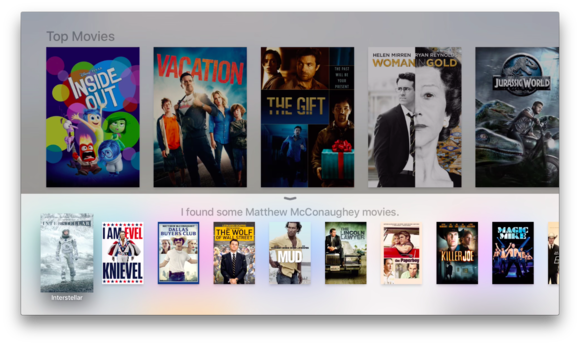
"Find Matthew McConaughey movies."

"Find the series finale of Mad Men."

"Find the movie starring Marilyn Monroe and Clark Cable."

apple tv siri find movies 1
apple tv siri find movies 2

While you're in an app like Netflix, you can ask Siri to start playing specific episodes of TV shows without scouring each season.

"Play episode 3 of season 1 of The New Girl."

"Play the episode of Buffy the Vampire Slayer with John Ritter."

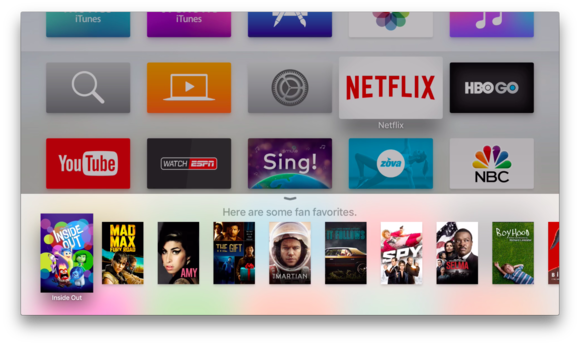
When you don't know what you're in the mood to watch, let Siri offer recommendations.

"What should I watch tonight?"

"Show me some funny indie movies."

"Search for nature documentaries."

"Show me PG-rated movies."

"What are some popular new releases?"

"Find TV shows for kids."

apple tv siri recommendations 1
apple tv siri recommendations 2

She can refine your search results if you don't like the initial suggestions.

"Only the good ones."

"Only the ones from the '80s."

"Only comedies."

"Just show me the ones from this year."

apple tv siri refine search

While you're watching a movie or TV show, Siri can pause to answer questions or perform tasks.

"Turn on Closed Captioning."

"Turn on English subtitles."

"Fast-forward five minutes."

"Jump back 10 minutes."

"Play from the beginning."

"What did she just say?"

"Who stars in this?"

"Who directed this?"

"What is this movie rated?"

"When did this come out?"

apple tv siri now playing

But that's not all. Siri can open apps.

"Go to Apple Music."

"Open the App Store."

"Open Settings."

"Play Netflix."

apple tv siri netflix 1

She can answer questions about the stock market.

"Where's the NASDAQ today?"

"How's Microsoft's stock doing today?"

apple tv stocks 1
apple tv stocks 2

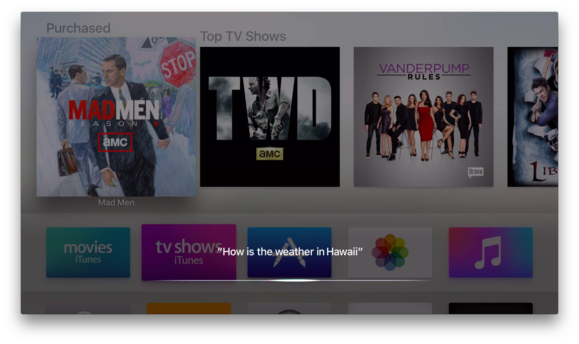
She can give you the weather forecast.

"What's the temperature right now?"

"What time does the sunset in New York?"

"How's the weather in Hawaii?"

apple tv weather 1
apple tv weather 2

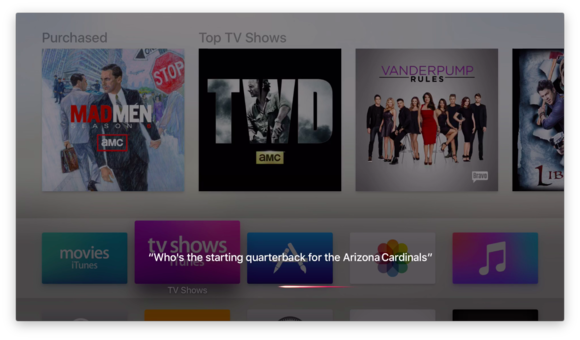
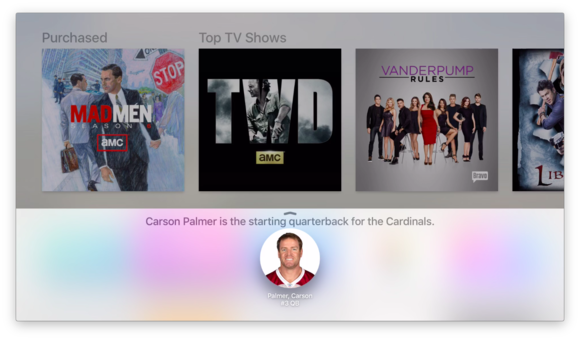
She knows the latest sports information.

"What's the NHL schedule?"

"Who won the World Series?"

"Who's the starting quarterback for the Arizona Cardinals?"

"Who are the Patriots playing on Sunday?"

apple tv siri sports 1
apple tv siri sports 2

Right now, Siri can only help you search in eight countries: the U.S., U.K., Australia, Canada, France, Germany, Japan, and Spain. Apple reportedly has to train Siri to understand pronunciations of movie and TV show titles, actor and actress names, and other commonly searched terms in the other 22 countries where the voice assistant is available. It's unclear when Siri will become functional on Apple TV remotes in those countries.

Can you stump Siri on Apple TV? Has she surprised you with an answer? Let us know in the comments.


http://www.macworld.com/article/3002099/home-players/heres-everything-siri-can-do-on-apple-tv.html#tk.rss_all

Sent with Reeder


Aron

Brief message sent from a handheld device.

Tuesday, November 3, 2015

How to set restrictions on the new Apple TV

Macworld How to set restrictions on the new Apple TV

The new Apple TV provides lots of options for bringing all sorts of content to your television, but not all that content may be suitable for everyone in your home. To deal with that, Apple gives you tools to control what can be downloaded and displayed on your TV. Unfortunately, those tools aren't consistently applied across all content sources yet and don't always work as expected. Even so, it's better than nothing. Here's a walkthrough of how these features work. 

Getting started 

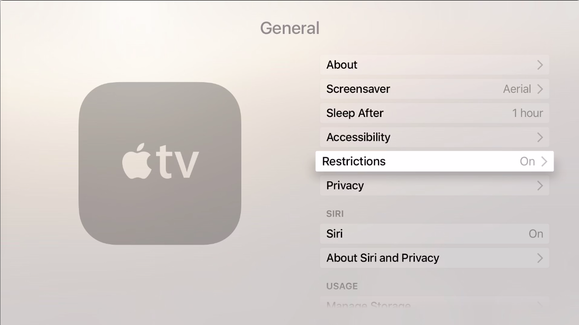
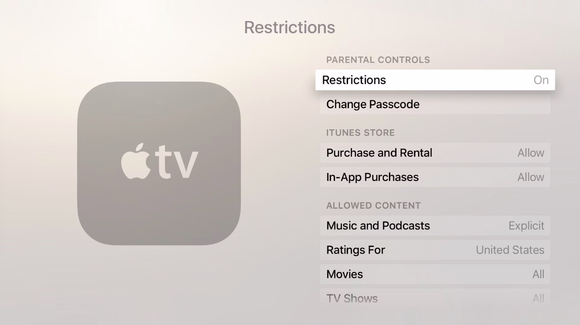
Apple TV's tools for managing content are in the Settings app, under the Restrictions option. It would be nice if Siri would bring you directly here, but asking her to open either Restrictions or Parental Controls prompts a terse reply that you don't seem to have an app by that name. You can use Siri to open Settings, because that is indeed the name of the app. Whichever method you use to get there, once you're in Settings, you can go to General > Restrictions

appletv settings general restrictions

You'll then see a menu of options broken down into categories: Parental Controls, iTunes Store, Allowed Content, Game Center, and Allow Changes. Some of these options are binary—either Allow or Restrict, for instance—but when there are more choices, you'll get a new page with a list of your options.

appletv settings restrictions passcode

As long as Restrictions are tuned off, all options for specific controls are grayed out. To change any or all of them, you need to click Restrictions to toggle them on. Doing so will prompt you to create a four-digit passcode, which you'll type in again to confirm. If you ever forget your passcode, you can reset it (along with all other settings) in Settings > System.

What you can change 

appletv settings restrictions

Once you've tweaked your general restrictions, you can dig a little deeper. Here's a full list of what you can change and restrict:

iTunes Store:

  • Purchase and Rental: Toggles between Allow and Restrict.
  • In-App Purchases: Toggles between Allow and Block.

Allowed Content:

  • Music and Podcasts: Toggles between Explicit and Clean.
  • Ratings For: Lets you choose which country's ratings system to use when setting restrictions. This affects what you'll see in the options for Movies and TV Shows.

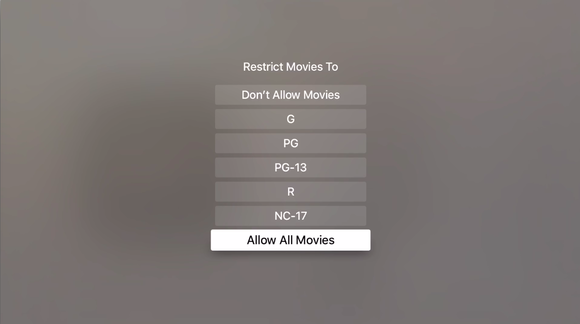
Movies: Shows a listing of MPAA film ratings (or those from your country of choice.) Choose the highest rating you want to allow; everything above that will be restricted. You can also choose to allow all movies or no movies. 

TV Shows: Similar to Movies, but with TV ratings system labels.

Apps: The same again, but using Apple's App Store ratings.

Siri Explicit Language: Toggles between Show and Hide.

When you use voice commands, Siri displays what she hears on screen. This option obscures certain "adult" language by using the first and last letter of the offending word and filling in the rest with asterisks. For example, if "feather" happened to be one of George Carlin's "Seven Dirty Words," (NSFW link) Siri might display it as "f`*****`r." Be warned, though—act like a potty mouth and you can expect Siri to chide you for your language, whether you've chosen to hide your naughty words or not. It's not a perfect system by any means—your idea of objectionable words may not coincide with Siri's, and even some of the words on Carlin's list aren't obscured.

Game Center:

  • Multiplayer Games: Toggles between Yes and No.
  • Adding Friends: Toggles between Yes and No. 

Allow Changes: These settings allow users to override the main system settings.

  • AirPlay Settings: Toggles between Allow and Restrict.
  • Location Services: Toggles between Allow and Restrict.

How it works 

If a user—let's say your kid—never tries to play or buy restricted content, they'll never know restrictions have been applied, because these settings don't affect any other aspect of using the Apple TV. Try to purchase something beyond what the restrictions allow, however, and they'll be prompted for that four-digit passcode—even if you set your iTunes account to never require a password. 

For iTunes content—including apps—this seems to work well. With Movies restrictions set to PG, I had to enter my passcode to watch movies with PG-13 and R ratings that I had purchased from iTunes. I had the same result with purchased music tagged as Explicit when I had restrictions set to Clean and apps I tried to purchase with that option restricted. 

appletv settings restrictions movies

Here's the trouble: Dealing with other content providers—and even your own content played through Home Sharing. For now at least, ratings restrictions don't seem to be honored when watching content from other providers like Netflix or network apps. I was able to watch shows with ratings of TV-14 and higher on Netflix, NBC, and ABC's apps without being prompted for my passcode, despite the fact that I had restricted TV shows to TV-Y. 

Content I had ripped from DVDs was more of a mixed bag. Apple TV seemed to honor ratings on movies I played via Home Sharing, as long as the meta tags had been properly filled out. (I use Meta Z to enter tags and artwork when I rip my own media.) However, I could play ripped TV shows regardless of their rating, even though I had restrictions set to TV-Y. 

I also had to enter my Apple ID frequently to view content I had already purchased. This seemed like overkill to me, but it doesn't seem to be tied to Restrictions settings. On a device that doesn't (yet?) bring back support for Bluetooth keyboards or read settings from a trusted device, this seems more like a glitch than a feature, but time will tell.

Additionally, if you switch away from Restrictions and come back later, you'll be returned to the General settings section and have to re-enter your passcode to get back into the Restrictions page. That's a great security feature, but unfortunately, it only seems to work some of the time, with no discernible reason as to why it locks sometimes but not others. (Timing didn't seem to be a factor.) 

All in all, if your digital life falls mostly within Apple's ecosystem, the Apple TV's Restrictions may work well enough to keep inappropriate content away from impressionable eyes. But if you make frequent use of the other content sources available on Apple TV, Apple's controls fall short. At this point at least, Parental Controls are no substitute for parental involvement.


http://www.macworld.com/article/3000493/streaming-hardware/how-to-set-restrictions-on-the-new-apple-tv.html#tk.rss_all

Sent with Reeder


Aron

Brief message sent from a handheld device.

Small business accounting software: everything you need to know

TechRadar: All latest feeds Small business accounting software: everything you need to know

Small business accounting software: everything you need to know

Introduction

It's finally here. The problem you've dreamed of having. The problem your jealous business school friends, your nay-saying family, and your competitors wish you didn't have. The problem your mentor calls "good."

Your small business has become too successful to continue accounting with Excel.

Congratulations on your problem. You need accounting software.

Choosing the right software isn't easy, especially for a small business. Accounting software is like marriage: it (usually) lasts forever. So it has to be a match for your business not only today, but in sickness and in health, and most importantly, as your business grows older.

Here are 4 tips to help you find "the one" accounting software your small business needs.

Accounting software

1. Look in the proverbial mirror and make a list

Arguably the most important, if mundane, tip is list your small business's accounting needs. Most owners have a general idea of what they want, but if you want to minimize cost then a specific list is key. Otherwise you end up paying for features you don't need.

Not sure where to start? First, pick the low-hanging fruit.

Take all the functions you are already doing with Excel/graph paper/post-it notes and put them at the top of your list. Things like invoices, inventory, and income and expense tracking. Then ask yourself who accesses, or will need to access, this information. (Sales staff, the bookkeeper, the accountant?) Check off the number of seats your new accounting software will need to support.

Now your list has its basic framework. And if you're a very small business who just needs the "basic framework" then stop here. Software like Wave or Zoho Books is probably the best fit for you.

But if not, it's time to determine what "advanced" features you'll need out of your accounting software. Use these three questions as a guideline:

What functions will help save time on employee management? What functions will help save time on customer relations? What applications and processes will the accounting software need to integrate with?

Let's go question by question.

Employee Management

Payroll, sick, personal and vacation day tracking are the most common employee management tasks a small business handles. Small businesses with significant head-counts should research dedicated human resources management tools and/or payroll processing services for these tasks, but for very small businesses, an add-on to their accounting software, like Deputy or Intuit QuickBooks Payroll, might be all that's needed.

Base your decision on the value such time-saving will generate for your business. Could the time spent on employee management be instead used to generate more revenue? If so, tasks like payroll should go on your list.

Customer Relations

Customers will take note of your sales and delivery strategy, but they will remember forever how you present your bill. How you manage your accounting procedures says a lot about how you manage your customers.

Your new accounting software must maintain the goodwill you've worked so hard to build with your customers – and help you get paid faster too.

Do you want to generate invoices for customers right at the point-of-sale, wherever that may be? Then the phone-and-tablet functionality of FreshBooks might go on your list. Do customers want to pay without having to fill out repeat paperwork? Credit card processing with a program like Sage Payment Solutions should be explored. Are paper invoices getting lost in the mail? Consider an add-on like automatic recurring payments with InvoiceSherpa.

Evaluate each stage of your accounts receivable process, from purchase order to bank deposit, to see where software can clean up any inefficiencies. Cash flow is a top priority for a small business. You want accounting software to speed up payment, not slow it down.

Integration

Consider the applications you're already using to run your business. How would new accounting software integrate with those applications?

Maybe you're a retailer that needs its point-of-sale system to instantly give sales and inventory updates to accounting (Try Xero. It integrates with a ton of third party apps.) Maybe you're a direct sales organization that needs customer invoices to post directly into your CRM. (Yendo could be the all-in-one program you're looking for.) Or maybe you're any business that just wants its old Excel files to load without wingdings infiltrating the spreadsheets. (The industry giant, Intuit QuickBooks, loves Excel – it should be everyone's first demo.)

Whatever you are, save yourself the pulled-hairs and check compatibility before you make a decision.

Tips 2, 3 and 4

2. Consult with professionals

Sure, you ignored the warnings from your parents when you married your long-time sweetheart, but with a software marriage, you can't afford to ignore those with experience.

If you have a bookkeeper, ask them for a recommendation. At the very least make sure your accounting staff is proficient with your software choice. After all, it's your money going to waste when your bookkeeper spends their workday googling "QuickBooks tutorial help!!!" instead of sending invoices.

Get your IT staff involved too. If you're going to keep accounting data storage and security in-house, your servers will have to be up to the task.

Accounting software

The most obvious, and critical, consultation is with your accountant or CPA firm. They are not only experienced with many of the platforms you're looking into, they are also deeply familiar with your business.

Ultimately you'll want a program your accountant is comfortable using. Why make the professional who's trying to keep you out of IRS hell miserable? Make sure they endorse your choice. If this isn't an aphorism, it should be: if you're accountant isn't happy, you're not happy.

A side-note: you may want to give your accountant year-round access to your software so they can head off any tax-angina. If so, online or cloud-ready capabilities are something you'll want to put on your software wish list.

3. Demo, demo, and demo again

You have your list and your professional recommendations. Now you need to get your feet wet – but in the shallow end of the pool. It's time to demo products.

Most products on the market offer free trials, and a couple of hours spent clicking around is incredibly useful. Use this time to check how intuitive the interface is, how well it jives with your work habits and task flow. Remember, you're getting married. You don't just want fancy features, you want to be able to talk to it on an average Thursday afternoon too.

Don't dismiss a curated demo. Yes, you'll probably have to listen to a sales rep point out features as breathlessly as a kindergartner with a new macaroni necklace. Put up with it so you can ask questions about everything on your list.

Support is often overlooked when choosing software, but as a small business you're more likely than most to need it. Ask if the vendor offers product training. Ask about the hours and breadth of their tech support. And don't forget to ask how much all that support costs.

If your small business has limited, or even non-existent IT, ask the vendor how your data is backed up and how they keep it safe. And how easy it is to recover all your files if your systems are damaged by an act of God (or man – or office cat.)

Most importantly, inquire about the product's scalability. Do you really want to go through this matching process again when you grow from small to medium to (fingers crossed) enterprise? Good software should grow with you.

4. Don't overbuy

This one's quick and dirty: remember all that time you spent on your list? Honor that effort and stick to your guns. Suspect anything that sparkles. The program that does what's on your list is the best program. As a small business, cost is key - you only want to pay for what you're going to use today. If the program is scalable (and it should be) then its bells and whistles will be there for you when you're ready.

Age-less pro-tip: Garbage In, Garbage Out

You did it. You made your list, you asked your accountant, you hounded a few sales reps and you didn't overbuy. Congratulations again. This time on your software marriage.

Want to stay out of divorce court? Develop good data-entry habits. Your new accounting software, for all its power, won't fix sloppy data-entry. Neither time nor money will be saved when you need a secret decoder ring to figure out your chart of accounts.

Hey, you can always stick with Excel.


http://rss.feedsportal.com/c/669/f/9809/s/4b3600fe/sc/28/l/0L0Stechradar0N0Cus0Cnews0Csoftware0Cbusiness0Esoftware0Csmall0Ebusiness0Eaccounting0Esoftware0Eeverything0Eyou0Eneed0Eto0Eknow0E130A81560Dsrc0Frss0Gattr0Fall/story01.htm

Sent with Reeder


Aron

Brief message sent from a handheld device.

Product Photography Tutorial: How to Shoot Great Photos on the Cheap


The Ultimate DIY Guide to Beautiful Product Photography

This guest post is by Jeff Delacruz a founding member & photographer at Products On White Photography.

If there's one thing that's true when it comes to ecommerce, it's that the perceived value of your products and the trustworthiness of your business is often judged by the quality of your web design. And a big part of having an attractive website these days also means having high-quality, beautiful product photography.

But it's not just aesthetics we're talking about. Showcasing your products with high-quality images can also be the winning difference between a conversion and no sale at all. This is particularly true if you're also distributing your products on marketplace sites like Amazon where they are displayed alongside those of your competitors.

But when you're just starting out, getting your product photos shot can be an intimidating prospect because good photography can be expensive. There are hundreds of product photography tools to help you get the job done yourself. As business owners with lean start-up roots, we understand this more than anyone, and as a company that works with small businesses everyday, we also know that sometimes the money's just not there. If that's you, and your budget is tight, have you thought about taking the DIY approach to taking your own images? It's not as hard as you might think.

There are lots of techniques for shooting successful product photography, but the one I'm going to show you is commonly known as The Window Light Technique.  From someone who photographs products everyday, this tutorial has been specifically crafted for business owners on a budget, and it's been designed to be simple while producing excellent high quality results with most product types.

Enjoy!


Bonus Guide: Get "How to Capture High Quality Product Photos With Your SmartPhone" - a free, step-by-step guide that shows you exactly which tools and apps you'll need. Get the guide.

What You're Going to Need

Gear is at the heart of photography and can be really exciting, but typically it's the aspect that most people become confused about.

There's no necessity to spend a large portion of your budget on high-tech equipment, so keep an open mind and try not to overspend on gadgets that do the same job lighting your product as a $5 piece of card can do.  You can probably do this window light setup for $20 or less if you already own a camera.

You're only going to need a few things for this setup:

1. Camera

You don't need a crazy camera system. While shooting images with a Nikon D800 ($2796) sporting a 105mm f1.4 lens ($740) is awesome, it's also totally unnecessary.

Still, if you're feeling excited, and have the budget to stretch to a new camera system for this project, I suggest reading a post I wrote on quora which offers tips to help you pick out a good camera for product photography.  

When I did the test images for this, I started with my older model (2008), beat-to-hell Canon G10 point-and-shoot.  I love the Canon G series point-and-shoots because they can go full manual and they shoot a really nice raw file. I picked this camera because it's definitely not top of the line anymore, allowing me to demonstrate that even with modest equipment, good results are attainable.

So what camera do you need?  I would just start out with whatever you have handy and see what the results are. It's a common myth that it's the camera that takes the pictures, but in reality the camera is only one piece of the whole.  A photograph is made up of series of choices that incorporates lighting, exposure, styling and post processing decisions.

2. Tripod

Not to get too technical, but you're going to set your camera to a very small aperture so that you can have the most depth of field your camera is capable of.  

The width of the depth of field defines the area of sharp focus, and to get to that you need the largest f/stop number your camera can obtain. Shutter speed and f/stop are related, and since a larger f/stop number like f/8 lets in less light, you'll need to counter than by using a slower shutter speed to allow more light through.  

When a camera has a slow shutter, you can't hand hold it or the subject will be blurry – so a tripod is your answer. If you're interested in learning more about the fundamentals of photography, check out this video I did with Harrington College of Design last year.  

I realize that most point-and-shoots may not allow you to choose your f/stop.  That's ok and there are ways to get around this which we'll discuss in the step-by-step.

Again, you shouldn't need to spend a whole lot of money on a tripod at this point in your adventure, and there are many, many options out there that are under $30.  I did a quick search on Amazon and found something that would work for $20.  

3. White Background

There are lots of options for a white background and if you're going to be shooting a lot, you may want to go to your local photography store and get a small white sweep

If you're not in an area with a good photography store, you can always head over to your frame shop/art store and get a 32x40 sheet of their thinnest white Mat Board, which is what we're using in this example. 

Look for something that you can bend a little bit to create a sweep.  You can usually get this for under $7.  Remember to look for pure white as off-white or cream, while cool, will be more difficult to make pure white.

4. White Bounce Cards Made of Foamcore

While you're at the art store/frame shop, ask them if they have any extra scraps of white foamcore you can buy.  You only need a piece roughly the height of your product, and about 3x the width. Typically, a letter size will work.  We like to bend ours in half, like in the above example, so that it will stand up on its own.  Its purpose is to bounce light back onto the product.  

5. Table

A standard folding table works best, and a width that's between 24 and 27 inch wide is ideal.

6. Tape

Depending on the table you end up with, you can use tape or clamps to secure down your board so that it sweeps properly.

7. The Right Room

A room with windows next to a wall is perfect, and the bigger the window, the more light you'll get in.

How to Photograph Your Product on a White Background

Alright, let's get into the step by step process for shooting your photos. 

Step 1: Set Up Your Table
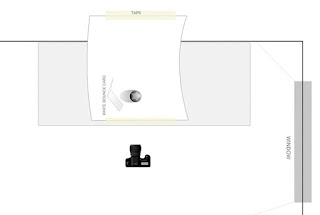
Once you have collected your gear together, it's time to set up your shooting area.  Place your table as close to the window as possible without intersecting the shadow from the windowsill.  You'll want to start with the window 90 degrees to the right or left of your setup.  The closer you are to the window and the larger the window, the softer the light will be.  

Also, remember to turn off all other lights inside the room you're shooting in as other light will contaminate the set.

Variations:

You can try rotating the set so the window is at 45 degrees to the set, or try it with the window straight onto the set for a different style of lighting.  Food photography is often shot with a window behind the setup and the camera shooting into the window for a more dramatic setup.  Another variation is setting up in a garage with the door open, it will have the same qualities of light as a window, just without the glass.

Tips:

You do not want direct sunlight hitting your set. Direct sunlight is harsh and looks bad on most people and products.



Step 2:  Set Up Your Sweep

There are a lot of ways to do this, but the ultimate goal is to have your mat board sweep from being flat on your table to being vertical.  You may need to roll up the board to help it reach that shape.
In my set-up, we placed the table against the wall and taped the sweep to the wall and the table. If you don't have a wall, you're going to have make something to secure the back of the sweep to. Some bricks or a wooden block would work well.

Place your product in the center on the flat part of the sweep and leave enough room to sneak your white reflector card in later. In this case, our product is a cool Skyrim & Doom toy available from Symbiote Studios. Thanks guys!

Step 3: Set Up Your Camera


  1. Set Your White Balance (WB) to Auto.  

  2. Turn your flash setting to off

  3. Image Settings – set it to the largest quality settings:

  • Set it to raw if you have it.  Most point and shoot cameras don't have this setting, but if you do then use it.  This file is the largest file the camera can shoot, and utilizes the full bitdepth of the camera.  You will have to edit in a software that reads raw imagery though, like Photoshop, Bridge, Lightroom or Aperture.

  • If you don't have raw, set it to the largest JPG setting you have.  In my canon there are 2 settings to look out for:

    Size –  sometimes L (large), M- (medium) S- (small)  Pick large.  This setting determines the file size, and you almost always want to shoot it at its largest file size for optimal image quality.  You can always shrink an image once it is take but you can't make it larger.

    Quality – S (Superfine), F (fine), N ( normal). You should always set it to Superfine.  This setting determines the number of pixels that are used on the camera sensor.  Not using all the available pixels will render a lower quality image.

  • Set your ISO to 100:  The ISO controls the sensitivity of the sensor.  The higher the ISO the more noise there is.  Typically, the lowest ISO you can set your camera to is ISO 100, so set it there if you can.

  • Exposure Settings


    Option A:  Set your camera to Manual (M)
    This is the best setting for this type of work because nothing will be moving or changing as you take the pictures.  In manual, change your f/stop to the highest number, which will give you the greatest depth of field.

    Preview the image on the back of the camera through liveview.  Everything is probably pretty dark, which is ok.  Now, switch to your shutter speed and rotate the dial to make it bright enough that the image is properly exposed.  Your shutter number should be going down.  For example, your number may go from 1/60th to ¼ .  These are fractions of a second that your shutter will be open for and as the number lowers it will let more light in.  Adjust this number until the preview of the image is correct.

    Option B:  Use Aperture Priority, Av…
    Your camera may not have this either, but if it does, change the f/stop to the highest number.  This should automatically adjust the shutter to be what the camera thinks it should be.  This may be wrong and you may need to use the exposure compensation dial to add light.

    Option C: Auto Exposure
    If you're stuck in the all-auto world, there may not be much you can do.  Don't fret, it's not a big deal.  If you have an exposure compensation dial, you will most likely need to add +1 or +1 ½ to get the correct exposure.  If all you have is the running man images to choose from, try picking something like sunset. With the iPhone, just tap the area you want exposed properly.

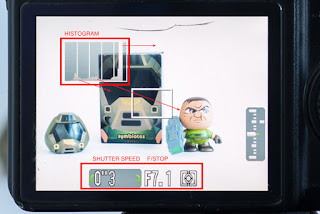
    Use the Histogram on the back of the camera.  You're looking for the slope to be closer to the right hand side like in the image above.

    Exposure Tip:  Don't trust the image on the back of the camera, instead pay attention to the histogram to know if your exposure is correct.  The far right hand side is white, and left is black.  In the example image there is a little gap on the right hand side which means that there is no pure white.  Adjust the exposure till the part of the curve representing the white background is touching the right edge without going over.  In this example, you would probably need to add 1/3 of a stop, or one click for more light.

  • Zoom In
    Cameras typically have an optical zoom and a digital zoom.  Don't use the digital zoom as this will lower the quality of the image - it's essentially just cropping the digital image.  If you have an optical zoom, try zooming in as far as you can without going digital zoom.  A longer zoom will remove distortion caused by a wide angle lens.

Step 5:  Set Up Your Product in the Middle of the Surface

Setting up your product is one of those things that seems simple, but can take time to position correctly.  If it's a bottle, pay attention to keeping the label type centered.  Many times there are lots of tiny movements needed to get everything lining up perfectly.

Step 6: Set Up the Reflector Card

This simple white card is the single most important light modifier we have in our studio and we use it with everything.  The light will bounce off the card and fill in all the shadows.  How you position this card is matter of taste, so try it at different angles to the product.

Step 7:  Take the Picture and Evaluate

Once you take the picture, take some time and really look at what you've created.  This is where experience and education comes into play – what's working, what isn't working and what can you do to make it bettser.  Experiment with different ways of making your image better and over time you're skills will naturally improve.

Upload your images onto your computer to get a better idea of how they look. The back of your camera is never very accurate. I suggest using Adobe Lightroom to organize all your images, and it can be used to do almost all of your editing except very advanced processes.  You'll no doubt need to make some adjustments to the images to get them to look right.  

Post production software like Adobe Lightroom is very in-depth and we won't have time to go into the details of using it because it's just too much.


Step 8: Get Your Pictures Retouched

Once you've got a final image you're happy with, it's time to get it retouched. If you photographed your product correctly, the product should be exposed properly and your background a light grey.  It should look something like the un-retouched image above, and comparing it to retouched version shows you how important this step of the process actually is.

The retouching tasks associated with on-white photography, for someone without a lot of training, can be tricky, and tend to be the weak link for most people trying to photograph products themselves.  So, instead of trying to teach you advanced Photoshop, I'm going to show you how to outsource it.
You'd be surprised how affordable this can be. From around $4 - $10 an image, you can have a professional retouching company improve your images for you.  Finding a good company can be tough, but one company that works best for consumers is Mister Clipping. They have an office in New York City, so you're not trying to correspond with someone overseas, and they're super-friendly.  

Their process is simple. Just create an account, upload your images and they'll give you a quote.

For the directions write:

Make the background 255 white. Keep the hard shadow under the product and fade the long shadow. Enhance the product contrast and correct for color.  Spot product and fix damaged areas. Correct for distortion. Deliver Full resolution jpegs with no compression.


Step 9: Upload Your Pictures to Your Website

Once you get your images back, it's time to upload them to your site.  

If you're using Shopify you're lucky, as it resizes the images for you. You have no idea how many websites I see where the image is the wrong size.  When this happens the image becomes skewed and stretched, ruining all the work you put into the image.  

With Shopify, completed images will be ready to load directly into your store, thanks to some handy software that prepares and resizes the images automatically for you. Some other CMS platforms, like Wordpress, also have this capability.

Uploading Images to your Site for Non-Shopify Site Owners

If your online store doesn't resize the images for you - perhaps you have a custom built site - you'll need to crop your images to the correct dimensions and then resize the image.

Step 1:  Find Your Image Size

Images, particularly jpegs, do not enlarge well, so you want your final image to start as large as your camera will shoot it. If your camera shoots a 4416 x 3312 pixels size image than this means that you can shrink this image by cropping or down-resizing (shrinking it proportionally) to a smaller size. The not so technical industry term is down-rezing referring to lowering the resolution.  
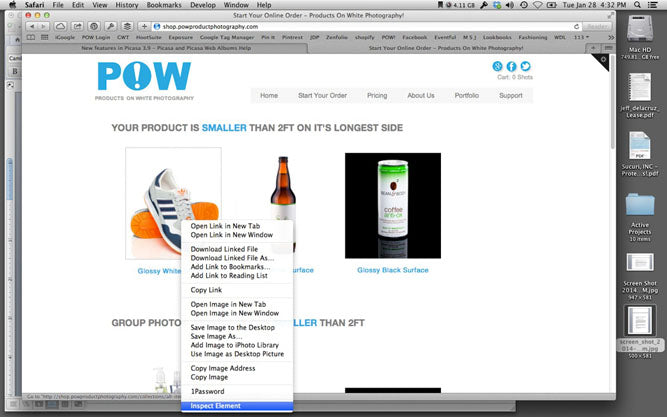

To find your image size, right click on the image on your website to inspect the image.  You'll see the dimensions in two areas. Each browser's 'inspect element' is a little different.  I'm using Safari in the above image example.

Step 2:  Crop Your Images to Size in Lightroom

Chances are your images will need to be cropped to fit the exact dimensions required by your website, but thankfully this is something you can manage easily in Lightroom, but entering a custom crop size.


With your images in Lightroom, click the image you want to crop and go into the 'develop' menu.  Click where it says 'original' next to the lock icon, and click again on 'custom'.  In 'custom', enter in the size you acquired from 'inspect element', and click ok to crop your image.  


Step 3: Export Your Images to the New Size Using Lightroom

Once you've cropped the image, it's time to export the final cropped image for upload to your site.  Start by right clicking and selecting 'export'.  The important part is how you set the file settings and image sizing:

  • Image Format: Jpeg
  • Quality: Between 70 – 90, 100 is typically not necessary.
  • Colorspace: Srgb (anything on the web must have this colorspace set)
  • Resize to fit: Width and Height – match your crop size
  • Resolution: 72 pixels per inch (this is a standard screen res)

Everything else is up to you, or self-explanatory.  Press 'export' and upload your images.  

Conclusion

There you have it!  The simple 'how to take your own products on white photography the easy way, without having to buy tons of gear and complicated lighting' article.

If you try this, please post an image of your setup and a final image so everyone can see what you did.  We'd love to see the results!  

Bonus Guide: Get "How to Capture High Quality Product Photos With Your SmartPhone" - a free, step-by-step guide that shows you exactly which tools and apps you'll need. Get the guide.


About The Author

Jeff Delacruz is co-founder of Products On White Photography, a super easy way to get professional photographs of your products for your ecommerce website. You can follow Jeff's photo exploits on Google+ or connect with us on the POW! Facebook Page.