I was at the Corte Madera Apple Store this afternoon getting my laptop's power supply and battery swapped out and someone next to me at the Genius Bar was there trying to figure out why his 'Back to My Mac' remote access wasn't working. While I have not personally used B2MM to connect across the Internet, I have a different solution that I have used for remote desktop connections and other things for a few years now. It is simplified with Leopard because they have included a basic remote desktop utility called Screen Sharing that is the underlying application used to, well, share screens of another Mac. This all assumes both computers are running Mac OS X version 10.5. Here's what I did....
- Sign up for a free Dynamic DNS account by registering. You will end up with a subdomain name. For the sake of this example, I will call mine wilbur.dyndns.org where 'wilbur' is my subdomain name.
- Download and install the DynDNS Updater software from the Support section to your home computer (one that will be on all the time) and fill it in with your account information after it's installed. Configure it so that it launches whenever the computer is turned on.
- Change the home computer's IP address to a static one on your subnet. For instance, if your home firewall/router is providing DHCP addresses, leave that setting but choose an IP address that's available for your home computer. For instance, Linksys firewalls by default use the IP addressing schema of 192.168.1.xxx. They by default hand out IP addresses starting with 192.168.1.100 and up. In this instance I would use a lower IP address, such as 192.168.1.50 for the computer to be controlled remotely. Test it and make sure you can still get to the Internet in your browser.
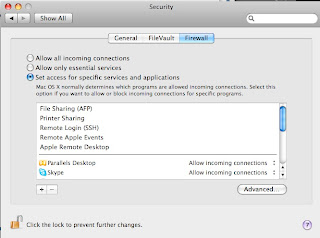
- On your Mac, go to System Preferences/Security/Firewall and add 'Apple Remote Desktop' under the 'Set access for specific services and applications'. See the picture on this entry for more detail.
- On your home firewall/router, make sure you open up TCP/UDP ports 3283 and 5900 and have them route connections to the IP address of the computer you want to remotely control (for this example, 192.168.1.50). You will likely need to restart your home firewall/router now.
Now, on your remote Mac, you can go to your Macintosh HD/System/Library/CoreServices/ and double click on 'Screen Sharing'. In the box at the bottom type in the name of your subdomain that you registered for in step 1 above. In my case, it is wilbur.dyndns.org and click on 'Connect'. If you did everything right, you should be connecting to your remote computer!
No comments:
Post a Comment